

Your Ring Doorbell 2 has stopped responding to the app, or you’re preparing it for a new home. That frozen screen or persistent connection error means you need a factory reset—but you’re worried about losing security footage or bricking your device. Don’t force a reboot yet. This guide delivers the exact sequence to reset your Ring Doorbell 2 successfully while safeguarding your data and avoiding common pitfalls that leave homeowners stranded with a useless doorbell.
A factory reset wipes all settings clean like a factory-fresh device—erasing Wi-Fi credentials, motion zones, and recorded videos. This isn’t a quick reboot; it’s a complete system purge essential for resolving stubborn connectivity loops, removing personal data before selling, or fixing setup failures that survive power cycling. How to reset Ring Doorbell 2 correctly ensures you don’t trigger permanent errors. You’ll be back online in under 10 minutes with this verified process.
Verify Power Source: Battery Charge vs Hardwired Voltage
Check Minimum Power Requirements
Battery models must have at least 25% charge—anything lower prevents reset completion. Open your Ring app: if battery shows below 20%, plug in the micro-USB cable for 30 minutes before proceeding. Hardwired units require stable 16-24VAC from your doorbell transformer. No power = no reset, regardless of button-holding duration. A weak transformer causes the most failed reset attempts.
Confirm Power Delivery Visually
Stand directly in front of your doorbell and observe the LED ring. Any response—solid white, flashing blue, or pulsing light—confirms adequate power. Critical warning: If the ring stays completely dark after pressing the doorbell button, troubleshoot power first. For hardwired units, check your circuit breaker and transformer connections. Battery models need charging even if the app shows residual power.
Secure Footage and Settings Before Erasure
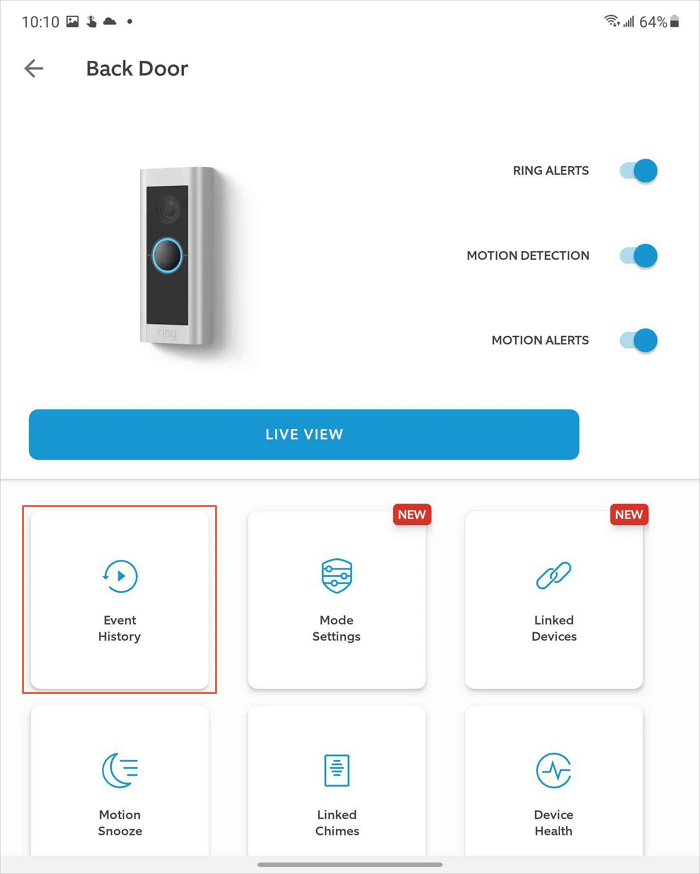
Download Critical Recordings Immediately
Open the Ring app and navigate to your event history. Tap each video you must keep, then select the share icon (↑) and choose “Save Video.” Do this now—factory reset permanently deletes all recorded footage within minutes of completion. Cloud archives vanish too; there’s no undo button after reset initiation.
Document Custom Configuration
Take screenshots of your motion zones, notification schedules, and linked devices. Recreating complex motion zones from memory takes 20+ minutes during re-setup. Note your Wi-Fi network name and password—you’ll need them when reconnecting. This 2-minute prep saves hours of frustration later.
Remove Faceplate Without Damage
Locate and Extract Bottom Screws
Identify 1-3 screws along the bottom edge of your Ring Doorbell 2. Use the included T6 torx screwdriver (or equivalent precision tool)—standard Phillips heads won’t fit. Pro tip: Place a magnetized tray under the unit to catch falling screws. These tiny fasteners vanish instantly on concrete.
Execute Safe Sliding Technique
After screw removal, gently nudge the faceplate upward ¼ inch using your fingernail at the bottom edge. Then pull straight away from the main body. Never force it—the cover detaches smoothly when aligned correctly. Forcing causes cracked housings that compromise weather resistance. You’ll now see the battery compartment and reset button directly in front of the lens.
Press Reset Button With Precision Timing
Identify the Correct Reset Button
Behind the faceplate, locate the small black button near the camera lens (often marked with an orange dot or “Setup” label). Critical distinction: This is the ONLY reset button—ignore any ports or buttons on the sides or back. Ring Doorbell 2 lacks secondary reset points.
Execute 15-Second Hold With Timer
Press and hold this button for exactly 15 seconds while watching the LED ring. Use your phone’s stopwatch—releasing at 12 seconds fails; holding 20 seconds wastes time. Visual confirmation: The ring flashes blue rapidly when reset initiates. Keep holding until flashes stop, then release immediately.
Decode LED Light Patterns During Reset

Blue Flashing Sequence Meaning
During your 15-second hold, rapid blue flashes confirm reset processing. If lights stop before 15 seconds, your battery is too low—recharge and restart. Never hold beyond flashes; it doesn’t accelerate the process.
White Spinning Light = Data Wipe
After releasing the button, a white light spins clockwise for 60-90 seconds. This indicates system data erasure. Total reset time: 1-2 minutes from button release. If spinning exceeds 3 minutes, the process froze—proceed to troubleshooting.
Setup Mode Confirmation
Reset succeeds when four blue corners flash in sequence. This signals readiness for fresh setup. No four-corner flash? Repeat the reset—you likely held the button too briefly. Persistent failures indicate hardware issues.
Remove Device From Ring App Properly
Delete Lingering Device Connection
Even after reset, your doorbell may appear ghosted in the app. Open Ring → hamburger menu (☰) → Device Settings → General Settings → Remove Device. Skipping this causes “already exists” errors during re-setup. Confirm deletion when prompted.
Clear App Cache Immediately
Force-quit the Ring app after removal: iPhone users swipe up from screen bottom and swipe the app away; Android users open recent apps and swipe Ring closed. Relaunch the app—this purges residual data that blocks new connections.
Complete Fresh Setup Without Failures
Scan QR Code Under Optimal Conditions
During setup, position your phone 6-8 inches from the doorbell’s QR code (on the back). Lighting tip: Use your phone flashlight if outdoors at night—shadows cause repeated scan failures. Hold steady until the app confirms recognition.
Ensure Reliable Wi-Fi Connection
Stay within 10 feet of your router during setup. Ring Doorbell 2 only works on 2.4GHz networks—disable 5GHz temporarily if your router combines bands. If setup fails twice, power-cycle your router before retrying.
Fix Common Reset Failures Immediately
No LED Response During Button Press
Solution: For battery models, charge 45 minutes minimum. Hardwired units need transformer voltage checks—use a multimeter to confirm 16-24VAC output. If power tests pass but lights remain dead, the reset button may be stuck; press it rapidly 5 times to free internal contacts.
LED Stuck on Continuous Blue Flash
Solution: Power cycle the unit. Remove battery for 30 seconds (or flip the circuit breaker for hardwired models), then restart the reset process. This clears frozen firmware states causing the loop.
Returns to Previous State After Reset
Solution: Hold the reset button for 20 seconds instead of 15. The initial flashes may appear weak—keep holding until you see consistent blue pulses. This deeper reset overcomes corrupted memory sectors.
Post-Reset Optimization Checklist
Recreate Motion Zones Efficiently
Use your pre-reset screenshots as templates. Start with conservative zones—expand them after testing. Expert note: Walk through detection areas at varying speeds (walking, jogging) while monitoring live view to calibrate sensitivity perfectly.
Restore Critical Notification Settings
Reconfigure motion scheduling first to avoid nighttime alerts. Enable “Person Detection” if you had it previously—this prevents false alarms from passing cars. Test notifications by ringing your own doorbell before finalizing.
Verify Weatherproofing Integrity
After reassembly, ensure the faceplate sits flush with no gaps. Gently wiggle the unit—no movement should occur. Critical: Tighten screws just until resistance is felt; overtightening cracks the housing. Check the rubber gasket is fully seated around the perimeter.
Your Ring Doorbell 2 now operates like new. Test live view, motion alerts, and two-way audio before considering the job done. For ongoing reliability, perform a factory reset every 12-18 months to clear accumulated glitches—this maintains peak performance without data loss if done proactively. If LED patterns still confuse you during future resets, bookmark this guide: your doorbell’s lights tell the whole story when you know what to watch for.


