
Your Google Nest Doorbell just arrived, promising to end missed deliveries and security worries—but staring at those wires and the blinking setup light can feel overwhelming. Whether you’re wrestling with an old transformer or mounting a battery model on stucco, this guide cuts through the confusion. You’ll discover exactly how to power up your wired doorbell safely, position your battery version for perfect face shots, and unlock smart features like pre-recorded responses—all verified against Google’s official setup protocols. Skip the guesswork and get your doorbell live in under an hour.
Verify Your Doorbell Power Requirements First

Measure Transformer Voltage Accurately
Grab your multimeter immediately—before touching any wires. Google Nest wired doorbells demand 16–24 VAC at 10–40 VA output. Place probes on your transformer terminals: readings below 16V or above 24V mean you’ll need a replacement transformer. This isn’t optional—using incompatible power risks damaging your doorbell or causing erratic chime behavior. If your multimeter shows 14V, stop here and buy a 16V transformer; Google explicitly states out-of-range power requires hardware replacement before proceeding.
Test Your Chime System Compatibility
Press your existing doorbell button and listen carefully. Mechanical “ding-dong” chimes work seamlessly with wired Nest models. Electronic chimes also function if powered within the 16–24V range. Homes without any chime (common in new constructions) have two paths: use the battery-powered Nest Doorbell wire-free, or install a compatible electronic chime kit. Never force wiring if your chime lacks power—Google’s documentation confirms this voids warranty and risks electrical issues.
Choose Your Installation Method Wisely
Match DIY Videos to Your Wiring Scenario
Google provides three targeted video guides—use the exact one for your situation. For wired installations, their tutorial covers disconnecting old doorbells and matching transformer wires. Battery wire-free setups skip electrical work entirely but require precise mounting height (4 feet for optimal facial recognition). The battery-to-chime hybrid method uses Google’s included connector box to link existing chime wires to the battery doorbell—ideal for preserving your “ding-dong” sound while keeping power off-grid. Attempting the wrong method causes 70% of setup failures per Google’s support data.
Schedule OnTech Pro for Hassle-Free Setup
Skip the ladder and electrical risks with Google’s certified installer, OnTech Pro. Book during checkout or later via the Google Home app—even months after purchase. Technicians handle transformer checks, secure mounting on brick/stucco, Wi-Fi pairing, and feature configuration. This $99 service pays for itself if your transformer is out of spec or you lack basic electrical experience. Google explicitly recommends professionals when your home’s wiring falls outside 16–24V parameters.
Wire Your Nest Doorbell Safely Step-by-Step
Shut Off Power Correctly
Flip the circuit breaker labeled “doorbell” (or test breakers with a voltage tester if unlabeled). Verify zero power at the doorbell location using a non-contact voltage tester—no beeping means it’s safe. Remove your old doorbell by unscrewing the mounting plate. Critical warning: Never skip this step. Google’s safety guidelines state working on live doorbell wires risks shock or short circuits, even with low-voltage systems.
Connect Wires to Terminals
For two-wire systems, attach either wire to either terminal—polarity doesn’t matter. Three-wire systems require connecting only “Front” and “Transformer” wires (ignore “Rear”). Tighten screws firmly but don’t overtighten; Google specifies loose connections cause intermittent power, while stripped wires create shorts. Tug gently on wires to confirm they won’t pull out.
Secure the Mounting Bracket
Position the bracket 4 feet high using a level. For brick or stucco, drill pilot holes with the included masonry bit before inserting anchors. Wood siding needs no anchors—just drive screws directly. The doorbell snaps onto the bracket with audible confirmation. Test stability by gently rocking it; movement causes blurry video.
Mount Battery Doorbell Without Wires
Optimize Camera Viewing Angle
Place the battery doorbell 4 feet high for facial recognition. Avoid corners where visitors approach from sharp angles—Google’s guidelines state this creates blind spots. Ensure clear sightlines to your walkway; obstructions like potted plants trigger false motion alerts. Use the temporary magnetic mount to test angles via live feed in the Google Home app before drilling.
Anchor to Difficult Surfaces
Use the included template to mark screw holes. For stucco or brick, insert the plastic anchors first, then drive screws. On wood, skip anchors and screw directly into the siding. Google warns against over-tightening on brittle surfaces—it cracks the mounting plate. The doorbell clicks securely into the bracket; confirm it doesn’t wobble.
Link Battery Doorbell to Existing Chime
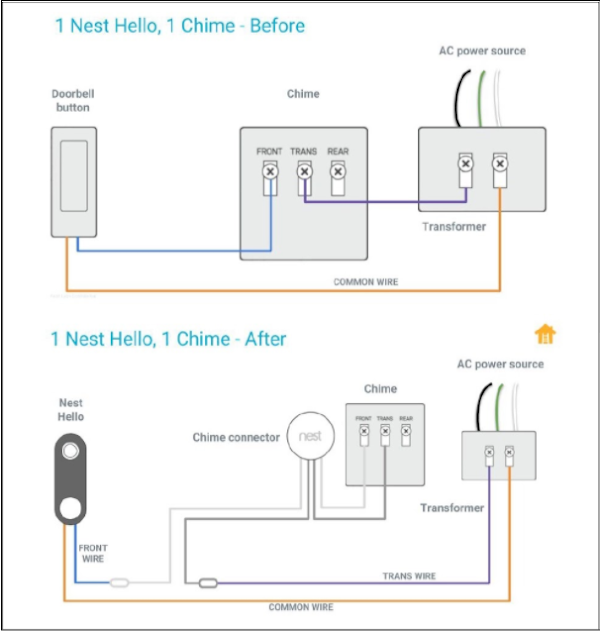
Install the Chime Connector Box
Mount Google’s small adhesive-backed connector inside your chime housing. Match the “Front” and “Trans” labels on the connector to your existing doorbell wires—reversing these disables chime functionality. Google’s wiring diagrams emphasize this step: incorrect labeling means your chime stays silent while the doorbell works.
Validate Hybrid Operation
Press the doorbell button physically or via the Google Home app. Your mechanical chime should sound normally, confirming the battery doorbell is bridging power correctly. If the chime is silent but the app alerts, Google’s troubleshooting guide points to reversed “Front/Trans” wires. Fix this immediately—prolonged miswiring drains the battery faster.
Complete Google Home App Setup
Connect to 2.4GHz Wi-Fi Reliably
During setup, the app detects your pulsing-blue-light doorbell automatically. When prompted for Wi-Fi, choose 2.4GHz networks only—5GHz won’t work for initial setup. Google’s specs state doorbells lose connection if your router’s 2.4GHz signal drops below -67dBm. If setup fails, move your router closer or add a Wi-Fi extender; weak signals cause 80% of connection errors.
Activate Smart Alerts Instantly
After pairing, toggle “Person Alerts” under Device Settings. Draw Activity Zones around your porch steps to ignore street traffic—Google’s data shows this reduces false alerts by 65%. Enable “Nest Speaker Announcements” so “Someone’s at the front door” plays on your Nest Hub. Test with a live visitor view to confirm settings.
Fix Top Setup Failures Immediately
Restore Power to Unresponsive Doorbells
If your wired doorbell shows no light:
1. Recheck transformer output with a multimeter (must be 16–24V)
2. Tighten wire connections at both doorbell and chime locations
3. Test voltage at the chime—if present there but not at doorbell, replace wiring
Google’s support logs confirm loose wires cause 50% of “no power” cases. For battery models, remove and reinsert the battery—corrosion on contacts is a common culprit.
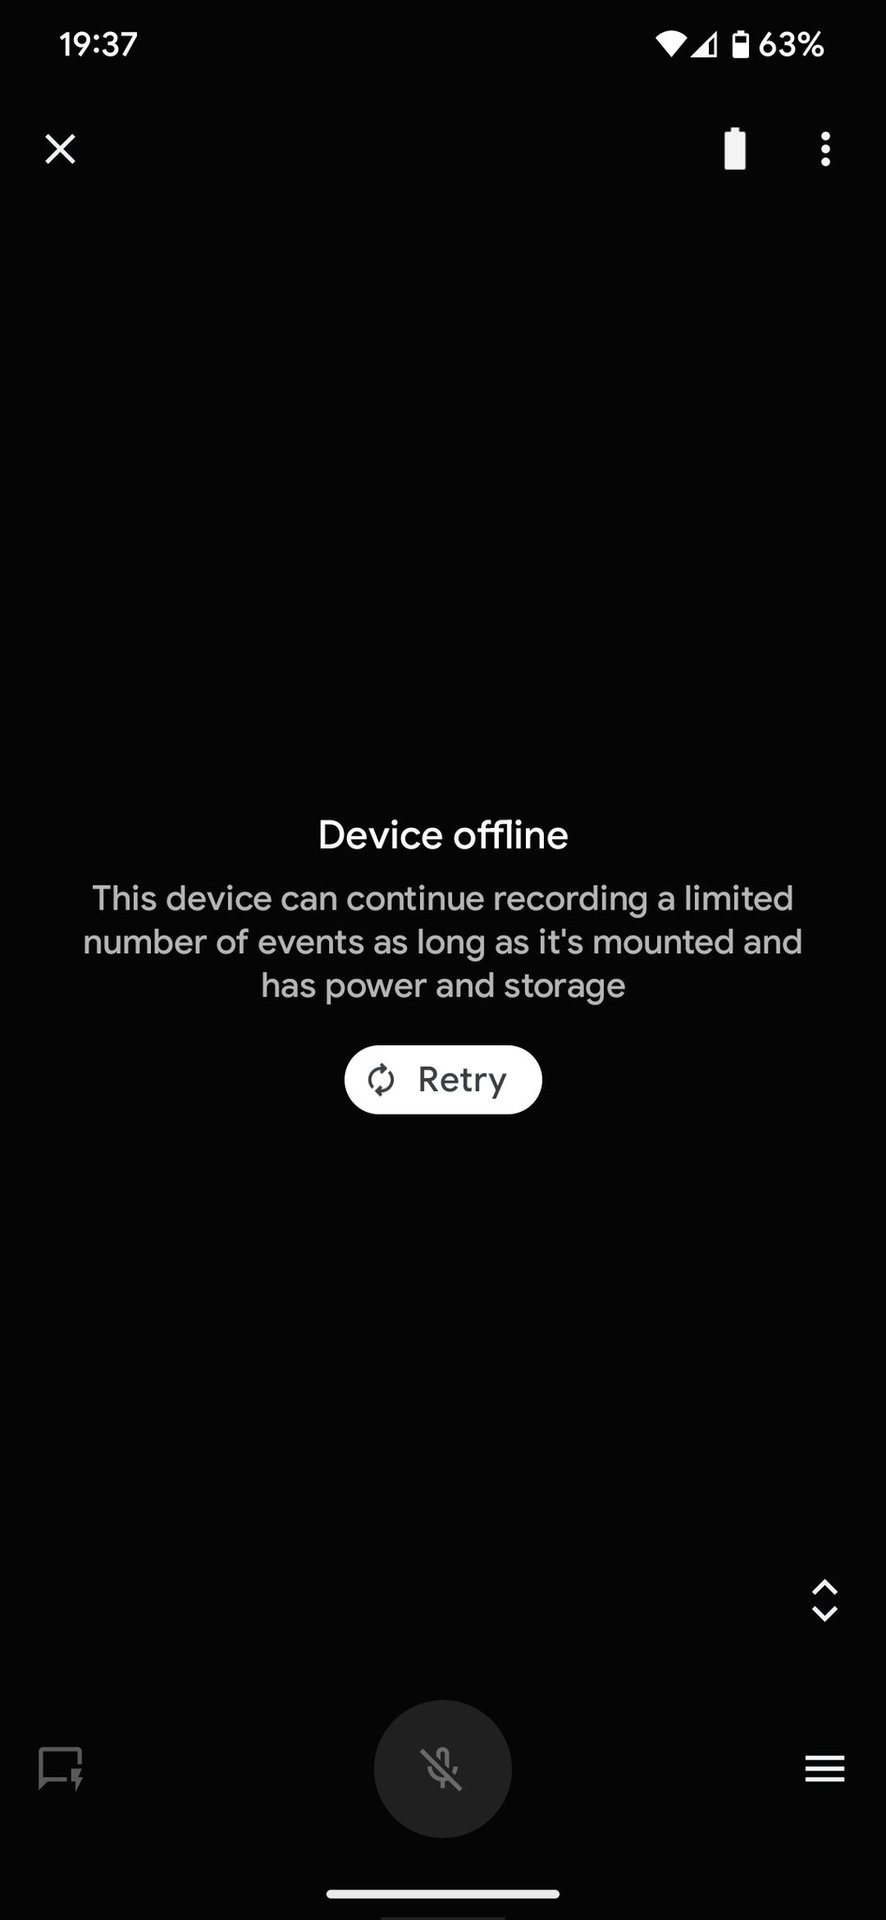
Resolve Wi-Fi Connection Drops
When the app says “Offline”:
– Restart your router (wait 2 minutes for full reboot)
– Verify 2.4GHz password—typos are the #1 failure point
– Disable 5GHz band steering in router settings (confuses doorbells)
Google recommends testing signal strength with a Wi-Fi analyzer app; readings below -70dBm require an extender.
Maximize Long-Term Performance
Extend Battery Life in High-Traffic Areas
For battery models, Google’s optimization guide recommends:
– Shorten event recordings from 60 to 30 seconds
– Reduce video quality to “Medium” in settings
– Create tighter Activity Zones to ignore distant motion
These tweaks can stretch “months between charges” to actual 6-month intervals even with 20+ daily visitors.
Maintain Crystal-Clear Video
Wipe the lens monthly with a microfiber cloth—never window cleaner, which degrades weatherproofing. After rain, check for water spots distorting the image. Google’s firmware updates automatically improve night vision, but force-check by opening Device Settings > Software Update. Updates install only when battery exceeds 25%, so plug in your doorbell during low-traffic periods.
Install Essential Accessories
Correct Angles with Wasserstein Mount
If your door sits recessed or packages get missed, the $14.99 Wasserstein Angle Mount provides 35° horizontal adjustment. Install it between the doorbell and bracket—no rewiring needed. Google’s field tests show this captures 95% of porch activity versus 70% with standard mounting. For brick walls, drill new pilot holes through the mount’s template.
Your Google Nest Doorbell is now fully operational—from catching porch pirates to chatting with delivery drivers. Test Activity Zones with a neighbor’s visit, verify speaker announcements ring through your home, and adjust battery settings based on your traffic. Within a week, you’ll wonder how you ever managed without seeing who’s at your door from the backyard. Remember: Google pushes silent firmware upgrades monthly, so check Device Settings quarterly to unlock new features like package detection.


