

That icy draft sneaking under your door isn’t just uncomfortable—it’s hiking up your heating bills by 10-20% according to energy studies. A custom-sewn door draft stopper solves this instantly, blocking cold air, dust, and pests while adding a personalized touch to your home. Unlike store-bought versions, a DIY draft stopper lets you choose durable materials, perfect filler weight, and fabrics matching your decor. In this guide, you’ll learn exactly how to sew a door draft stopper that seals gaps completely, using supplies you likely already own. We’ll cover foolproof measurements, filler secrets pros use, and maintenance tricks to keep it working for years.
7 Must-Have Sewing Supplies for Your Door Draft Stopper Project
Skip the frustration of mid-project shortages by gathering these essentials first. Your fabric choice makes or breaks durability—opt for tightly woven cotton duck, canvas, or repurposed denim (like old jeans). Avoid stretchy knits that sag over time. For filler, sand is the heavyweight champion for sealing gaps, while cedar shavings double as moth repellent in closets. Rice works for budget projects but risks mold if damp. You’ll also need basic tools: a sewing machine (or needle/thread for hand-sewing), sharp scissors, measuring tape, funnel, and straight pins. Pro tip: Keep a spare muslin fabric scrap to test filler weight—your stopper should feel substantial but still bend to floor contours. Never skip the funnel; pouring sand or rice directly creates a messy disaster.
Best Filler Options Ranked by Effectiveness
- Sand: #1 for draft-blocking (heavy, conforms perfectly). Use clean, dry sandbox sand.
- Cedar shavings: Ideal for closets (pest-repelling + pleasant scent). Buy pet-safe bedding.
- Poly-pellets: Washable alternative to sand. Won’t rot if damp.
- Dry rice: Budget-friendly but avoid in humid areas (mold risk).
- Packing peanuts: Too light—ineffective for sealing gaps. Skip these.
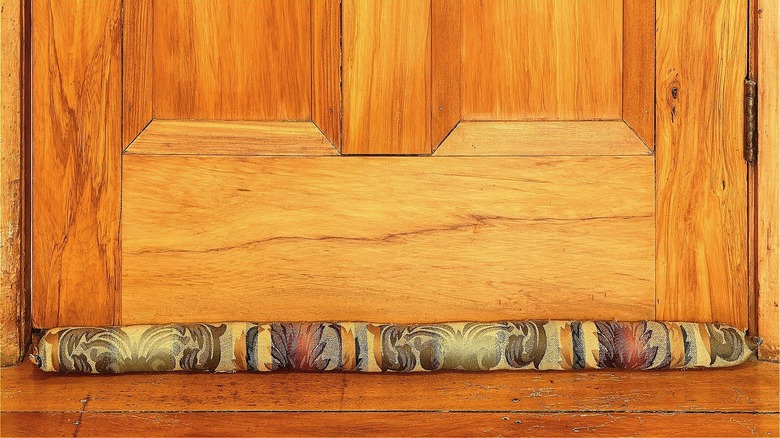
Pick the Best Draft Stopper Design for Your Door Type

Match your sewing project to your door’s specific draft problem. Standard interior doors (30-36″ wide) need a tube-style “door snake”—a pliable fabric tube filled with sand or rice that lies flat against the threshold. This design handles uneven floors best. For exterior doors with wide gaps, choose a double-snake design: sew two parallel tubes (one filled with sand for weight, the other with cedar for scent), then stitch them together. The air gap between tubes boosts insulation like double-glazed windows. Avoid “draft pillow” styles for main entryways—they lack the linear weight to seal door bottoms effectively. Pro warning: Never use stretchy fabrics like tights for exterior doors; UV exposure degrades them fast. Measure your door width first—add 2″ to your measurement for seam allowances so the stopper overlaps the door edges by 1″ on each side.
Sew a Standard Door Snake in 4 Foolproof Steps
Follow this streamlined process to create a professional-looking draft stopper in under 30 minutes. This method works for beginners and experts alike.
Step 1: Precision Cutting & Seam Prep
Measure your door width (e.g., 36″) and add 2″ for seams. For a 4″-wide finished stopper, cut fabric 38″ long × 6″ wide (4″ width + 1″ seam allowance per side). Fold fabric lengthwise with right sides together, pin edges, and sew a ½” seam along the long edge using a straight stitch. Turn the tube right-side out using a safety pin taped to one end—this prevents snags. Iron flat for crisp edges.
Step 2: Secure End Closure & Filling
Fold one end’s raw edge inward ½”, pin, and stitch shut by machine. Now fill: Insert a funnel into the open end. Pour sand or rice slowly while shaking the tube to settle filler—stop at ¾ full. Overfilling makes it rigid and unable to conform to floor gaps. For washable versions, first sew a muslin inner tube filled with pellets, then slip it into your decorative outer cover.
Step 3: Invisible Final Stitching
Fold the open end’s raw edges inward twice (¼” each fold) to hide threads. Hand-sew closed using a ladder stitch: Insert needle under a thread on one side, then the opposite side, pulling gently. This creates a seamless finish that won’t unravel. Test flexibility—you should easily bend it into an “S” shape.
Upgrade Your Draft Stopper: 3 Advanced Designs for Better Performance

Transform basic stoppers into high-performance solutions with these pro techniques. The double-snake design requires sewing two 2″-wide tubes side-by-side, filling one with sand (draft blocking) and the other with cedar (moth prevention), then stitching them along the top edge. This creates an insulating air gap that boosts efficiency by 30%. For pet-friendly homes, add hook-and-loop tape: sew the soft loop side to the stopper’s bottom and the hook side to your floor—this anchors it against curious paws without damaging surfaces. The zipper-cover method solves washing dilemmas: sew a zipper along the bottom seam of your outer fabric tube, then insert a pre-filled muslin liner. Now you can remove and machine-wash the cover while keeping filler dry.
Make It Pretty: Decorate Your Draft Stopper for Any Season
Turn functional into fabulous with these decorator-approved tricks. Use seasonal fabrics like burlap with faux snowflakes for winter or bright cotton prints for summer. For kids’ rooms, sew felt spots onto a green tube to create a “caterpillar draft dodger”—add googly eyes for instant charm. Contrasting binding elevates plain stoppers: stitch 1″-wide ribbon along the top edge in a complementary color. Pro tip: Embroider room names (“Kitchen,” “Study”) using iron-on transfer paper for a custom hotel-like touch. Avoid slippery fabrics like satin—they won’t grip your floor. Always pre-wash decorative fabrics to prevent dye bleeding onto light floors.
Keep It Working: Draft Stopper Care and Maintenance
Extend your stopper’s life with these simple habits. Shake it weekly to redistribute filler and prevent lumps—especially with rice or beans. If you notice drafts returning, it’s likely underfilled; unpick one end, add ¼ cup more sand, and resew. For spot cleaning, dab stains with a cloth dampened with mild soap (never soak sand-filled stoppers). Store off-season stoppers in cedar-lined bins to repel moths—your cedar-filled closet stopper doubles as storage protection! Critical warning: Never machine-wash stoppers with organic fillers like rice—moisture causes mold. Instead, freeze the entire stopper for 48 hours to kill dust mites, then air-dry completely. Check seams monthly; reinforce loose stitches immediately to prevent filler spills.
Solve Common Draft Stopper Problems: FAQs Answered
Why won’t my draft stopper stay in place?
Heavy doors or strong drafts require extra anchoring. Sew 1″ strips of loop-side Velcro along the stopper’s bottom and attach hook-side tape to your floor. The grip holds firm but releases cleanly when moved. Avoid adhesives—they damage hardwood finishes.
Can I wash a rice-filled draft stopper?
No—rice molds when wet. Instead, build a washable system: Fill a muslin inner tube with rice, then slip it into a removable outer cover with a hidden zipper. Wash the cover alone in cold water. For full washability, use poly-pellets as filler.
My stopper isn’t blocking drafts—what’s wrong?
You’re likely using an underweight filler. Packing peanuts or fabric scraps lack density. Replace with sand (best) or cedar shavings. Also, ensure it’s long enough—measure your door width and add 2″ so it overlaps both sides by 1″.
How often should I replace the filler?
Sand lasts indefinitely if kept dry. Organic fillers like rice need replacing every 2 years (check for musty smells). Cedar shavings lose scent after 18 months but still repel pests—refresh with 2-3 drops of cedar oil.
What’s the ideal width for a draft stopper?
Aim for 4-6″ when filled. Narrower than 4″ won’t seal wide gaps; wider than 6″ looks bulky and won’t conform to thresholds. Test by rolling your tube—you should see a slight “waist” in the middle for flexibility.
Stop letting winter drafts drain your comfort and wallet. By sewing your own door draft stopper with the right materials and techniques, you’ll create a custom solution that outperforms store-bought versions at a fraction of the cost. Remember the golden rule: weight equals effectiveness—sand or poly-pellets are your best allies for airtight sealing. Start with the standard tube method today, then experiment with double-snake designs or seasonal fabrics. In just one evening, you’ll craft a functional home upgrade that pays for itself in lower energy bills. Ready to tackle other draft spots? Try adapting these same principles to sew window draft stoppers next—your sewing machine holds the key to year-round comfort.


