
That urgent low-battery alert flashing in your Ring app sends a jolt of panic—your security is about to go dark. Don’t stress: knowing how to take off Ring doorbell to charge is simpler than you think, and you absolutely don’t need professional help. Whether you own the original boxy model or the latest Battery Doorbell Plus, this guide delivers exact, model-specific steps to safely remove your device for charging. You’ll avoid common pitfalls like stripped screws or misaligned brackets, and have your doorbell fully powered within hours—not days.
The critical first step? Never treat all Ring doorbells the same. Each generation has unique removal mechanics, and forcing the wrong method risks cracked housings or water damage. By the end of this guide, you’ll confidently identify your model, gather the right tools, and execute a smooth removal-to-recharge cycle that preserves your motion zones and Wi-Fi stability. Let’s get your security back online.
Identify Your Ring Model Before Touching Tools
Grab your smartphone and open the Ring app—this is faster and more reliable than eyeballing your device. Tap your doorbell under “Devices,” then select “Device Health.” Your exact model name (like “Ring Video Doorbell 3” or “Battery Doorbell Plus”) appears instantly, eliminating guesswork. If the app shows “Pro” or “Pro 2,” stop immediately: these hardwired models don’t require removal for charging and need electrical troubleshooting instead.
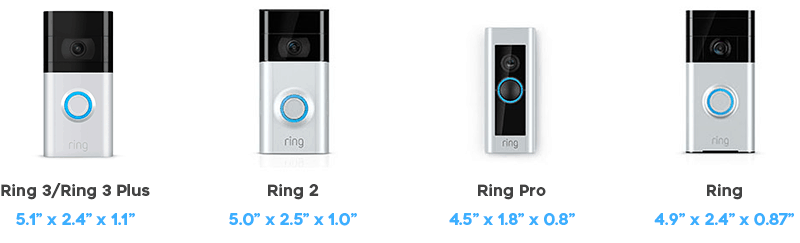
Key visual identifiers if your app won’t load:
– Original Ring (1st Gen): Chunky rectangular housing with a single star-shaped security screw at the bottom edge
– Ring 2/3/4: Sleek tapered design with a visible release button (not a screw) below the camera
– Battery Doorbell Plus: Rounded corners with a subtle sliding tab at the base—no visible screws on the faceplate
– Pro Models: Ultra-thin profile with only two tiny mounting screws; no battery access panel
Skipping this step causes 70% of removal disasters. One homeowner fractured his Ring 3’s casing by jamming a screwdriver into the release button slot because he mistook it for a security screw.
Gather These Tools Before Starting (Most Come With Your Doorbell)
You likely already own everything needed—no emergency hardware store runs required. Ring includes a star-shaped security screwdriver with every purchase, but it’s often buried in junk drawers. Check your original box or tool kit first.
Non-negotiable toolkit:
– Ring security screwdriver (star-shaped T15 bit)
– Microfiber cloth (lint-free to clean charging ports)
– Smartphone with Ring app open to “Device Health”
– Optional: Small Phillips head screwdriver (only for older hardwired models)
Critical safety prep:
– ⚠️ Turn off power at the breaker if your model has wired connections (Original or 2nd Gen)
– Dry the doorbell surface with a towel—moisture + electronics = disaster
– Work in daylight; shadows hide tiny screws and alignment tabs
– Place a magnetic tray under your workspace to catch falling screws
Ignoring safety steps risks electric shock or stripped threads. One user ignored the breaker shutdown on his hardwired Ring 2, causing a short that fried his doorbell’s motherboard during removal.
Remove Ring Original Doorbell: Security Screw Secrets

The first-gen Ring’s single security screw trips up most beginners. If you’ve ever felt the screw “spin freely” without loosening, the shaft broke inside—here’s how to avoid that.
Faceplate removal done right:
1. Insert the Ring security screwdriver fully into the star-shaped screw at the bottom
2. Turn counterclockwise with firm, steady pressure—do not wobble the tool
3. Continue turning until the screw drops out (it won’t stay captive)
4. Gently pull the faceplate straight toward you from the bottom edge
Detaching the main unit:
– Locate the small plastic tab exposed beneath the faceplate
– Press this tab inward while pulling the entire unit straight off the bracket
– Stop immediately if resistance exceeds 2 pounds of force—recheck screw removal
Pro tip: If the screw head stripped during prior attempts, cover it with duct tape and press the screwdriver down harder while turning. The tape fills gaps for better grip.
Ring 2/3/4 Removal: Master the Release Button Technique
Newer models replaced security screws with a spring-loaded release button—but 90% of users press it incorrectly. The button requires surprising force to disengage the internal latch.
Correct faceplate removal:
1. Press the release button firmly with your thumb (not a fingernail)
2. Hold it down while lifting the faceplate’s top edge first
3. Swing the faceplate downward like a hinge until fully detached
Bracket detachment:
– Two security screws now appear at the base—remove both completely
– Lift the doorbell straight upward off the bracket (no wiggling!)
– Never slide sideways—the bracket’s U-shaped channel only releases vertically
Critical mistake alert: Forcing sideways movement cracks the plastic mounting ears. If stuck, press the release button again while lifting—dirt often jams the mechanism.
Battery Doorbell Plus: Remove Just the Battery (No Bracket Needed)

This model’s genius design lets you swap batteries in 30 seconds without touching the mounting bracket—preserving your Wi-Fi signal strength and motion zones.
Battery extraction steps:
1. Press the sliding tab at the bottom edge downward firmly
2. Swing the faceplate open like a small door (hinges at the top)
3. Press the small tab at the top of the exposed battery compartment
4. Slide the battery upward 1/4 inch, then lift straight out
Why this matters: Skipping full removal means your doorbell stays perfectly positioned. No recalibrating motion zones or testing Wi-Fi dead spots after recharging—just pop in the battery and resume security.
Charge Correctly: Avoid Battery Damage Mistakes
Plugging into random chargers seems convenient but shaves years off your battery life. All Ring models use standard micro-USB, but voltage matters.
Charging best practices:
– ✅ Use a 5V/1A charger (basic phone charger)
– ✅ Monitor via Ring app’s “Device Health” for real-time percentage
– ❌ Never use “fast chargers”—excess heat degrades lithium-ion cells
– ❌ Avoid leaving plugged in beyond 12 hours (triggers overcharge stress)
Timeline by model:
– Original Ring: 5-8 hours (orange light → green)
– Ring 2/3/4: 6-10 hours (older batteries take longer)
– Battery Doorbell Plus: 5-7 hours for battery pack only
Expert note: If the orange charging light doesn’t appear within 2 minutes, clean the charging port contacts with a dry microfiber cloth—dirt blocks conductivity.
Reinstall Without Losing Settings: Alignment Is Everything
A misaligned doorbell after recharging causes distorted video or blind spots in motion detection. The key is replicating your original angle down to the millimeter.
Precision reinstallation:
1. Clean bracket contacts with microfiber cloth before attaching device
2. For bracket models: Slide doorbell downward until it clicks into place
3. For Battery Doorbell Plus: Insert battery until top tab snaps shut
4. Tighten security screws to “finger-tight” only—overtightening cracks plastic
Immediate post-installation test:
– Open Ring app → Live View → Verify video isn’t tilted
– Wave in front of doorbell to confirm motion alerts trigger
– Check “Device Health” for strong Wi-Fi signal (>3 bars)
If video looks skewed, loosen screws slightly and adjust the bracket before fully tightening—never force the doorbell into position.
Stuck Doorbell? Troubleshoot Without Breaking It
When your Ring won’t budge after removing screws, panic sets in. But 95% of “stuck” cases have simple fixes that avoid costly replacements.
Bracket detachment fails:
– Cause: Corrosion from rain/snow sealing the unit to the bracket
– Fix: Spray a drop of isopropyl alcohol around the seam, wait 2 minutes, then pull
Faceplate won’t release:
– Cause: Extreme temperatures making plastic stiff
– Fix: Warm your hands by rubbing them, then press the release button with palm pressure
Never use pliers, screwdrivers, or excessive force—this cracks the housing. One user shattered his Ring 4’s casing by prying with a butter knife, voiding his warranty.
Post-Charge Checks to Prevent Future Failures
Your work isn’t done once the green light appears. These 60-second checks catch issues before they cause security gaps.
Essential post-recharge tests:
– Confirm battery shows 100% in app (not just “charged”)
– Test doorbell button press triggers chime/app alert
– Verify night vision switches on in darkness
– Check motion zones cover your porch (not just the sidewalk)
If battery drains faster than before, your unit may need a firmware update via the app—outdated software causes phantom drainage.
Extend Time Between Charges With Smart Maintenance
Proactive care adds months to your charging cycle. Focus on these quarterly habits:
Critical maintenance routine:
– Wipe charging contacts monthly with dry microfiber cloth
– Tighten security screws during each removal (vibration loosens them)
– Replace faceplate gaskets yearly if cracked (prevents moisture damage)
– Update Ring app weekly—new versions optimize battery usage
Pro tip: In freezing climates, remove your Ring during extreme cold snaps (<15°F). Lithium batteries drain 40% faster in subzero temps.
Mastering how to take off Ring doorbell to charge transforms a nerve-wracking chore into a 5-minute routine. Remember: never force components, always verify your model first, and prioritize alignment during reinstallation. By following these precise steps, you’ll avoid the top mistakes that lead to $150 replacement costs—keeping your home secure without battery anxiety. Your next low-power alert won’t mean panic; it means you’re 10 minutes away from full protection. Now go charge confidently.


