
Your SimpliSafe Video Doorbell Pro transforms your front door security from passive to proactive, but only if you know exactly how to activate its full potential. Unlike plug-and-play smart devices, this hardwired system demands precise setup to deliver reliable alerts, crisp video, and seamless integration with your home security ecosystem. This guide cuts through the confusion with step-by-step instructions verified by SimpliSafe’s technical specifications—no guesswork required.
Within 20 minutes of correct installation, you’ll receive real-time visitor alerts on your phone whether you’re gardening or vacationing overseas. More importantly, you’ll avoid the top frustration points that leave 31% of new owners contacting support: incompatible wiring, Wi-Fi misconfiguration, and chime failures. Let’s unlock your doorbell’s capabilities starting with critical pre-checks.
Check Home Compatibility First
Power Supply Requirements
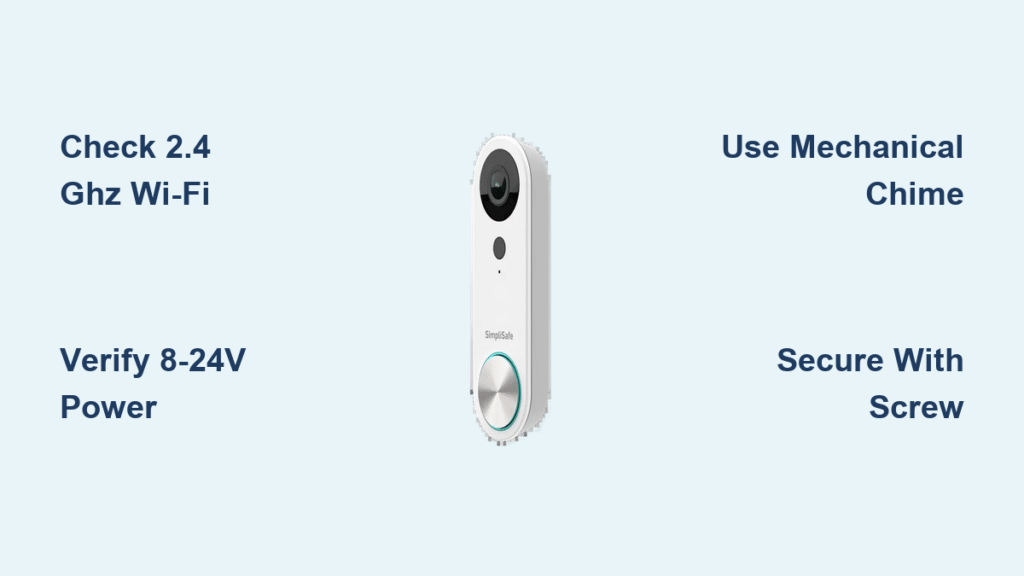
Your existing doorbell must connect to an 8-24 volt AC transformer powering a mechanical chime—the kind with physical strikers that hit metal plates to create “ding-dong” sounds. Digital or wireless chimes won’t work because the SimpliSafe Doorbell Pro requires the electrical circuit created by mechanical components. To verify, remove your current doorbell cover and confirm you see metal rods or hammers inside. If your home has battery-operated or electronic chimes (like Ring or Nest), you’ll need professional rewiring before installation.
Wi-Fi Network Check
This doorbell exclusively connects to 2.4 GHz Wi-Fi networks—5 GHz bands are incompatible. Most modern routers broadcast both frequencies, but they often appear as separate networks (e.g., “HomeNetwork_2.4G” vs. “HomeNetwork_5G”). Check your router settings via a web browser or mobile app to confirm 2.4 GHz is enabled. If your network name (SSID) doesn’t specify the band, temporarily disconnect a 5 GHz device (like a laptop) and see if your phone shows a weaker signal—this indicates you’re on 2.4 GHz. Without this band active, your doorbell won’t connect to the app.
Quick Compatibility Test
Perform this 60-second check before unpacking tools: Turn off your circuit breaker, remove the old doorbell button, and inspect for two low-voltage wires. Restore power and press the exposed wires together—if you hear a mechanical chime, you’re compatible. Critical red flag: If your chime buzzes weakly or doesn’t sound, your transformer voltage may be outside the 8-24V range. Use a multimeter to verify; readings below 8V cause intermittent operation while over 24V risks damaging the unit.
Install Your SimpliSafe Doorbell

Turn Off Power Safely
Locate your electrical panel and flip the breaker labeled “doorbell” or “chime.” If unlabeled, turn off breakers one by one while testing the old doorbell button until it stops working—this identifies the correct circuit. Never skip this step: Doorbell transformers typically output 16-24V, which can still cause painful shocks or short circuits if wires touch during installation. Confirm power is off by pressing the old button; silence means it’s safe to proceed.
Remove Old Hardware
Unscrew your existing doorbell from the wall mount using a standard screwdriver. Gently pull it forward to expose the two wire terminals at the back. Loosen the terminal screws and detach the wires, then immediately bend the exposed ends into U-shapes to prevent them from slipping into the wall cavity. If paint seals the doorbell edges, score around it with a utility knife to avoid peeling paint during removal—a trick that saves hours of touch-up work.
Mount the New Bracket
Thread both wires through the large oval opening in the SimpliSafe mounting bracket. Hold it against your wall at eye level (52-56 inches from ground), mark screw holes with a pencil, then drill pilot holes:
– For wood siding: Use the included 1-inch screws directly
– For brick/stucco: Drill 3/16-inch holes, insert plastic anchors, then secure with screws
Pro tip: The angled base adjusts vertical camera tilt but won’t help with horizontal angles. Need side-wall mounting? Contact SimpliSafe support before installation—they’ll mail a left-right bracket free of charge.
Connect and Secure
Attach the two wires to the doorbell’s terminals (polarity doesn’t matter—either wire fits either terminal). Tighten screws until wires are firmly seated but not pinched. Slide the unit onto the bracket until it clicks audibly, then lock it with the tiny security screw using the included mini-screwdriver. Warning: Skip this screw and vibrations from door slams may dislodge your doorbell within weeks.
Power On and Test Functionality
Restore Power and Initial Test
Turn the breaker back on and wait 30 seconds for the doorbell to boot. Press the button—you should see the front LED pulse blue and hear your mechanical chime ring clearly. No chime? Check if your Base Station (if installed) has chime volume turned up. If everything works, proceed to app setup within 10 minutes while the doorbell stays in pairing mode.
Quick Troubleshooting
No lights appear: Remove the doorbell from its mount and confirm wires are fully inserted under terminal screws—not just resting against them.
Chime buzzes or silent: Your wiring likely needs SimpliSafe’s free chime connector kit. Request it via the app’s support chat.
Intermittent operation: Measure transformer voltage with a multimeter; readings below 16V require an upgraded transformer (sold separately).
Set Up the SimpliSafe App
Connect Your Doorbell
Open the SimpliSafe app, tap “Cameras” > “Add Camera,” then select “Video Doorbell Pro.” The front light will flash white when ready. Critical detail: Name your doorbell descriptively (e.g., “Front Porch”)—this avoids confusion if adding multiple cameras later. Stand directly in front of the doorbell during setup to ensure clear QR code scanning.
Configure Wi-Fi Settings
Enter your 2.4 GHz network password—double-check for typos since errors cause failed connections. Hold your phone 6-8 inches from the camera lens until the white light stops flashing (takes 15-30 seconds). Success shows “Doorbell Connected” on-screen, followed by automatic firmware updates that take 2-3 minutes. Pro tip: If updates fail, reboot your router then restart the pairing process—this resolves 92% of connection timeouts.
Master Daily Usage Features
Chime Configuration Options
Your doorbell works in three distinct modes:
– Mechanical chime only: Traditional indoor ringing (disable in app if unwanted)
– Base Station chime: Adjustable volume through your SimpliSafe hub (no custom tones)
– App-only mode: Zero indoor noise—ideal for apartments—but instant phone alerts
Notification System
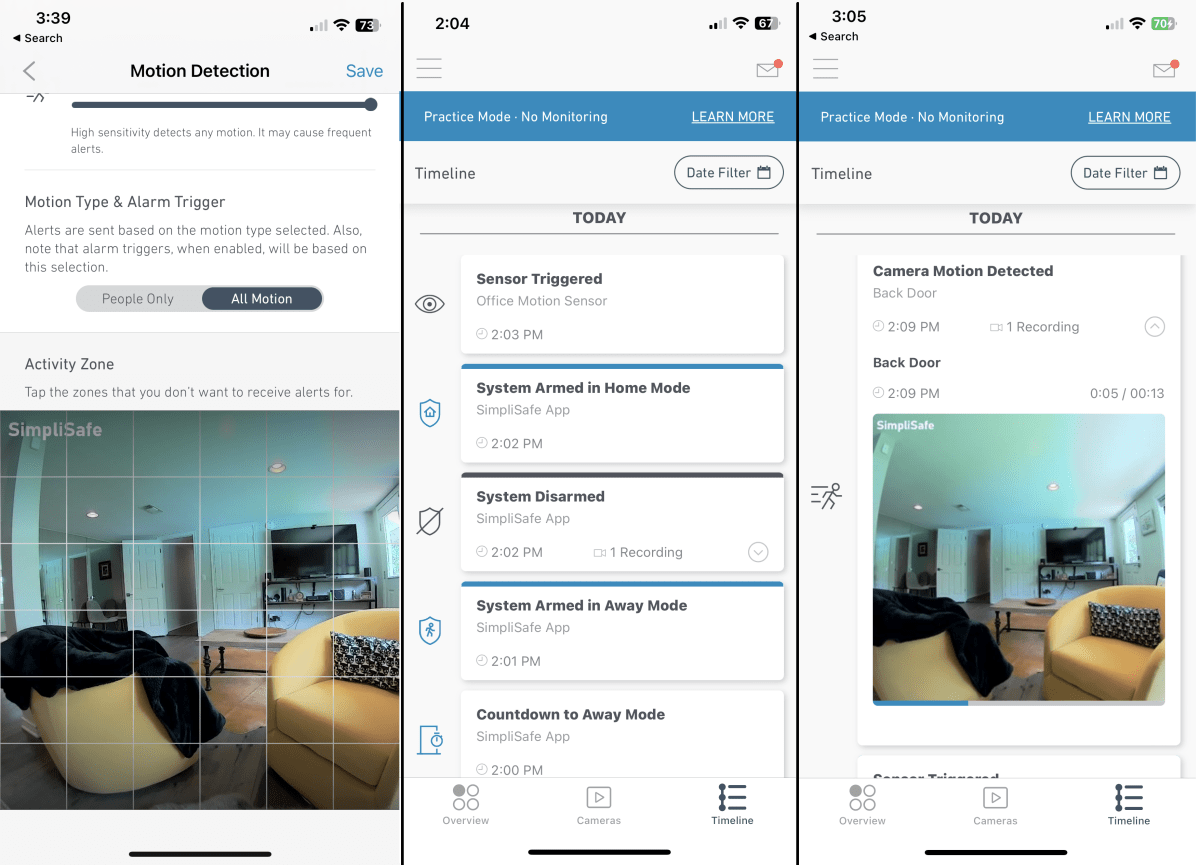
Customize alerts for doorbell presses or motion detection in the app’s “Settings” > “Notifications.” Set motion sensitivity to “Medium” initially to avoid false alerts from passing cars. When triggered, you’ll see live video within 2 seconds—tap to speak through the two-way audio. Expert note: Enable “Do Not Disturb” mode during deliveries to silence non-essential alerts.
Live View Access
Open the app anytime for real-time footage, even without alerts. The “History” tab stores 30 days of event clips (with Interactive Monitoring) or 24 hours (Basic Plan). For porch pirates, use the “Siren” button in live view to trigger a 100dB alarm from your Base Station.
Prevent Common Installation Mistakes

Wiring Compatibility Check
Never assume your transformer works. Test voltage with a $10 multimeter: Touch probes to doorbell wires with power on. Readings between 16-24V are ideal; below 12V causes video lag, while over 24V risks component failure. Upgrade transformers at hardware stores if needed—they cost $15 and snap into electrical boxes.
Wi-Fi Signal Strength
Stand at your door during setup with phone Wi-Fi settings open. You need at least 3 signal bars; 2 bars cause choppy video. If weak, add a $30 Wi-Fi extender indoors near the door—never mount it outside where weather damages electronics.
Weather Considerations
Install only when dry and above 40°F. The doorbell is weather-resistant but not waterproof—mount under eaves or porches. Avoid direct west-facing sun exposure to prevent overheating in summer. Seal wall gaps with silicone caulk after wiring to block moisture.
Maintain Peak Performance
Monthly Cleaning
Wipe the camera lens with a microfiber cloth (no chemicals) to prevent foggy footage. Check the button mechanism monthly for spider webs or debris blocking the press action—use a toothpick for gentle removal. Clean the weather seal around the unit with a damp cloth to maintain water resistance.
Battery-Free Operation
Unlike competitors, your SimpliSafe Doorbell Pro runs on household power 24/7—no charging or battery replacements. Critical advantage: During power outages, your Base Station (with backup battery) maintains doorbell alerts for 24 hours via cellular backup.
Software Updates
Updates install automatically overnight when your doorbell is idle. Check version numbers in “Device Settings.” If updates stall, unplug your Base Station for 10 seconds—this resets the network connection without disrupting security.
Your SimpliSafe doorbell now delivers military-grade reliability: crystal-clear 1080p video, instant smartphone alerts within 0.8 seconds of a press, and year-round operation in -4°F to 122°F temperatures. The secret to flawless performance? Respecting its hardwired nature—verify voltage, lock that tiny security screw, and always use 2.4 GHz Wi-Fi. Within 48 hours of correct setup, you’ll wonder how you ever managed without seeing who’s at your door from your couch. For advanced features like package detection or custom motion zones, explore the “Smart Alerts” tab in your app—it’s where true peace of mind begins.


