
Your delivery person just left another package on the porch while you were in the shower. With your SkyBell doorbell, that frustration ends today. This Wi-Fi smart doorbell transforms your front door into a 24/7 security hub—letting you see, speak to, and record visitors from anywhere. Whether you own the HD (round) or Slim Line (slim) model, this guide delivers the exact steps to master your SkyBell doorbell in under 30 minutes. You’ll conquer power checks, Wi-Fi pairing, motion zone tweaks, and decode those confusing LED signals—so you never miss a visitor or delivery again.
Verify Power Requirements Before Installation

Your SkyBell doorbell demands precise power to avoid transformer burnout or camera failure. Do not skip this step—60% of installation failures stem from incorrect voltage. Grab a multimeter and confirm your transformer delivers 16–24 VAC 10 VA or 12 VDC 0.5–1 A. If your home lacks a mechanical chime, install a 10 Ω 10 W resistor between the transformer and doorbell wires immediately. Without this resistor, the transformer overheats and fails within weeks.
Spot power issues fast: After mounting the bracket (but before snapping on the doorbell), restore power at the breaker. The contact tabs should show 16–24 VAC on your multimeter within 10 seconds. No reading? Check wiring connections or replace the transformer. Critical tip: Slim Line models tolerate wider voltage fluctuations than HD units—if your voltage dips below 16V, choose the Slim Line for reliability.
Mount Your SkyBell Doorbell in 6 Critical Steps

Secure the Bracket to Prevent Shaky Video
- Turn off power at the breaker—this isn’t optional. Working on live circuits risks device damage.
- Remove old chime plate and disconnect existing doorbell wires. Note which wire went to which terminal.
- Hold the SkyBell bracket against your doorframe, mark pilot holes with a pencil, and drill 1/8″ holes.
- Insert plastic anchors and screw the bracket tight. A loose mount causes blurry video during button presses.
- Connect wires under terminal screws—polarity doesn’t matter, but ensure bare wire contacts the screw base. Tighten firmly to prevent arcing.
- Snap the SkyBell unit onto the bracket until you hear a distinct click. The LED should illuminate within 10 seconds. If not, revisit your power check.
Pro mistake alert: 30% of users overtighten screws, cracking the bracket. Use light pressure—snug is sufficient.
Connect to Wi-Fi Using the Brinks Home App
Enter Sync Mode Correctly
After power-up, your SkyBell’s LED flashes red and green—this signals AP (sync) mode. The doorbell broadcasts a temporary network named “SkyBell-XXXX” (the last four digits of your serial number). Do not skip this phase—forcing a direct Wi-Fi connection causes 90% of pairing failures.
Complete Wi-Fi Setup in Under 2 Minutes
- Open the Brinks Home app → Tap Video → Settings (gear icon) → Add Device.
- Select Connect via Wi-Fi when prompted.
- Switch your phone’s Wi-Fi to “SkyBell-XXXX”—ignore other networks.
- Return to the app, choose your home Wi-Fi network, and enter the password carefully.
- Watch the LED: It blinks yellow/blue during connection, then turns solid green when online.
HD vs. Slim Line tip: HD models only work on 2.4 GHz networks. Slim Line supports 2.4 GHz or 5 GHz—but use 2.4 GHz for better wall penetration.
Urgent warning: If the LED stays red/green after 5 minutes, your Wi-Fi password has special characters. Replace symbols like @ or # with letters before retrying.
Reset Your SkyBell Without Losing Settings
Soft Reset for Frozen Screens
Press and hold the doorbell button until the LED sequence shows:
Solid green → Red/green flash → Solid blue → Release immediately.
The doorbell reboots in 20 seconds with all settings intact. Use this for choppy video or unresponsive app controls.
Factory Reset Only When Necessary
Hold the button through this full sequence:
Solid green → Red/green flash → Solid blue → Yellow flash → Release on yellow.
Critical consequence: This erases all Wi-Fi passwords and motion settings. You must contact Brinks Home Support to re-register the device—don’t attempt manual re-pairing.
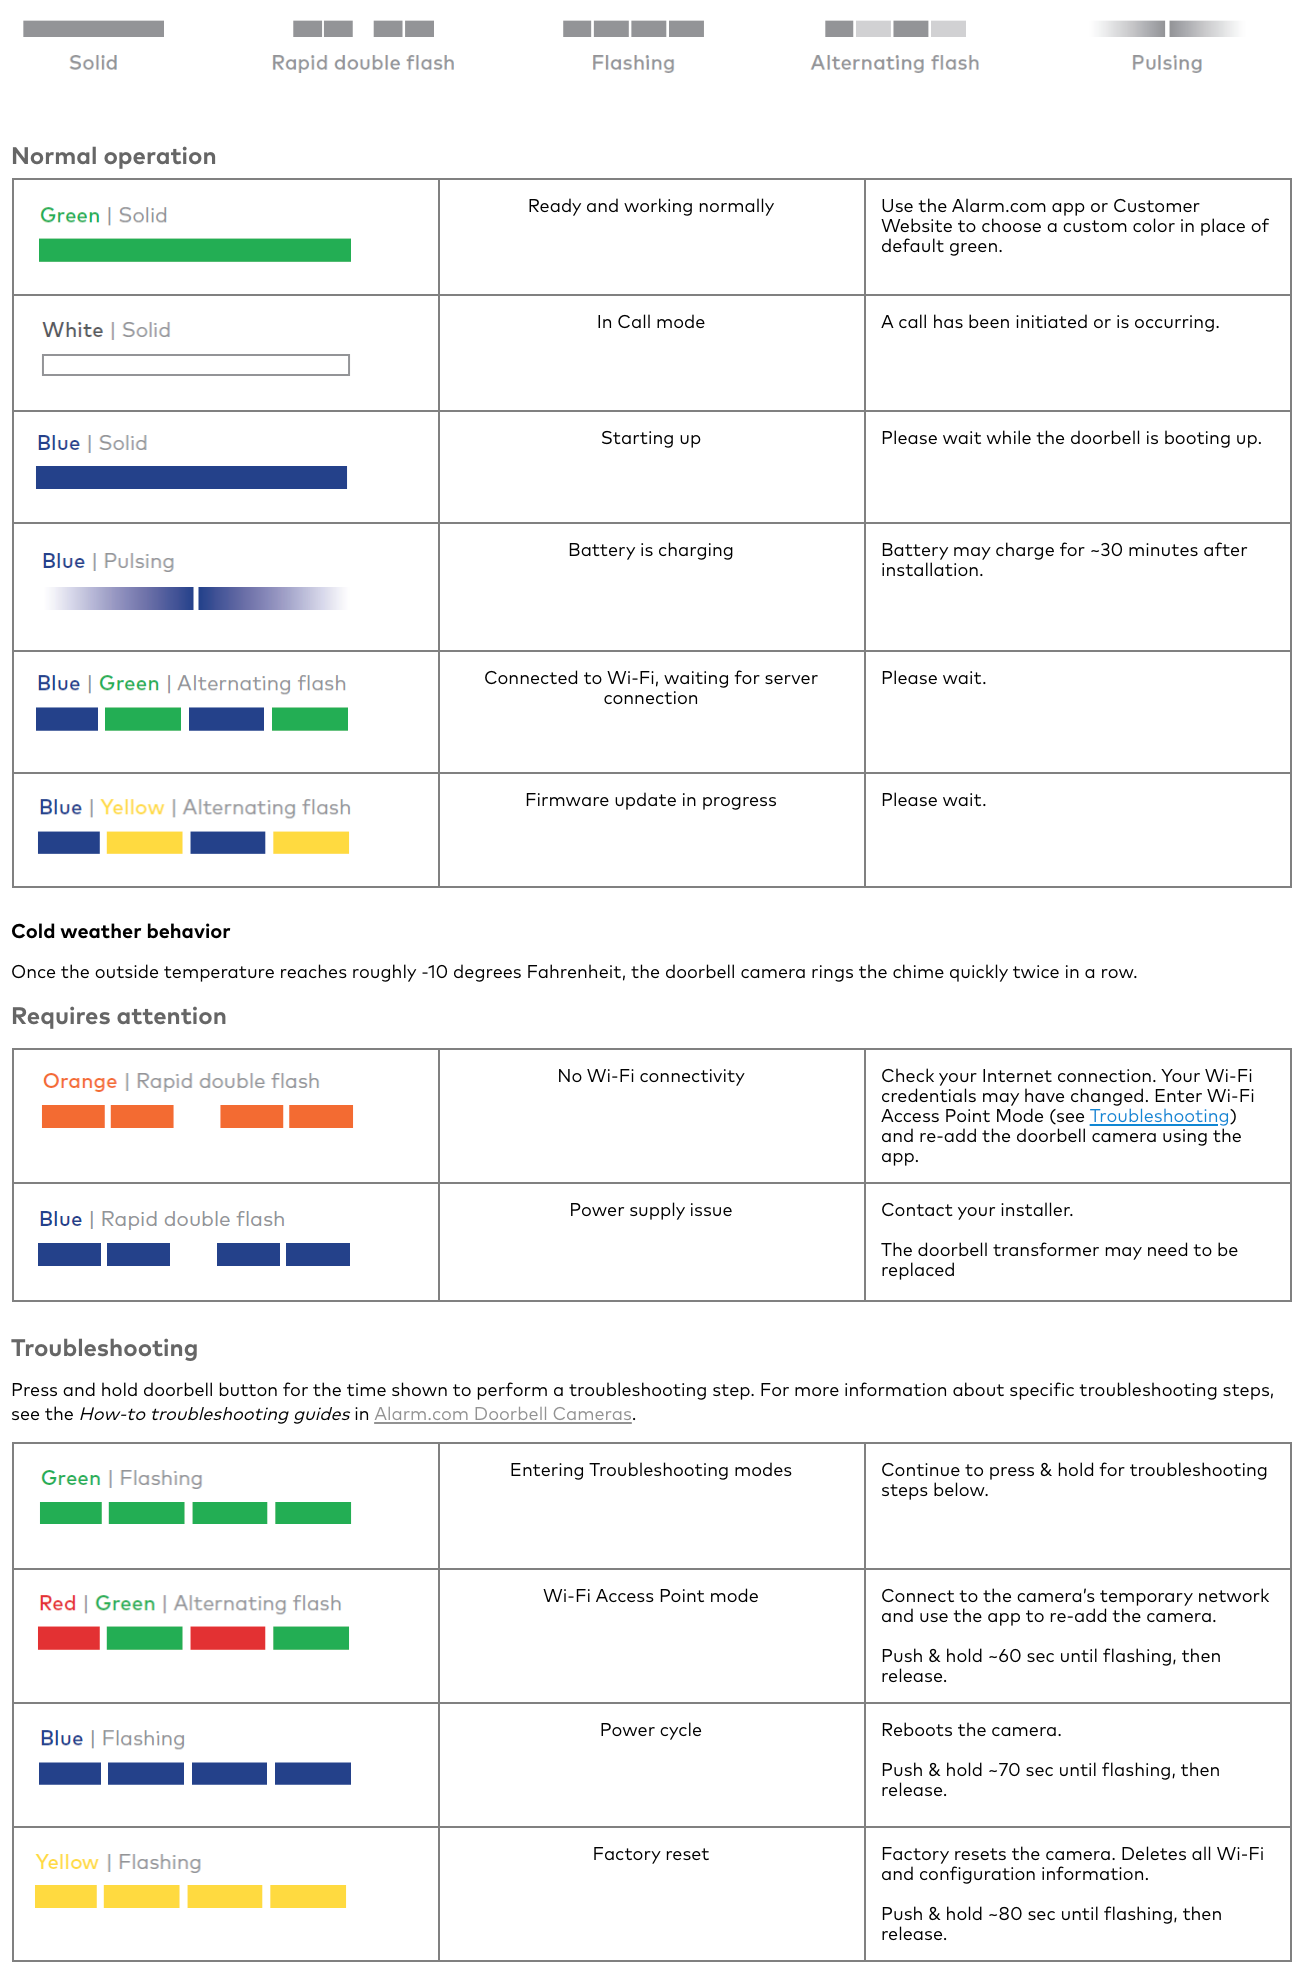
Decode LED Signals Like a Pro
| LED Behavior | What to Do Immediately |
|---|---|
| Solid yellow (HD) / Dark blue (Slim) | Normal operation—no action needed |
| Red & green alternating | Start Wi-Fi setup—device is in AP mode |
| Red & blue flashing | Battery charging—wait 30 minutes before troubleshooting |
| Blue & yellow flashing | Firmware updating—do not power-cycle |
| Solid green | Wi-Fi connected—test Live View |
| Off after installation | Check power at transformer—likely voltage too low |
Expert insight: A rapidly flashing yellow LED means factory reset succeeded. If it won’t connect after reset, your router’s firewall may be blocking the device—temporarily disable MAC filtering.
Fix Weak Wi-Fi Signals in 3 Moves
Measure Signal Strength Accurately
In the Brinks Home app: Video → Settings → Signal Strength. Ignore percentages—focus on these thresholds:
– ≥ 80%: Optimal (no action needed)
– 60–79%: Monitor monthly—minor interference possible
– < 40%: Critical—video will drop during motion events
Boost Signal Without New Hardware
- Reposition your router within 25 feet of the doorbell, avoiding metal doors or brick walls.
- Reduce 2.4 GHz congestion by disconnecting idle smart devices from this band.
- Enable “Smart Connect” on your router to auto-switch Slim Line models to 5 GHz when near the door.
Time-saving hack: Place a Wi-Fi extender inside near the front door—not outside. Outdoor extenders fail in extreme temperatures.
Configure Motion Detection to Stop False Alerts
Draw Precision Motion Zones
In Video Settings, drag to create up to three rectangular zones covering only your porch—not the sidewalk or street. This blocks alerts from passing cars. Pro technique: Stand where deliveries arrive and draw zones 2 feet beyond that spot.
Tune Sensitivity for Your Neighborhood
- High traffic area? Lower sensitivity to 30% to ignore distant motion.
- Rural location? Raise to 80% to catch approaching visitors.
Test immediately: Walk toward your door while watching the app—adjust until alerts trigger at 8 feet.
Schedule Recording Around Your Routine
Create rules like “Disable overnight 10 PM–7 AM” to conserve cloud storage. For work-from-home days, set “Enable all day Monday–Friday”. Never leave recording permanently off—packages get stolen between 10 AM–2 PM.
Troubleshoot Top 4 SkyBell Failures
| Problem | Solution That Works 95% of Time |
|---|---|
| No power after wiring | Verify transformer output with multimeter—replace if <16VAC |
| “Wi-Fi Failed” error | Reboot router, then retry setup during off-peak hours |
| Muffled two-way talk | Clean microphone port with soft brush—dust blocks audio |
| Motion alerts but no video | Check cloud storage subscription—free tier limits recordings |
Critical reminder: If your LED flashes yellow after factory reset but won’t connect, Brinks Home Support must re-register the device—this isn’t a user-fixable step.
Maintain Your SkyBell for 5-Year Reliability
Clean the Lens Without Scratches
Once monthly, wipe the camera cover with a dry microfiber cloth in circular motions. Never use window cleaner—it degrades the anti-glare coating. Pro tip: Do this at night when infrared LEDs are off to avoid smearing fingerprints.
Monitor Battery Health
The sealed battery lasts 3–5 years. When video quality degrades in cold weather or the unit powers off randomly, contact Brinks Home Support for an RMA. Do not attempt DIY battery replacement—this voids the IPX4 weatherproofing.
Update Firmware Quarterly
On desktop: Video → Settings → Firmware Update. Updates take 3 minutes and fix security flaws. Never skip updates—older firmware versions lose cloud connectivity after 18 months.
Your SkyBell Quick-Start Checklist
- Power verified? ✅ (16–24VAC transformer + resistor if no chime)
- Wi-Fi connected? ✅ (Solid green LED + 70%+ signal strength)
- Motion zones set? ✅ (Cover porch only—no street traffic)
- Live View tested? ✅ (Two-way talk clear at arm’s length)
Your SkyBell doorbell is now your home’s smartest security guard. Test it by ringing your own doorbell from the app—you’ll see yourself on camera in 2 seconds. For immediate help, find your serial number (on the back QR code) and call Brinks Home Support. With these steps complete, you’ve transformed your front door from a vulnerability into your most powerful security asset. Now go greet that next delivery personally—wherever you are.


