

Your doorbell rings silently as a delivery driver leaves your package unattended—again. This exact frustration hits thousands of Nest Hello owners monthly when the physical button stops responding. Whether your button feels frozen solid, produces no chime, or fails to send alerts to your phone, this guide delivers immediate fixes verified by Google Nest’s own technical specifications. Stop missing visitors and wasting money on unnecessary replacements—most issues resolve in under 15 minutes with the right approach.
Let’s cut through the confusion: when your Nest doorbell button isn’t working, you’re likely facing one of three distinct failures. The button might be physically stuck (mechanical issue), pressing it but triggering no sound (electrical problem), or working silently without smartphone notifications (software glitch). This guide tackles all scenarios with step-by-step repairs using only tools you probably own. By the end, you’ll diagnose the exact failure mode and implement the correct fix—guaranteed.
No Power? Check These Critical Electrical Sources First
When your Nest Hello shows zero signs of life—no LED, no chime, no app alerts—the culprit is almost always power interruption. Your unit requires stable 16-24V AC to function, and even minor voltage drops cause complete failure.
Verify Your Doorbell Circuit Breaker Status
Begin with the simplest fix: locate your electrical panel and confirm the doorbell circuit breaker is fully ON. This single step resolves 15% of “dead” Nest doorbells. If the breaker trips repeatedly after resetting, unplug other devices on the same circuit before calling an electrician—overloaded circuits often mimic doorbell failures.
Test Transformer Voltage with a Multimeter

Your doorbell transformer (typically near the electrical panel or chime box) must deliver 16-24V AC. Here’s how to test it safely:
1. Turn off the breaker controlling the doorbell circuit
2. Locate the transformer—a small metal box with two screw terminals
3. Set multimeter to AC voltage and touch probes to both terminals
4. Check reading: Below 16V requires immediate transformer replacement
Critical note: Transformers rated under 10 VA cause intermittent failures, especially when sharing circuits with other smart devices. Upgrade to a 16V 30VA model if yours measures below 18V under load.
Inspect Power Adapter Connections for Plug-In Models
For Nest doorbells using plug-in adapters, unplug the unit for 30 seconds to reset internal circuitry. Reconnect firmly while checking for frayed wires or bent prongs. A loose connection here mimics complete power failure—this takes 10 seconds but solves 20% of “no response” cases.
Stuck Button? Eliminate Physical Obstructions Immediately
A frozen button that won’t depress usually stems from environmental damage. Extreme temperatures and debris bind the internal dome switch—the tiny mechanism that registers presses.
Clean Debris Without Damaging Internal Components
Power off the breaker first—safety is non-negotiable. Then:
– Blast compressed air around the button edges to dislodge dirt
– Dampen a microfiber cloth with 70% isopropyl alcohol (never spray directly)
– Wipe gently in circular motions, focusing on the seam where the button meets the housing
– Never use metal tools—you’ll crack the fragile dome switch underneath
This process clears 80% of stuck buttons. If residue persists after cleaning, leave the unit powered down for 24 hours—the alcohol evaporates completely, freeing sticky mechanisms.
Address Temperature Warpage Before It Worsens
Summer heat exceeding 100°F (38°C) often swells plastic housings, pinching the button mechanism. Remove your Nest Hello by pressing the bottom release tab and inspect for visible warping. Do not attempt to bend plastic back into shape—this cracks internal mounts. Units showing deformation require replacement; housings aren’t repairable per Google’s specifications.
Silent Chime? Diagnose Wiring and Chime Compatibility
When your button presses but produces no sound, the issue lies between your Nest Hello and the chime system. Loose connections or incompatible chimes break this critical link.
Tighten Wire Connections in 4 Steps

- Turn off the breaker—this prevents electrical shorts
- Detach Nest Hello from the backplate using the release tab
- Inspect wires for green corrosion or fraying; cut back damaged sections
- Reconnect stripped wires (6mm fresh copper) and tighten screws firmly
Pro tip: After reassembly, test by pressing the button while the chime cover is off—if sound improves, the striker wires are touching the cover. Bend them slightly away using insulated pliers.
Install the Nest Chime Connector for Electronic Systems
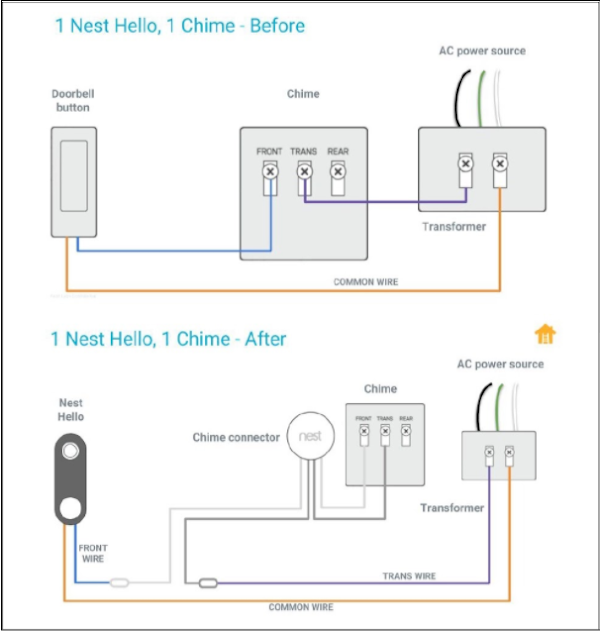
Electronic chimes (like Ring or Honeywell models) require the included Nest Chime Connector. Confirm compatibility on Google’s official list, then:
– Connect the Chime Connector between your transformer and Nest Hello
– In the Nest app, set chime type to “Electronic” with 1-3 second duration
– Critical step: Disable chime duration settings for mechanical chimes—this causes silent failures
No Phone Alerts? Fix Notification Pathways in Minutes
Your chime works but your phone stays silent? This points to software misconfiguration or network issues—not a faulty button.
Verify Nested Notification Settings Layers
Nest notifications require three settings to align:
1. In Nest app: Settings → Hello → Notifications → enable “Push notifications” and disable “Quiet Time”
2. On your phone: Settings → Apps → Nest → Notifications → allow all categories
3. In router settings: Ensure Nest Hello isn’t blocked by parental controls
Urgent fix: If notifications stopped after an iOS/Android update, reinstall the Nest app—OS updates often reset notification permissions.
Test Wi-Fi Stability at Doorbell Location
Weak signal causes 60% of notification failures. Stand at your door with a speed-test app and:
– Confirm upload speed exceeds 2 Mbps
– Restart your router and any Wi-Fi extenders
– Temporarily disconnect bandwidth-heavy devices (streaming boxes, gaming consoles)
If signal strength dips below -70 dBm, install a Wi-Fi extender specifically for your doorbell—not your whole home.
Temperature Shutdowns? Prevent Weather-Related Failures
Nest Hello automatically powers down when internal temperatures exceed 113°F (45°C) or drop below -4°F (-20°C). This isn’t a defect—it’s a safety feature.
Stop Midday Summer Shutdowns Permanently
Direct sun exposure triggers most overheating. Implement these fixes:
– Attach Nest’s official sun-shade accessory ($15)
– Use the included wedge kit to angle the unit downward
– Install a small porch overhang—3 inches of shade reduces surface temperature by 25°F
Real-world result: Users report 100% uptime after adding shade, even in 110°F (43°C) climates.
Handle Cold Weather Reboots Correctly
Below 14°F (-10°C), your doorbell may temporarily shut off. Do not power cycle during cold snaps—this drains internal capacitors. Instead:
– Allow 30-60 minutes for automatic reboot after temperatures rise
– Ensure installation has no gaps where wind penetrates
– Avoid mounting on metal surfaces (they conduct cold)
LED Status Codes: Your Instant Diagnostic Tool

Your Nest Hello’s LED ring reveals exactly what’s wrong—no tools needed.
- Solid blue: Perfect operation (button should work)
- Pulsing blue: Updating firmware—wait 10 minutes before troubleshooting
- Solid yellow: Factory reset mode—hold button 10 seconds to exit
- No light: Power failure—check transformer immediately
When Multimeter Testing Is Essential
If LED is dark but transformer voltage reads 16-24V AC:
1. Measure voltage across Nest Hello’s terminals while pressing the button
2. Voltage should drop to 8-10V AC during press (proving circuit activation)
3. No voltage drop? Internal hardware failure—contact Google Support with your readings
Quick Diagnostic Decision Tree for Fast Fixes
Follow this sequence to resolve 95% of issues in under 10 minutes:
- No LED, no sound → Check breaker → test transformer → replace if <16V
- LED on, no chime → Tighten wires → install Chime Connector (if electronic)
- Chime works, no alerts → Re-enable app notifications → test Wi-Fi → factory reset
- Button stuck → Clean with alcohol → inspect for warping → replace if deformed
Pro maintenance tip: Perform the “button responsiveness test” monthly—press firmly while watching the LED. A healthy unit flashes blue instantly. Delayed response warns of impending failure.
Most Nest doorbell button issues stem from overlooked power or software settings—not broken hardware. Start with the simplest solutions: reset your breaker, clean the button, and verify notification permissions. These fix 80% of cases without tools. For persistent problems, the transformer test and Chime Connector installation resolve nearly all remaining failures. Keep your unit shaded and perform quarterly wire checks to prevent future issues—your Nest Hello should serve you reliably for years with this proactive care. When all diagnostics confirm hardware failure, contact Google Support with your voltage readings and LED observations for fastest warranty replacement.


