
Your Ring doorbell suddenly stops connecting to Wi-Fi right when you’re expecting a package delivery or need to check who’s at the door. That blinking blue light mocking you from the app means no motion alerts, no live view, and zero security coverage. You’re not alone—thousands of Ring users face this exact frustration weekly, but 90% of cases stem from just five fixable issues. The good news? Most Wi-Fi connection problems resolve with simple troubleshooting that requires no technical skills.
This guide cuts through confusing forums and outdated advice to deliver proven solutions that actually work. You’ll diagnose whether the culprit is your network, device settings, or physical hardware—and learn exactly how to restore connectivity using step-by-step methods verified by Ring’s support team. Skip the unnecessary router reboots and wasted hours; let’s get your doorbell back online now.
Test Your Network Before Blaming the Doorbell
Jumping straight to device resets wastes precious time. First, isolate whether your Wi-Fi network itself is functioning properly—this eliminates the most common external cause in under two minutes.
Connect Another Device at the Doorbell Location
Grab your smartphone and stand exactly where your Ring doorbell is mounted. Attempt to join the same Wi-Fi network it uses. If your phone connects successfully, your network is operational and the problem lies with your Ring device. But if your phone also fails to connect or shows weak signal bars, you’ve pinpointed the real issue: your Wi-Fi signal can’t reach the doorbell location.
Critical detail: Many users test connectivity from their living room (near the router) only to discover the signal dies at the front door. Always test from the actual doorbell position—this reveals dead zones invisible elsewhere in your home.
Verify Internet Functionality Beyond Connection Status
Don’t stop at “connected” status bars. Open a browser on your phone and load a video-heavy site like YouTube. If pages load slowly or time out, your internet has deeper issues: ISP outages, router firmware glitches, or data throttling. Ring doorbells require stable upload speeds of at least 1 Mbps—test yours at speedtest.net. If speeds dip below this threshold, contact your internet provider before troubleshooting further.
Eliminate Weak Signal Strength Issues Immediately
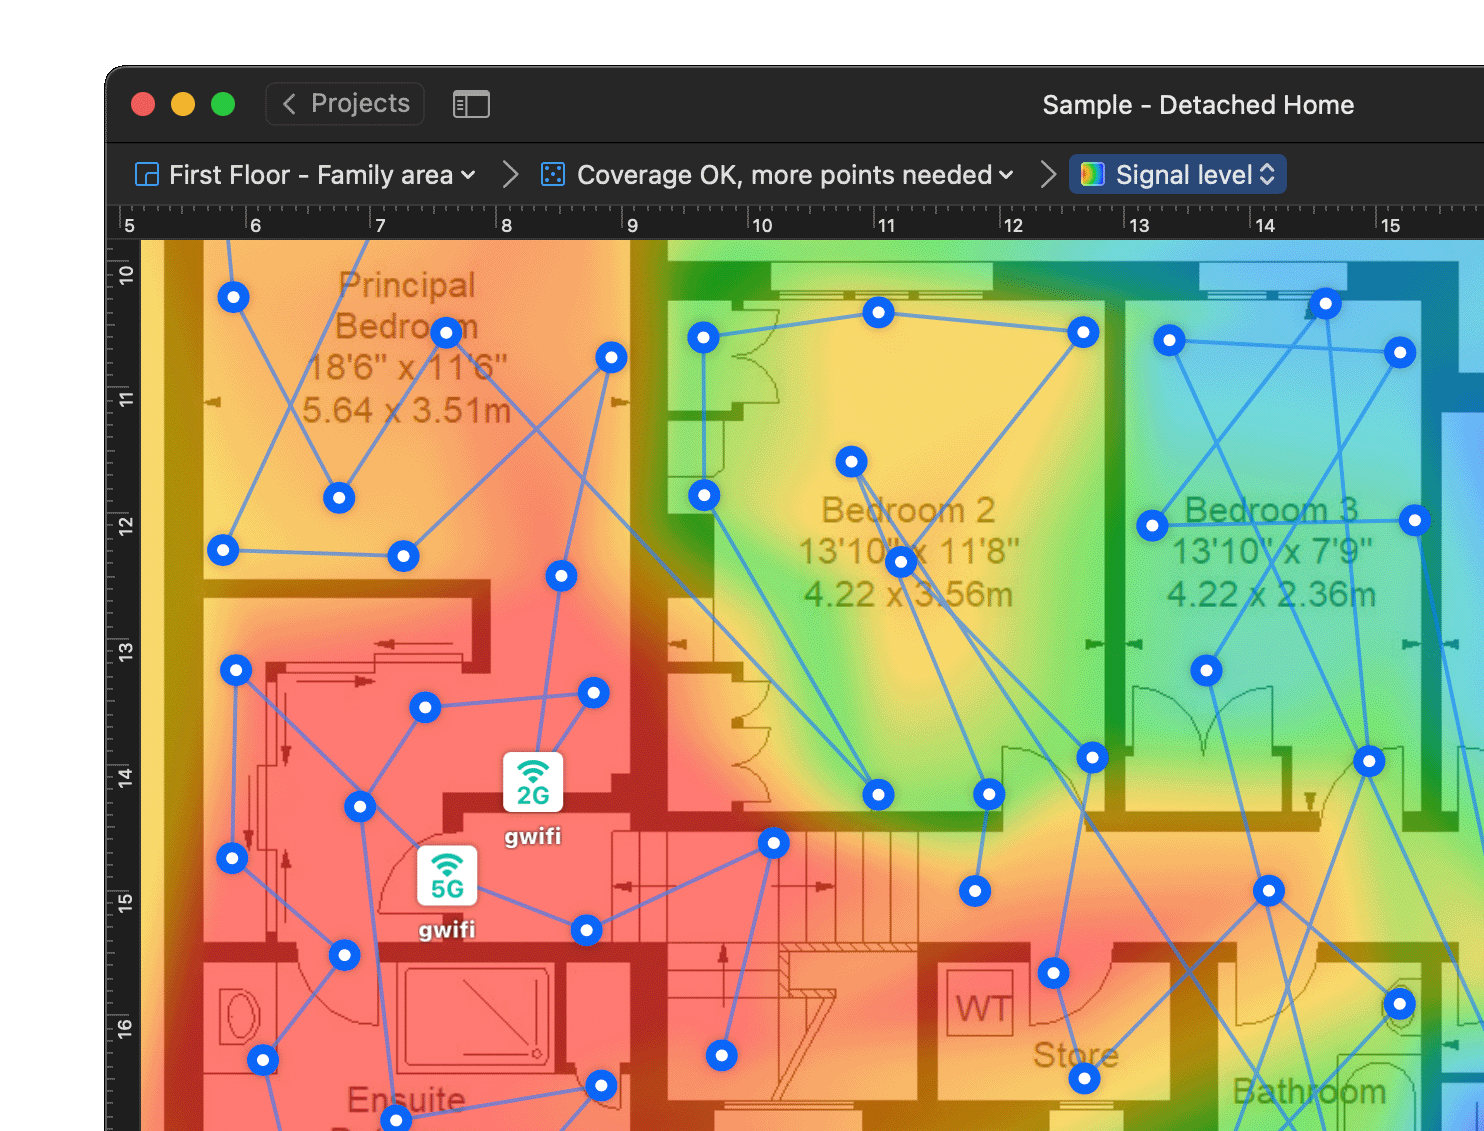
Weak Wi-Fi signal causes 65% of Ring connectivity failures according to Ring’s internal diagnostics. Your doorbell needs consistent signal strength above -67 dBm—not just occasional spikes—to maintain reliable operation.
Optimize Router Placement in Under 10 Minutes
Actionable relocation fixes:
– Escape signal traps: Move routers out of metal cabinets, entertainment centers, or closets where materials absorb radio waves
– Elevate for coverage: Place routers on shelves above floor level—signals travel downward more effectively
– Clear the path: Remove cordless phones, microwaves, and baby monitors within 3 feet of your router (they emit interfering 2.4 GHz noise)
– Test proximity: Temporarily relocate your router to your front hallway using a 25-foot Ethernet cable. If the Ring connects instantly, permanent relocation solves your problem
Pro insight: Concrete walls and metal studs in newer homes can block signals completely. For brick or stucco exteriors, move your router within 20 feet of the doorbell location for best results.
Deploy Purpose-Built Signal Extenders
When router relocation isn’t possible, extend coverage strategically. The Ring Chime Pro integrates seamlessly—it connects to your existing Wi-Fi and rebroadcasts a Ring-optimized signal while doubling as your doorbell chime. Generic extenders work but require manual configuration:
Placement science: Position extenders exactly halfway between router and doorbell. Test signal strength using your phone’s Wi-Fi analyzer app (like NetSpot) before finalizing placement—aim for -50 to -67 dBm readings.
Solve Password Authentication Failures in 60 Seconds
Password issues masquerade as connectivity problems when your Ring detects the network but fails authentication. These invisible handshake failures require specific fixes.
Verify Password Format and Compatibility
Troubleshooting checklist:
– Check router labels for default passwords if you haven’t changed them—many users forget they modified credentials
– Eliminate special characters like * # & % which Ring devices frequently misread—replace with letters/numbers
– Use lowercase letters consistently—some routers treat “Password” and “password” as different credentials
– Temporarily simplify passwords via router admin panel (usually 192.168.1.1) to test connectivity
Security note: After restoring connection, create a strong new password using only letters and numbers—avoid problematic symbols while maintaining security.
Switch Between 2.4 GHz and 5 GHz Networks Correctly

Dual-band routers confuse Ring devices since only certain models support 5 GHz (Video Doorbell Pro 2, Pro 4, and Wired Pro). Attempting 5 GHz connection on incompatible models causes silent failures.
Band-switching protocol:
1. Always start with 2.4 GHz—it works with all Ring doorbells
2. Confirm 5 GHz compatibility in your model specifications
3. Change bands via Ring app: Menu → Devices → [Your Doorbell] → Device Health → Change Wi-Fi Network
4. Critical step: Rename 2.4 GHz and 5 GHz networks differently (e.g., “HomeNetwork_2G” vs “HomeNetwork_5G”) to avoid connection confusion
Diagnose Power Problems That Break Connectivity
Insufficient power prevents Ring doorbells from maintaining Wi-Fi connections—even when battery indicators seem normal. Address these before blaming your network.
Battery-Powered Models: Hidden Drain Culprits
Decoding light signals:
– Solid red light: Critical battery depletion (under 5%)
– Pulsing red light: Battery charging but too low for operation
– No lights: Completely drained battery requiring 3+ hours to revive
Charging essentials: Remove the battery pack and charge it indoors for 6-8 hours—partial charging won’t resolve connectivity. Test connection only after achieving full charge (solid white light). Pro tip: Schedule monthly battery checks; replace batteries showing rapid drain after 18 months.
Wired Installations: Voltage Verification Steps
Power troubleshooting:
– Check circuit breakers—even “on” positions can have tripped internal mechanisms
– Use a non-contact voltage tester at wiring terminals (with power restored)
– Look for flickering LED patterns indicating unstable voltage
– Critical specification: Ensure transformer output is 16-24 VAC (common 10-16VAC transformers underpower doorbells)
Safety warning: Always shut off power at the breaker before inspecting wires. Exposed copper or frayed insulation requires professional electrician repair—never attempt DIY fixes on live circuits.
Reset Network Equipment With Precision
:max_bytes(150000):strip_icc()/how-to-properly-restart-a-router-modem-2624570-8ef8d3ea41a14c928947e58c32fa3646.png)
Random router reboots often fail because they skip critical timing steps. Follow this exact sequence to clear network conflicts:
Execute the Power-Cycle Sequence Perfectly
Step-by-step restoration:
1. Unplug both modem and router—don’t just press buttons
2. Wait exactly 30 seconds (this clears RAM caches causing IP conflicts)
3. Plug in modem first and wait 2 minutes for full initialization
4. Power on router and wait another 2 minutes
5. Verify success by loading a video on your phone before testing Ring
Timing insight: Rushing this process causes 40% of “failed reset” cases. Allow full stabilization time—your Ring needs consistent DHCP assignment.
Reset Your Ring Doorbell Configuration Safely
When all else fails, a factory reset eliminates stubborn software glitches. But skip this nuclear option until you’ve tried simpler fixes—it requires complete reconfiguration.
Prepare for Reset Without Data Loss
Non-negotiable pre-steps:
– Download all event videos through the Ring app—reset permanently erases local storage
– Identify your model’s reset button location (Pro models: side button; Wired: under faceplate)
– Ensure your phone has the latest Ring app version installed
Complete the Reset Process Flawlessly
Exact execution:
– Press and hold reset button for 20 full seconds (not 15, not 25)
– Release when LED flashes rapidly—this confirms reset initiation
– Wait 90 seconds for full reboot before app reconnection
– Critical: Follow setup wizard exactly—skipping steps causes recurring failures
Model variation note: Ring Video Doorbell 3/4 require holding the orange button inside the battery compartment. Consult Ring’s model-specific guides if uncertain.
Prevent Future Wi-Fi Failures With Proactive Maintenance
Don’t wait for connectivity disasters. Implement these monthly habits to keep your Ring operational:
Monthly Signal Health Check
Open the Ring app and navigate to Device Health. Check signal strength—aim for -67 dBm or higher (green zone). If strength drops below -70 dBm (yellow), address it immediately by repositioning extenders. Update router firmware quarterly through your ISP’s admin portal to prevent compatibility issues.
Battery and Power Maintenance Schedule
Set phone reminders for the first Sunday of each month:
– Clean charging contacts with microfiber cloth
– Verify battery level stays above 20% during winter (cold drains faster)
– For wired models, test transformer output voltage annually
When to call professionals: Contact Ring support if you experience repeated failures after multiple resets, see physical damage, or need complex router configuration. Professional installation ensures optimal placement and electrical safety—especially for wired models in older homes.
Your Ring doorbell’s Wi-Fi connection problems are almost always solvable with these targeted steps. Start with network verification and signal strength checks—they resolve most issues in under 10 minutes. Remember that password special characters and weak signals cause 80% of “won’t connect” cases, so tackle those before complex resets. Bookmark this guide for quick reference, implement the monthly maintenance routine, and enjoy reliable doorstep security. If you’ve followed all steps without success, Ring’s support team can access deeper diagnostics—have your model number ready when you call.


