

Your Unifi doorbell camera captures visitors perfectly, but the chime stays silent when the button is pressed. This frustrating issue leaves you missing deliveries, guests, and important notifications despite having a working camera. Whether your system stopped working after a firmware update or never properly integrated with your chime, this guide delivers the exact diagnostic steps to restore that essential “ding-dong” sound. You’ll discover how to verify power supply integrity, adjust critical settings in UniFi Protect, and determine whether your chime type is compatible with the Unifi ecosystem—all solutions requiring minimal tools and typically taking less than 30 minutes to implement.
Verify Power Supply Integrity Immediately

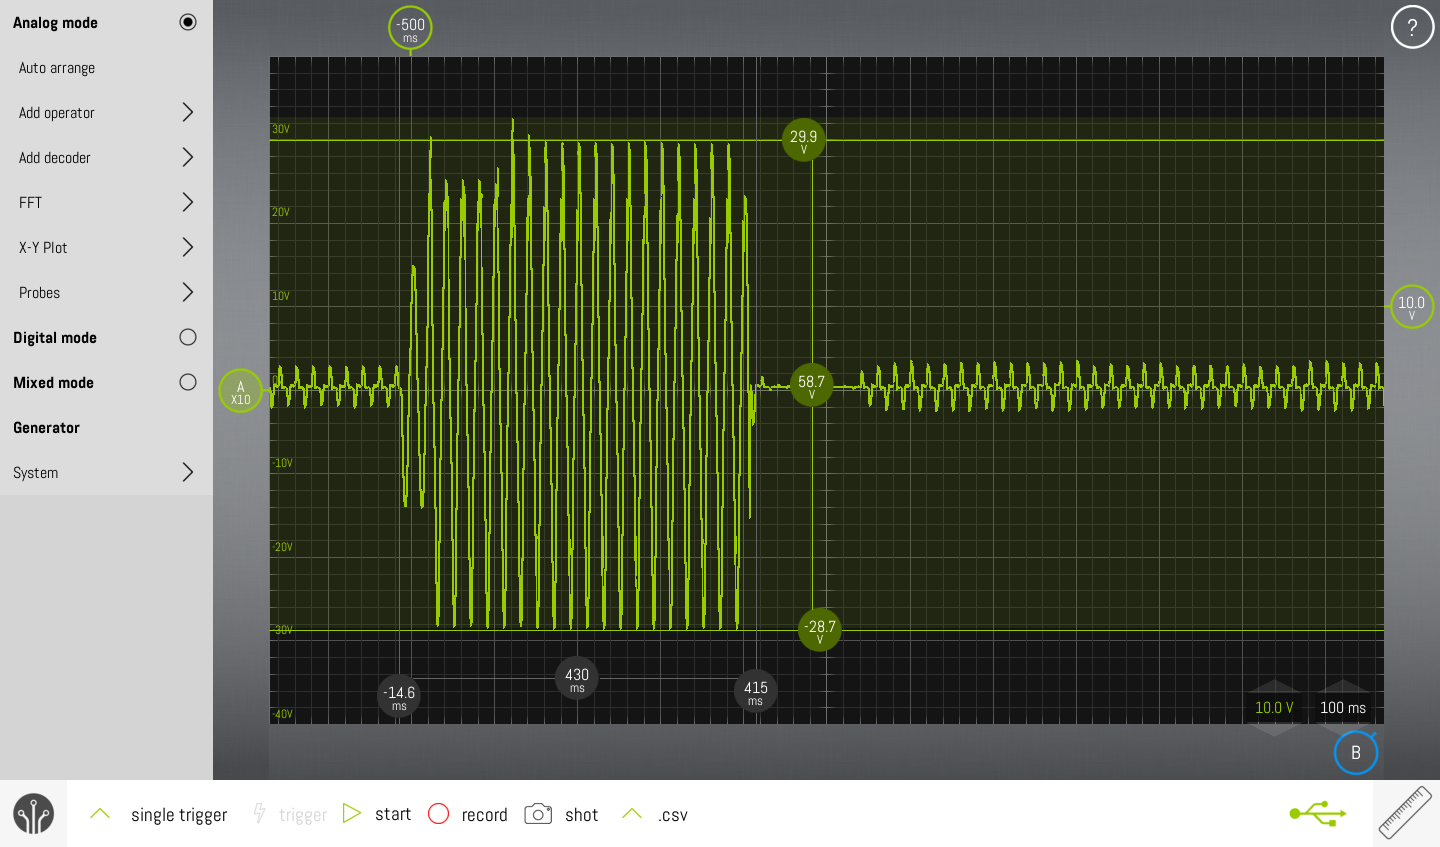
Measure Transformer Output Voltage Accurately
Your Unifi doorbell requires stable electrical power to activate the chime circuit. Begin troubleshooting by confirming your transformer delivers sufficient voltage using a digital multimeter. Turn the dial to AC voltage measurement mode, then carefully touch the probes to the secondary terminals where wires connect to your transformer.
With the circuit powered, observe the reading—your system needs between 16-24 volts AC to operate correctly. Anything below 15 volts indicates an overloaded or failing transformer. For an accurate assessment, have someone press the doorbell button while you monitor the voltage; if the reading drops more than 2 volts during activation, your transformer lacks adequate capacity. Upgrade to a minimum 24V/30VA transformer to ensure consistent performance, especially if you’ve added multiple doorbells or smart devices to the same circuit.
Critical warning: Always shut off power at the breaker before handling transformer connections. Transformers can deliver dangerous shocks even when the doorbell isn’t ringing.
Inspect All Wiring Connections Thoroughly
Loose or corroded wiring creates intermittent failures that mimic more complex problems. Remove the cover from your mechanical chime unit and examine each terminal connection. Wires should be securely fastened under the screw terminals with no exposed copper beyond the clamp point. Check for green corrosion on copper wires, which indicates moisture exposure and electrical resistance.
At the doorbell button itself, remove the mounting plate and verify both wires are firmly attached. Gently tug each connection—any movement means it’s too loose. Clean corroded contacts with electrical contact cleaner and a small wire brush before reattaching. For digital chimes, ensure the common (C) wire maintains solid contact, as this often causes silent operation when loose. Your doorbell system relies on these physical connections as much as software settings, so don’t skip this fundamental check.
Configure Chime Settings Correctly in UniFi Protect
Identify Your Chime Type Before Configuration
UniFi doorbells require different settings for mechanical versus digital chimes, and mismatched configuration causes silent operation. Mechanical chimes contain physical solenoids and metal bars that produce sound through movement, while digital models use electronic speakers and require different power handling.
Examine your chime unit: if you see metal tubes that a striker hits when the doorbell rings, you have a mechanical chime. Digital chimes typically feature control buttons, volume sliders, and electronic displays. This distinction is critical because selecting “Mechanical Chime” in your UniFi settings when you actually have a digital unit (or vice versa) prevents sound output regardless of other factors.
Adjust Critical Settings in the UniFi Protect Interface
Access your UniFi Protect system through the web browser interface for more configuration options than the mobile app provides. Navigate to your doorbell device settings, then locate the chime configuration section—this is often buried under advanced settings rather than the main menu.
Ensure the correct chime type is selected first, then verify the power kit jumper settings if using a mechanical chime. Many users overlook that mechanical chimes require the UniFi power kit installed with specific jumper configurations. For digital chimes, confirm the volume isn’t set to minimum and that “Chime Enabled” is toggled on—these settings sometimes reset after firmware updates. Save changes and immediately test by pressing the doorbell button while standing near the chime unit. If still silent, proceed to network diagnostics before assuming hardware failure.
Diagnose Network Connectivity Issues Systematically
Test WiFi Signal Strength at Doorbell Location
Your Unifi doorbell must maintain strong network connectivity to trigger chime notifications. Weak signal strength causes delayed or missed chime activation even when the camera functions normally. Stand at your front door with your smartphone and check the WiFi signal strength—aim for at least three bars on your network.
Run a speed test to confirm minimum requirements: your doorbell needs at least 2 Mbps upload speed for reliable operation. Metal doors, brick walls, and large appliances between your router and doorbell create signal dead zones. Temporarily move your router closer to test if signal improves, or install a UniFi mesh point midway to boost coverage. Remember that 5GHz networks provide faster speeds but poorer wall penetration than 2.4GHz—switch your doorbell to the 2.4GHz band if signal strength remains weak.
Confirm Critical Network Ports Are Open
UniFi devices require specific network ports to communicate properly with chimes and other components. Access your router’s administration interface and verify these essential ports aren’t blocked by firewall settings:
- Port 443 (HTTPS) must be open for basic communication
- Port 8883 (MQTT) enables real-time chime notifications
- Port 10001 handles device discovery across your network
Create a dedicated IoT VLAN for your UniFi devices to prevent conflicts with other smart home equipment. Check your DHCP settings to ensure the doorbell receives a consistent IP address through reservation rather than random assignment. Network issues often manifest as intermittent chime operation—working sometimes but not consistently—which makes precise port configuration essential for reliable performance.
Perform Strategic System Resets
Execute Proper Doorbell Factory Reset Procedure
When configuration errors prevent chime activation, a complete factory reset often resolves the issue. Unlike simple reboots, this process clears corrupted settings while preserving your camera footage. In the UniFi Protect app, remove the doorbell from your device list first to prevent automatic reconnection.
Locate the small reset button on the back of your doorbell—this usually requires a paperclip to press. Hold the button for exactly 15 seconds until the status LED flashes white rapidly, indicating reset initiation. Wait two minutes for the process to complete before attempting reinstallation. When adding the device back to UniFi Protect, carefully follow the setup wizard and pay special attention to the chime configuration section during initial setup.
Important: Back up any critical event recordings before resetting, as this process clears all custom settings and schedules.
Update Firmware in Correct Sequence
Outdated firmware creates compatibility issues between your doorbell and chime system. UniFi devices require updates in a specific order to maintain proper communication. Start by updating your UniFi OS Console to the latest stable release, as this manages all connected devices.
Next, update the UniFi Protect application itself, followed by individual device firmware. Never update the doorbell firmware before updating the Protect application, as this commonly causes chime integration failures. After each update stage, reboot your network equipment to clear any temporary glitches. Check the UniFi community forums for known issues with current firmware versions—if others report chime problems with a specific release, consider delaying the update until a patch arrives.
Replace Faulty Components When Necessary
Install Power Kit for Mechanical Chime Compatibility
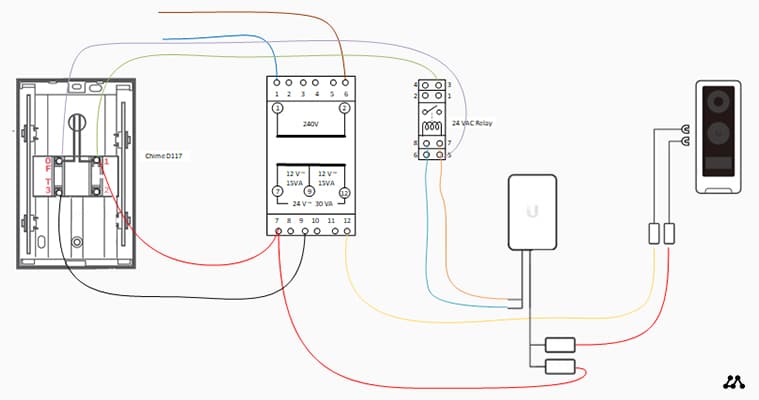
Mechanical chimes often require the UniFi power kit to function correctly with smart doorbells. This kit regulates voltage specifically for mechanical units that draw more power during activation. Turn off power at the breaker before beginning installation, as you’ll work with live wiring.
Mount the power kit between your existing doorbell wires and chime unit according to the included diagram. The kit features jumper settings that must match your specific chime configuration—typically “High” for most mechanical units. After installation, restore power and test the doorbell while monitoring for any humming sounds from the chime, which indicate improper installation. Some vintage mechanical chimes manufactured before 1990 lack compatibility even with the power kit, requiring replacement with a modern digital alternative.
Upgrade to UniFi-Compatible Digital Chime
When mechanical chime compatibility proves impossible, switching to a UniFi-certified digital chime provides reliable operation with additional features. The official UniFi Smart Chime offers direct integration without additional wiring, connecting via standard electrical wiring or batteries.
Digital chimes provide volume control through the UniFi Protect app, customizable chime tones, and support for multiple chime units throughout your home. Before purchasing third-party digital chimes, verify compatibility on the UniFi website—many “universal” digital chimes lack proper integration with UniFi’s notification system. Installation typically takes less than 15 minutes with basic screwdrivers, and most models include battery backup to maintain functionality during brief power outages.
Prevent Future Chime Failures Proactively
Implement Monthly Maintenance Routine
Prevent silent chime failures through simple monthly checks that take less than five minutes. Clean doorbell button contacts with isopropyl alcohol to prevent corrosion buildup that interrupts the circuit. Check your transformer for excessive heat—while warm operation is normal, overheating indicates overload that could damage connected devices.
Verify chime volume settings haven’t accidentally changed after system updates, and test battery backups if your digital chime includes this feature. Document baseline performance metrics like voltage readings and WiFi signal strength to quickly identify developing issues before they cause complete failure.
Pro tip: Create a maintenance log in your phone notes app with dates and observations—this helps identify patterns when problems do occur.
Monitor Network Health Continuously
Prevent connectivity-related chime failures by implementing basic network monitoring. Most UniFi routers allow setting up alerts for device disconnections, so you’ll know immediately if your doorbell loses connectivity. Schedule weekly speed tests specifically at your doorbell location to catch gradual signal degradation.
Document your network’s baseline performance during optimal conditions to recognize when interference from new devices (like baby monitors or wireless speakers) affects doorbell operation. Consider setting up a dedicated guest network for IoT devices to isolate them from potential conflicts with your main network traffic.
Key Takeaway: Power supply issues cause most Unifi doorbell chime failures, followed by incorrect configuration settings and network connectivity problems. Systematic troubleshooting starting with physical connections and progressing through software settings resolves 90% of silent chime issues without professional help.
Next Steps: If these methods don’t restore your chime function, contact UniFi support with your device serial number and documentation of troubleshooting steps already attempted. Most hardware failures occur within the first 90 days and qualify for warranty replacement—having detailed records speeds up the resolution process significantly.


