
Building a wooden door from scratch is a rewarding woodworking project that blends craftsmanship, precision, and practicality. Whether you’re restoring a century-old home or upgrading your interior spaces, a custom-built wooden door offers unmatched quality and character compared to mass-produced alternatives. With frame-and-panel construction, you can create a door that withstands seasonal wood movement while showcasing beautiful joinery and grain. This guide walks you through every step of how to build a wooden door, from selecting lumber and cutting joints to assembling the frame and installing floating panels.
The process may seem daunting at first, especially for beginners, but breaking it down into manageable stages makes it achievable. We’ll focus on building a 1 3/4-inch-thick interior frame-and-panel door using loose tenons, ideal for DIYers with intermediate skills and basic shop tools. By the end, you’ll have a solid understanding of how to build a wooden door that fits perfectly, operates smoothly, and becomes a lasting feature in your home.
Choose the Right Door Type for Your Project
Interior vs. Exterior Door Designs
Interior doors are simpler to build than exterior ones because they aren’t exposed to rain, UV rays, or extreme humidity swings. For most DIY projects, an interior door made with frame-and-panel construction is ideal. It’s stable, attractive, and resistant to warping when built correctly. Exterior doors require additional weatherproofing, dual floating panels, and often insulated cores, complexities best avoided for your first build.
Stick with a standard interior door unless you have advanced skills and a specific need for an exterior entry door. Even then, consider starting with an interior version to master the techniques before tackling outdoor conditions.
Frame-and-Panel vs. Solid Wood Construction
Avoid building a solid wood door from a single slab. Despite its appeal, solid lumber expands and contracts across the grain with humidity changes, leading to warping, cracking, or binding in the frame. Instead, use frame-and-panel construction, where a rigid frame holds a floating panel that moves freely within grooves. This method mimics fine cabinetmaking and ensures long-term durability.
For flat-panel Shaker-style doors, use plywood for the panel because it’s dimensionally stable and won’t warp like solid wood. Raised panels must be made from solid wood to maintain the traditional profile and visual depth that homeowners expect.
Select the Best Wood Species for Your Door
Recommended Hardwood Options
Choose stable, durable hardwoods that resist warping and accept finishes well. Popular options include:
- Hard maple: Dense, light-colored, and long-lasting, ideal for modern interiors
- Walnut: Rich, dark grain with luxurious appeal, perfect for statement doors
- Mahogany: Naturally stable and rot-resistant, excellent for both interior and future exterior builds
- Cherry, oak, or poplar: Budget-friendly alternatives with good workability
Use the same species throughout the door for consistent expansion rates and cohesive appearance. Avoid mixing woods unless you’re intentionally creating contrast, such as walnut inlays for visual interest.
Understanding Cost and Material Needs
A full-size interior door (typically 80 inches tall by 30 inches wide) requires 30 to 50 board feet of lumber. Premium woods like walnut increase cost significantly. Expect to spend approximately $600 in materials and hardware for a single DIY walnut door, compared to $5,000 or more for a professionally made equivalent. This cost savings is one of the primary motivations for learning how to build a wooden door yourself.
Mill and Prepare Lumber for Door Construction
:max_bytes(150000):strip_icc()/Jointer-opener-46356d453f4a4ea982403bdb1f4457fd.jpg)
Four-Squared Stock Preparation
All pieces must be four-squared: jointed on one face and edge, planed to thickness, and ripped to width. This ensures tight joints and a flat final product. Use a jointer and planer if available. If not, hand planes like a #5 Bailey can flatten wide boards effectively.
For doors over 80 inches tall, inspect long stiles carefully for straightness. Even slight bends can cause alignment issues during assembly. Check for twist or cup by drawing pencil lines across the surface; high spots will remain marked after planing.
Laminating for 1 3/4-Inch Thickness
Most interior doors are 1 3/8 inches thick, but 1 3/4 inches is preferred for a heavier, more substantial feel and better sound insulation. Achieve this by gluing two 3/4-inch-thick boards together. Clamp the lamination on a perfectly flat surface, using MDF or plywood as a base. Apply even pressure with bar clamps every 8 to 12 inches. Insert spacers in the panel groove area during dry clamping to prevent warping. Let glue cure fully before cutting joinery.
Cut Precision Joinery for Strong Joints
Using Loose Tenons Effectively
Loose tenons offer superior strength and alignment over biscuits or pocket screws. They’re easier to cut accurately than traditional mortise-and-tenon joints and don’t require specialized tools like a Festool Domino. Each joint uses a rectangular hardwood tenon, typically 3/4 inch wide by 1 1/2 inches deep by 2 1/2 inches long, glued into matching mortises cut into both rail and stile ends.
Cut mortises with a router and straight bit using two parallel fences. A 3/4-inch diameter bit matches standard tenon width. Plunge carefully to avoid tear-out. Cut as much as possible with the router, then finish corners by hand with a sharp chisel to remove remaining waste.
Alternative Joinery Methods
Traditional mortise-and-tenon joints are strong and classic but time-consuming, best for hand-tool enthusiasts. Biscuit joints are acceptable for lightweight interior doors but less robust than loose tenons. Pocket screws are fast, but joints are weaker and visible screw holes compromise aesthetics. For strength and invisibility, loose tenons are the recommended choice when learning how to build a wooden door.
Shape Stiles and Rails with Professional Details
Adding Bevels and Curves
Many custom doors feature subtle chamfers or curves on stile and rail edges. Start shaping before assembly to ensure clean results. Use a table saw with a low-angle cut to remove most material, then refine with a hand plane and sandpaper for smooth, controlled outcomes. This approach prevents tear-out and allows fine-tuning.
Avoid aggressive profiles on first builds. Simple bevels enhance elegance without complicating joinery or requiring advanced skills.
Mitering Profiles at Corners
When shaping extends to the ends of rails and stiles, miter the profiles so they meet cleanly at corners. Cut miters on the table saw using an auxiliary fence for support on tall rail pieces. Stiles are too long for safe miter saw use, so cut miters by hand with chisels and planes for better control. Remember the woodworker’s rule: you can always remove more, but you can’t put wood back.
Flush-Trimming After Assembly
After gluing the frame, excess profile material may overlap at joints. Remove it with a trim router and flush-trim bit. This creates seamless transitions between stiles and rails and prepares surfaces for final sanding. Use a bearing-guided bit that follows the outer edge of one component to trim the other cleanly.
Assemble the Door Frame with Proper Techniques
Performing a Dry Fit First
Never skip the dry fit. Assemble the entire frame without glue using clamps and 3/4-inch spacers in the panel grooves to simulate panel presence. Check for squareness by measuring diagonals; they should match. Look for gaps at joints and alignment issues with profiles and edges. Mark each piece with chalk to maintain position during final glue-up.
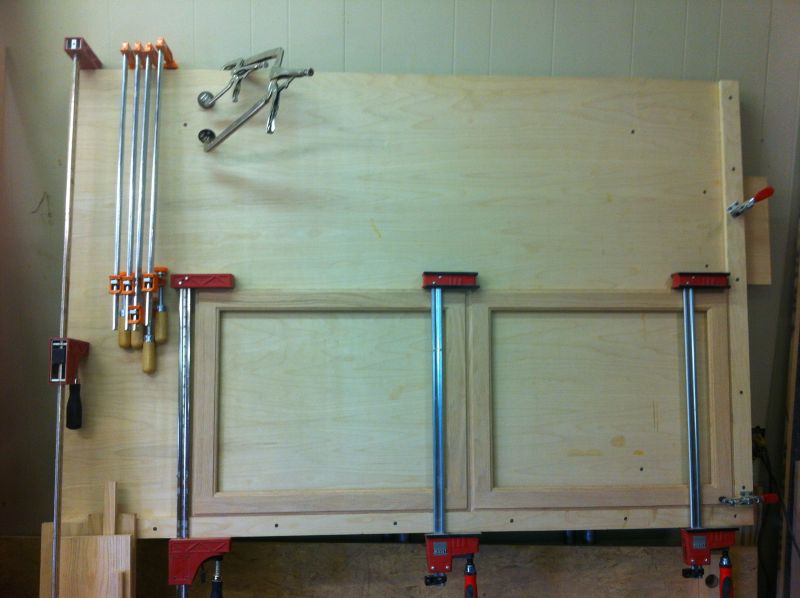
Gluing and Clamping the Frame
Use Titebond III or equivalent waterproof wood glue for structural strength and moisture resistance. Apply glue to both tenon faces and inside mortises, then insert tenons and assemble the frame. Clamp evenly across all joints using heavy-duty bar clamps. Use more clamps than in the dry fit to prevent bowing under pressure. Wipe off squeeze-out immediately with a damp cloth because dried glue interferes with finishing. Let cure for 24 hours before unclamping.
Trimming to Final Length
Leave stiles slightly longer during initial cutting so they extend below the bottom rail after assembly. These act as protective feet during handling. After glue cures, trim stiles flush with the bottom rail using a circular saw and straightedge or a hand saw for precision.
Install the Floating Panel Correctly
Cutting Grooves for Panel Movement
Use a dado stack on the table saw or a router with a straight bit to cut 1/2-inch-deep grooves along the inner edges of stiles and rails. Groove width should be slightly wider than 3/4 inch, aiming for 13/16 inch to allow seasonal swelling. Position grooves so the panel sits centered within the frame with a 1/8-inch reveal around the perimeter.
Sizing the Panel Properly
The panel must not be glued into the grooves because it floats to accommodate expansion and contraction. For a door opening of 30 inches wide, subtract 1/4 inch total (1/8 inch per side) to allow movement. A 29 3/4-inch-wide panel in a 30-inch-wide opening gives the needed clearance. For flat panels, use 3/4-inch plywood because it won’t warp and provides stability. For raised panels, shape solid wood on a router table with a cope-and-stick bit set.
Inserting the Panel
Slide the panel into the grooves only after the frame is fully assembled and sanded. No fasteners or glue are needed because gravity and frame integrity hold it in place. Some builders add small wood buttons or clips inside the groove ends to prevent rattle, but they’re optional.
Choose and Install Hardware and Hinges
Selecting the Right Hinges
For a clean, modern look, use SOSS concealed hinges because they’re hidden when the door is closed and support heavy doors well. Cost runs $30 to $40 per hinge, with 3 to 4 needed per door. For traditional styles, use mortised butt hinges because they’re affordable, reliable, and easy to adjust. Ensure hinges match door weight because heavy hardwood doors like walnut need robust hardware.
Mortising Hinges Carefully
Mark hinge locations precisely on both door and jamb. Use a chisel and straightedge to cut hinge mortises flush with the surface. Pilot drill screw holes to prevent splitting dense hardwoods. Countersink for flush screw seating. Test fit hinges during dry assembly to confirm alignment and swing clearance.
Fit Your Custom Door to the Opening
Dealing with Non-Square Frames
Older homes, especially pre-1930s construction, often have out-of-square door openings due to settling. Measure at top, middle, and bottom to identify the issue. Custom-fit the door by planing edges or scribing to match the jamb. Leave a consistent 1/8-inch reveal around the perimeter. Use shims behind hinges to fine-tune alignment and gap.
Hanging and Adjusting the Door
Attach hinges to the jamb first, then lift the door into place. Check for smooth swing and no rubbing against the frame. Adjust by tightening or loosening hinge screws or by shimming behind hinge leaves to achieve proper alignment.
Prevent Wood Movement Problems
Understanding Seasonal Expansion
Wood expands and contracts across the grain with humidity changes. A 15-inch-wide panel can vary by 1/8 inch or more between dry winter and humid summer conditions. Frame-and-panel design solves this by letting the panel move freely within grooves. Never glue or nail the panel in place.
Designing for Long-Term Stability
Use properly acclimated wood by storing it in your shop for two or more weeks before building. Avoid wide solid wood panels; use plywood or narrow staves instead. For exterior doors, consider dual floating panels on each side or insulated cores to manage stress properly.
Essential Tools for Door Building
Must-Have Workshop Equipment
You’ll need a table saw with dado stack for grooves, a router with straight and flush-trim bits, a jointer and planer or hand planes as substitutes, bar or pipe clamps (at least 6 to 8), chisels and mallet, a hand plane like a #5 Bailey, measuring tools including tape, combination square, and marking gauge, plus sanding tools with orbital sander and 120 to 220 grit sandpaper.
Helpful Additions
A trim router makes fine detailing easier. A miter gauge with auxiliary fence enables safer cuts. A workbench with a flat MDF or plastic laminate top provides a durable building surface. A vacuum press creates perfect lamination as an alternative to clamps, though it’s not essential for success.
Frequently Asked Questions About Building Wooden Doors
What type of wood is best for building a door?
Hard maple, walnut, mahogany, cherry, oak, and poplar are all excellent choices. Hard maple offers durability and a modern look. Walnut provides rich color and luxury appeal. Mahogany resists decay and works for interior or exterior applications. Choose based on your budget, desired aesthetic, and the door’s location in your home.
How long does it take to build a wooden door?
For an intermediate woodworker with basic tools, expect to spend 15 to 25 hours across multiple weekends. This includes milling and preparation (4 to 6 hours), cutting joinery (4 to 6 hours), shaping and assembly (4 to 6 hours), and finishing and hardware installation (3 to 5 hours). Experience and tool quality significantly affect the timeline.
Can I build an exterior door using the same method?
Exterior doors require additional considerations due to weather exposure. You need dual floating panels (one on each side), weatherproof finishes, and potentially insulated cores. The basic frame-and-panel technique works, but the design must account for greater moisture and temperature extremes. This is advanced territory best attempted after building several interior doors first.
Why do my doors warp after building them?
Warping typically occurs when the panel is glued in place, when wood wasn’t properly acclimated before building, or when the door is exposed to uneven humidity. Always allow panels to float freely in their grooves. Store lumber in your workshop for two weeks before building to let it adjust to local humidity levels.
What is the ideal door thickness for interior use?
Standard interior door thickness is 1 3/8 inches, but 1 3/4 inches provides a more substantial feel and better sound insulation. Achieve the thicker option by laminating two 3/4-inch boards together. This also creates a stronger, more warp-resistant frame that professionals prefer.
Do I need special tools to cut mortises for tenons?
A router with a straight bit and dual-fence jig works well for cutting mortises. You don’t need expensive specialized equipment like a Festool Domino, though it makes the process faster. A router and chisel combination produces excellent results with practice. The key is taking multiple shallow passes rather than one deep cut.
Key Takeaways for Building Your Wooden Door
Building a wooden door is a milestone project that combines precision, patience, and pride in craftsmanship. By following frame-and-panel construction principles, using loose tenons for strong joints, and allowing for wood movement with floating panels, you’ll create a door that performs beautifully for decades. The key steps are choosing the right door type for your needs, selecting stable hardwood species, milling stock square and flat, cutting precise joinery, and assembling with proper clamping technique.
Whether you’re matching historic architecture in an older home or crafting a modern centerpiece for a new build, the skills you gain from this project, including milling, joinery, shaping, and fitting, will elevate all your future woodworking. Start with an interior door, master the process, and soon you’ll wonder why you ever bought a pre-hung unit. The satisfaction of opening a door you built with your own hands is worth every hour spent learning how to build a wooden door.


