
A door that won’t close smoothly is more than just an annoyance. It can compromise your home’s security, drive up energy bills, and make daily life frustrating. Whether your door sticks at the top, drags along the floor, or simply refuses to latch, a door not closing properly usually stems from a handful of common issues you can fix yourself. Most problems come down to loose hinges, minor misalignment, or seasonal swelling, and the good news is you can resolve them in under an hour with basic tools. This guide walks you through every practical solution, from tightening screws to planing edges, so you can restore smooth operation without calling a professional.
Tighten Loose Hinges
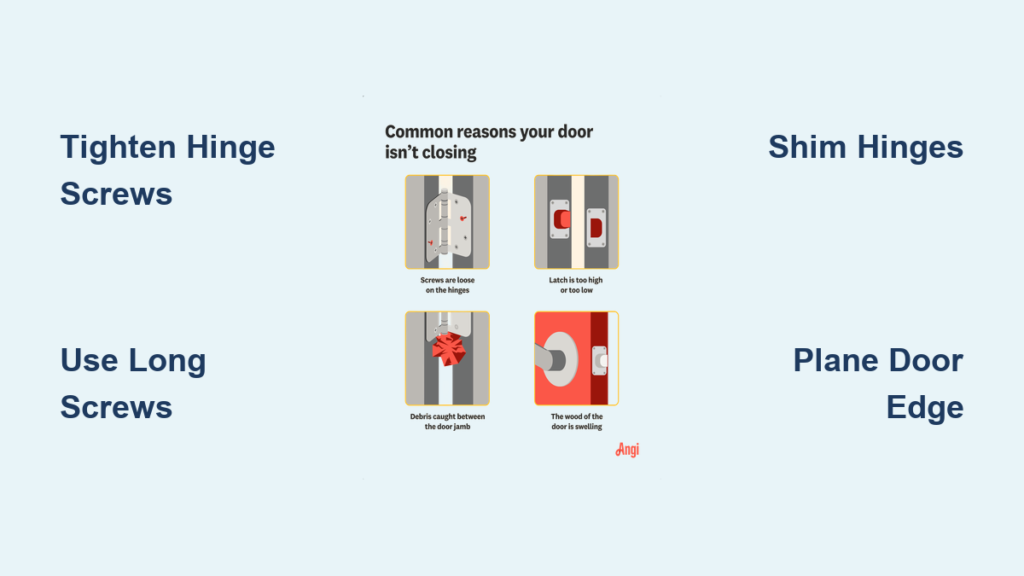
Loose hinges are the number one cause of doors that won’t close properly. Over time, screws loosen under the weight of the door, allowing it to sag and rub against the frame.
Check All Hinge Screws
Open the door fully and inspect each hinge on both the door leaf and the door jamb. Use a screwdriver or drill to tighten every screw you find. Pay extra attention to the top and bottom hinges since they bear the heaviest load.
• If a screw spins freely without catching, the hole is stripped
• Stop tightening if you feel resistance building to avoid stripping the hole further
Fix Stripped Hinge Holes
When screw holes are worn out, replace short 1-inch screws with 3-inch construction screws in the top and bottom hinges. These longer screws reach into the wall stud behind the jamb, pulling everything tight and realigning the door.
Pro Tip: Only replace the middle screw in each hinge with a long screw to avoid hitting electrical wiring or plumbing pipes hidden inside the wall.
For stripped holes that can’t accommodate long screws, try this repair method:
• Insert wooden toothpicks or matchsticks dipped in wood glue into the hole
• Break them flush with the surface and let dry for at least 2 hours
• Reinstall the original screw into the reinforced hole
• Auto-body filler or epoxy wood filler also works well for this fix
Install Long Screws for Sagging Doors

Doors that sag over time need more than just tighter screws. They need structural reinforcement to hold their position permanently.
Anchor Into Wall Studs
Use 3-inch screws in the top and bottom hinge jamb-side holes to anchor the frame directly into the wall studs. This technique lifts the door and corrects sag in one simple step.
• Pre-drill holes first to prevent splitting the jamb wood
• Drive the screw slowly and watch the door shift into alignment
• If the jamb pulls away from the wall, insert a shim behind it before driving the screw
User Result: “After adding a 3-inch screw to the bottom hinge, the top corner cleared the frame instantly.”
This method works so well because it pulls the entire door frame back toward the structural framing of your wall, creating a solid anchor that won’t loosen over time.
Shim Behind Hinges
When tightening screws fails to fix alignment, shimming reposition the door within its frame without removing any material.
Fix Top-Edge Rubbing
If your door hits the top of the frame on the latch side, place a cardboard or wood shim behind the top hinge on the jamb side. Reattach the hinge over the shim and tighten the screws. This pushes the top of the door outward, clearing the frame contact.
Lift a Dragging Door
If your door drags on the floor, shim the bottom hinge to raise the door slightly. Use a feeler gauge or business card to measure for a 1/8-inch gap at the bottom before tightening.
Expert Hack: “Scribe a 3mm packer around the door edge, cut it out, then rehang.” – u/yamumsntme
Trim any visible excess shim material with a utility knife for a clean appearance.
Bend Hinge Pins for Drifting Doors
Doors that swing open or closed on their own usually need more friction in their hinges. This is a quick fix that takes only minutes.
Create Tension in Hinges
Remove the hinge pin using a hammer and nail or pin punch. Set it on a hard surface and tap the center lightly with a hammer to create a slight bend. Reinsert the pin and the added resistance will stabilize the door.
Caution: This is a temporary fix. Over time, the pin may straighten back out or wear down, requiring repetition.
Try the Nickel Trick
For a subtle downward adjustment that clears the top corner, loosen the top hinge screws slightly and slide a nickel between the hinge leaf and the jamb. Retighten the screws and test the door.
Why a nickel? It measures exactly 1.95mm thick, which is enough to shift alignment without overdoing the adjustment.
Plane or Sand the Door Edge
When realignment tricks won’t work, modifying the door itself is often the fastest and most reliable fix.
Mark Contact Points
Use the lipstick test to identify exactly where rubbing occurs. Apply lipstick or chalk to the frame where contact happens, then close the door. The mark transfers to the door surface, showing you exactly where to remove material.
Sand or Plane the High Spot
For top-corner rubbing, use a hand plane, belt sander, or Surform tool to remove material. Work in 1/16-inch increments and test after each pass. Finish with 120 to 220 grit sandpaper for a smooth surface.
User Win: “Sanded the top corner with a belt sander—fixed it in 10 minutes.” – u/Fiddler017
For bottom dragging, a power planer delivers even removal across the entire width. Maintain a 1/2-inch to 3/4-inch gap from the floor.
Pro Move: Plane the door in place if only the top corner rubs slightly. Clamp a straightedge as a guide to ensure even cuts.
Adjust the Strike Plate
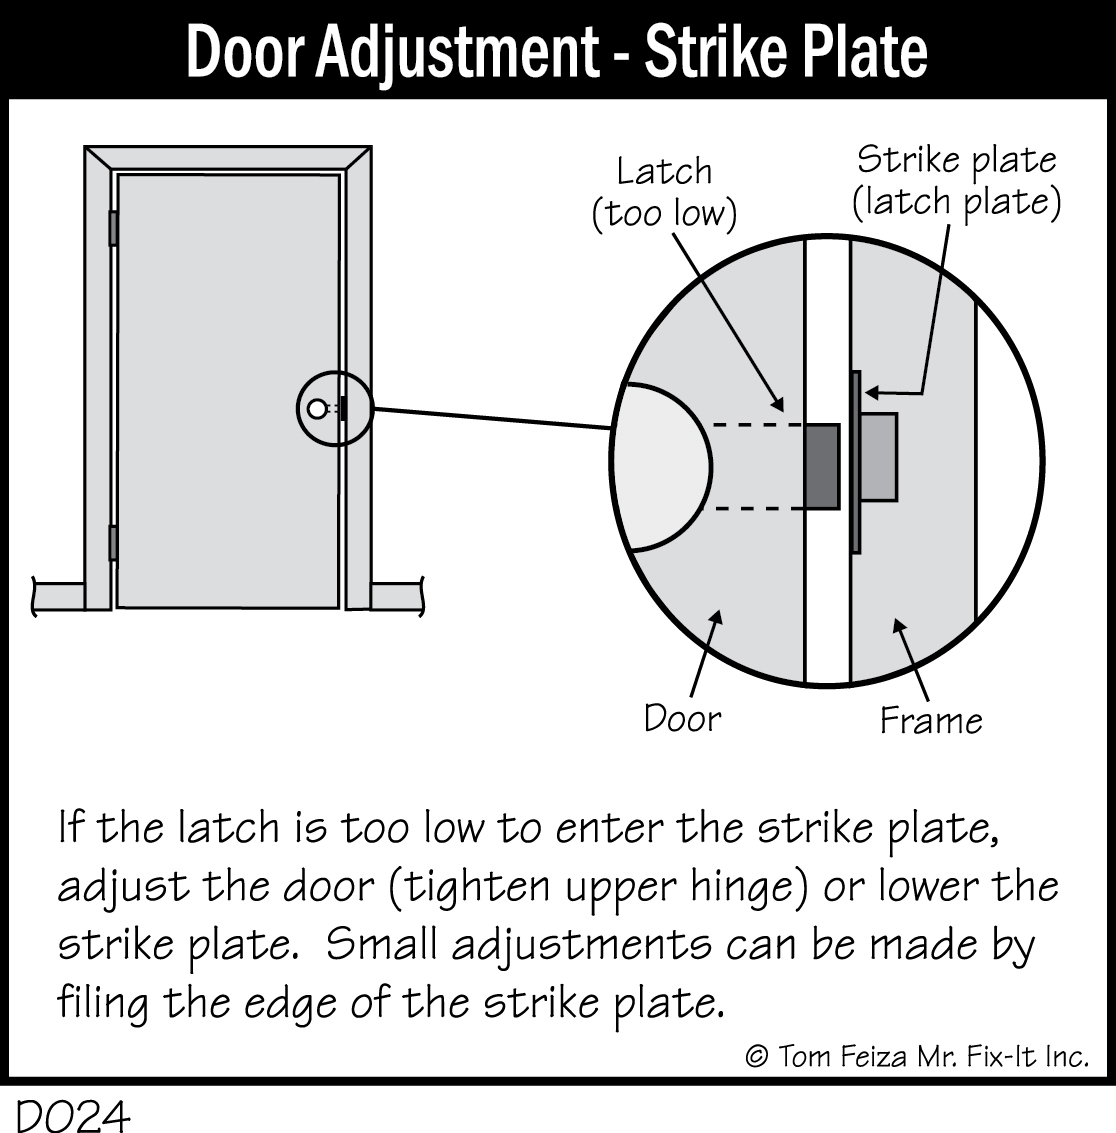
A door that closes but won’t latch almost always has a strike plate problem. The latch bolt isn’t meeting the plate correctly.
Reposition the Strike Plate
Check if the latch bolt hits the plate squarely. If it’s too high or too low, loosen the screws and shift the plate up or down. Fill old screw holes with toothpicks and wood glue if gaps appear when you remount the plate.
Enlarge the Strike Plate Hole
Use a metal file or drill bit to widen the hole if the bolt scrapes against the edge. Chisel out the mortise deeper if the bolt doesn’t extend fully into the plate.
Warning: Never bend the strike plate with a hammer. This weakens the metal and can cause it to fail over time.
Reset the Door Jamb
If the entire frame has shifted, a gentle nudge can restore proper alignment without removing the door.
Tap the Frame Back Into Place
Use a 3-pound sledgehammer and a wood block against the top hinge side of the jamb. Tap gently to move the jamb inward and test the door after each adjustment.
User Fix: “Hit the upper frame with a hammer using a board. Fixed the gap—just filled small trim cracks with caulk.” – u/Faccuracy
Avoid: Never hammer the top jamb outward. This can separate it from the side jambs and create visible gaps in the trim.
Reinforce Loose Door Jambs

A wobbly jamb needs structural support to stay in place permanently.
Screw Into Wall Studs
Drive 3-inch screws through the hinge jamb directly into the wall studs. Pre-drill first to prevent splitting, and use shims behind the jamb if it’s not flush with the wall surface.
Key Insight: If multiple doors in your home stick, it may indicate house settling rather than just loose hardware.
Lubricate Hinges and Latch
Friction can make closing feel stiff even when alignment is perfect.
Apply Dry Lubricant
Use silicone spray or powdered graphite on hinge knuckles, the latch bolt, and the spring mechanism. Avoid oil-based lubricants since they attract dust and create gummy buildup.
User Tip: “Rub soap on the top corner—it slides smoothly now.” – u/KatAtWork
Try the Bar Soap Hack
No lubricant on hand? Rub bar soap directly on rubbing spots or hinges. It acts as a dry, temporary lubricant that works surprisingly well.
Fix Swollen Wooden Doors
Humidity causes wood to expand, especially in bathrooms and during rainy seasons. This seasonal swelling is a common reason a door suddenly won’t close properly.
Sand Swollen Areas
Focus on the top corner or edge where contact occurs. Start with coarse 40 to 60 grit sandpaper for quick material removal, then switch to fine grit for finishing. Reapply paint or finish to protect the exposed bare wood.
Prevent Future Swelling
Improve room ventilation using a fan or dehumidifier. Install a door sweep that allows a small bottom gap. Consider replacing wooden doors with engineered wood or steel in high-moisture areas.
Seasonal Tip: Check doors every spring and fall. Make adjustments as needed when humidity levels shift.
Check Under-Door Clearance
Improper floor clearance causes dragging, especially after installing new flooring.
Ideal Gap Sizes
Interior doors need 1/2-inch to 3/4-inch from the floor. Exterior doors should have 3/4-inch maximum to maintain weatherstripping effectiveness.
Trim the Door Bottom
If the gap is too tight, remove the door and use a power planer for even cuts. Sand in place with a belt sander and straightedge guide if removing the door isn’t practical.
If the gap is too large, install an adjustable door shoe or threshold seal to fill the space.
When to Call a Professional
Some door problems go beyond simple DIY fixes.
Signs You Need a Pro
Call a carpenter if the frame is visibly out of square, multiple doors stick throughout your home indicating structural movement, foundation cracks are present, or the door is fire-rated or security-grade where modifications could void certification.
Expert Advice: “If you just bought the house, talk to your realtor. This could be house settling.” – u/ferretkona
Serious Fix: In extreme cases, repair of the foundation may be necessary. – u/TexasBaconMan
Frequently Asked Questions About Fixing a Door Not Closing Properly
Why does my door suddenly won’t close properly?
Sudden closing problems usually stem from loose hinge screws, seasonal humidity causing wood to swell, or house settling shifting the frame. Check hinges first since this is the most common cause and the easiest fix.
Can I fix a door that drags on the floor without removing it?
Yes. You can shim the bottom hinge to lift the door slightly, or use a power planer to shave the bottom edge while the door hangs in place. The shim method works best for minor adjustments under 1/8 inch.
How do I know if my door problem is caused by house settling?
If multiple doors throughout your home stick or won’t close properly at the same time, house settling is likely the culprit. Single door issues are usually isolated to that specific door or its hardware.
Should I use oil or silicone lubricant on door hinges?
Use silicone-based spray or powdered graphite. Oil-based lubricants attract dust and dirt, creating gummy buildup that actually increases friction over time.
How much material can I remove when planing a door edge?
Remove material in small increments, starting with 1/16 inch at a time. Test fit after each pass. It’s easy to remove more material but impossible to add it back, so err on the side of caution.
When should I replace the door instead of repairing it?
Replace the door if it’s warped beyond correction, has water damage, is older than 30 years with persistent issues, or if repairs would cost more than replacement. Security and fire-rated doors should always be replaced rather than modified.
Key Takeaways for Fixing Your Door
Most doors that won’t close properly can be fixed with basic tools and a systematic approach. Start with the simplest solutions first: tighten all hinge screws, then try the long screw technique for sagging doors, followed by shimming if needed. For persistent rubbing at the top corner, planing or sanding the door edge is the most reliable permanent fix. Remember to check for seasonal swelling in wooden doors and lubricate hinges annually to prevent future problems. Cut conservatively when modifying door material, and always test fit frequently during adjustments. With these proven methods, your door will close smoothly again without requiring a professional.


