
A garage door that refuses to close is frustrating, inconvenient, and a genuine security concern for your home. Whether your door starts to close and immediately reverses, sits completely unresponsive, or only works when you hold the wall button down, understanding how to fix garage door not closing issues saves you time and money. The good news is that over 80% of these problems stem from the safety sensor system, meaning you can likely resolve this without calling a professional.
This comprehensive guide walks you through every possible cause, from sensor misalignment to track binding, with step-by-step fixes you can complete in under an hour. We’ll cover diagnostic techniques, specific repair procedures, and the warning signs that mean it’s time to bring in a pro.
Diagnose Why Your Garage Door Won’t Close
Before attempting any repairs, identify the specific symptom pattern your door exhibits. This determines your troubleshooting path and saves wasted effort on irrelevant fixes.
The three primary symptom patterns include doors that begin closing but immediately reverse, doors that show no response at all when remote or wall buttons are pressed, and doors that move slightly then stop or reverse mid-cycle. Each pattern points to different underlying causes. If your door reverses after starting to close, the safety sensors are almost certainly the culprit. If nothing happens when you press the button, check power and trolley engagement first. Doors that hesitate or bind often have mechanical issues requiring track or roller attention.
A simple diagnostic test involves pressing and holding the wall button. If the door closes while you hold the button, the safety sensor system is being bypassed, confirming a sensor-related issue rather than a mechanical problem.
Fix Misaligned Safety Sensors
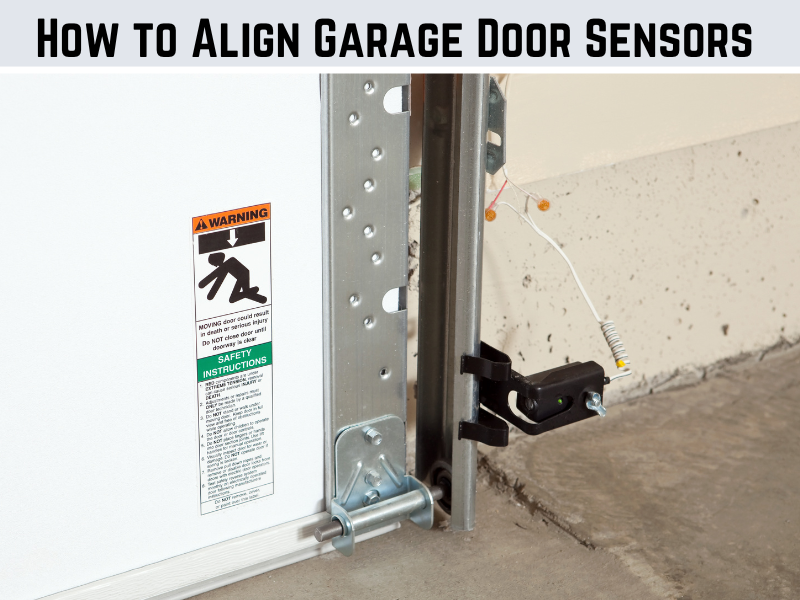
Misaligned photoelectric sensors rank as the number one reason a garage door won’t close. Federal safety standard UL 325 mandates these sensors on all openers manufactured after 1993, and even a slight bump can knock them out of alignment.
Locate the sensors mounted about 6 inches above the garage floor on both sides of the door tracks. Check the LED indicator lights on each sensor. Both should glow solid green or yellow. If one LED is off, blinking, or showing red, alignment is the problem.
Loosen the mounting bracket screws on both sensors slightly. Gently adjust the sensor angle until both indicator lights turn solid and stay steady. Hold the position while retightening the screws. Test the door operation immediately after securing the alignment.
Even a misalignment as small as 1/8 inch or 1 to 2 degrees of angular deviation can break the infrared beam and prevent closure. Use a level to ensure both sensors sit at identical heights facing directly across the doorway.
Clean Dirty Sensor Lenses
Dust, spiderwebs, condensation, frost, or grime accumulation on sensor lenses blocks the infrared beam even when alignment appears correct. This obstruction mimics a broken sensor, triggering immediate reversal.
Turn off power to the garage door opener before cleaning the lenses. Wipe each sensor lens gently with a microfiber cloth. For stubborn residue, apply a mild glass cleaner and wipe dry with a separate clean cloth. Ensure lenses are completely dry before restoring power.
Cleaning resolves approximately 60% of sensor-related closure issues according to user reports. Perform this simple maintenance monthly to prevent recurring problems.
Block Sunlight Interference on Sensors
Direct sunlight hitting the sensor receiver during morning or evening hours can overwhelm the infrared signal, causing the system to interpret this as a blocked beam. This interference commonly occurs when the sun angle aligns with the sensor position.
Test for sunlight interference by attempting to close the door at night. If it works at night but fails during daylight hours, sunlight is likely the culprit. Create simple DIY shields using black electrical tape, plastic tubing, or cardboard flaps over each sensor unit. Commercial sun shields cost $10 to $15 and install in minutes.
Position sensors slightly if your mounting brackets allow adjustment. Choose a position less likely to receive direct sunlight during peak morning and evening hours.
Test and Replace Faulty Sensors
Sensors can fail internally even when LED indicators appear normal. If alignment, cleaning, and sunlight fixes don’t resolve the issue, the sensor units themselves may be defective.
Replace both sensors as a set rather than individually, even if only one appears faulty. Purchase OEM or manufacturer-matched sensors for your specific opener brand. Replacement sensors cost $20 to $50 and take 15 to 30 minutes to install.
The replacement process involves unplugging the opener, disconnecting the wire harness from old sensors, connecting new sensors matching wire colors, mounting securely, and testing alignment. Ensure both new sensor LEDs glow solid before tightening mounting screws.
Inspect Sensor Wiring for Damage

Loose, cut, or poorly spliced wires interrupt the signal between sensors and the opener. Many installers cut factory wires and splice them with wire nuts, creating weak points that fail over time.
Follow the sensor wire path from each sensor to the opener unit. Inspect for fraying, cuts, or loose connections at wire nut junctions. Gently wiggle each wire section while observing the door operation. Intermittent response indicates a broken wire at that location.
Repair damaged sections with new wire nuts, electrical tape, or butt connectors. Secure all wiring away from sharp edges and moving parts. Many intermittent sensor failures traced to wiring resolve completely after proper connection repair.
Adjust Down Travel Limit and Close Force
Incorrect limit settings cause doors to stop short of the floor or reverse after contacting the floor. The down travel limit controls closing distance, while the close force determines how much resistance triggers auto-reverse.
Locate limit adjustment screws on the opener motor unit, typically labeled “Up” and “Down.” Turn the down travel limit screw clockwise in quarter-turn increments, testing after each adjustment. The door should close fully and compress the bottom rubber seal slightly without reversing.
Find the close force dial on the opener and turn it clockwise slightly to increase downward pressure. Test with a 2×4 board on the floor. The door must still reverse upon contacting the board to maintain safety compliance.
Never over-tighten these settings. Excessive force damages the motor, gears, and door components. The door must still reverse when encountering a 1.5-inch obstruction to meet safety standards.
Fix Binding or Misaligned Tracks and Rollers
Door binding in the track triggers safety reversals because the opener interprets resistance as an obstruction. Inspect tracks for dents, bends, or loose mounting brackets that cause rollers to rub or jump.
Loosen track mounting bolts and gently tap bent sections back into alignment using a rubber mallet. Ensure tracks slope slightly downward toward the garage opening for proper water drainage. Retighten bolts after alignment.
Lubricate rollers, hinges, and tracks using silicone spray or white lithium grease. Avoid WD-40, which removes existing lubricant and attracts dust and debris, creating more problems. Spray the entire length of each track for consistent lubrication.
Test Door Balance and Spring Tension
An unbalanced door strains the opener and causes erratic operation. Test balance by pulling the red emergency release cord to disconnect the opener. Manually raise the door halfway and release it. If the door drifts up or down on its own, spring tension needs adjustment.
Torsion springs above the header and extension springs on either side of the door both affect balance. Look for visible gaps, sags, or broken coils as signs of spring failure.
Never adjust or replace springs yourself. These components store 150 to 200 pounds of tension and cause severe injury or death if they release unexpectedly. Call a professional garage door technician for any spring work.
Reset Power and Reprogram the Opener
Power surges or glitches can corrupt the opener’s internal logic, causing erratic behavior that mimics mechanical or sensor problems. A simple power reset clears temporary faults.
Unplug the opener from the electrical outlet. Wait 10 to 30 seconds, or up to 24 hours for stubborn issues. Plug the opener back in and test door operation.
Power outages sometimes reset rolling-code systems, requiring remote reprogramming. Press the “Learn” or “Smart” button on the opener until the indicator light flashes. Within 30 seconds, press and hold a remote button until the opener light blinks or clicks. Repeat for additional remotes and keypads.
Replace remote batteries before troubleshooting remote-related issues. Dead batteries account for the majority of remote malfunction reports.
Check for Physical Obstructions
Small objects in the door path trigger sensor reversal or cause mechanical binding. Inspect the garage floor and door frame for toys, tools, boxes, snow, ice, or debris.
Check for protruding nails, screws, or flashing that creates resistance when the door contacts the floor. Some users report finish nails in the door frame flashing causing enough resistance to stop closure.
Manually close the door to test for binding. If manual closure is difficult or jerky, inspect tracks, rollers, and hinges for obstruction or damage.
Perform Preventative Maintenance
Regular maintenance prevents most closure issues and extends component life. Clean sensor lenses monthly and verify alignment at the same time.
Lubricate rollers, hinges, and springs every six months using silicone spray or white lithium grease. Test auto-reverse functionality quarterly by placing a 2×4 board on the floor and closing the door. The door must reverse upon contacting the board.
Inspect tracks quarterly for damage, and check cables and springs annually for wear. Replace remote batteries yearly regardless of whether they appear weak.
Know When to Call a Professional
Certain repairs require professional expertise and specialized tools. Call a garage door technician if you notice broken torsion or extension springs, severely bent tracks, loud grinding noises from the opener, or door imbalance when tested manually.
Repeated auto-reverse with no visible cause after thorough troubleshooting may indicate internal sensor failure or logic board problems. These electronic issues benefit from professional diagnosis and replacement.
Professional technicians identify root causes quickly and ensure long-term reliable operation. Attempting high-tension component repairs yourself risks serious injury.
Secure the Door Temporarily
If repairs require time or professional scheduling, secure your garage manually. Engage built-in slide bolts or keyed locks if your door includes them.
Insert a carriage bolt or padlock through pre-drilled holes in the vertical tracks to prevent lifting. Alternatively, clamp a C-clamp to the track above the trolley to lock it in place, but only when the door is fully closed.
These measures provide temporary security while you arrange proper repairs. They are not long-term solutions for a malfunctioning garage door.
Frequently Asked Questions About Garage Door Not Closing
Why does my garage door reverse immediately after starting to close?
This behavior indicates the safety sensor system detected an interruption. The photoelectric eyes either need realignment, cleaning, or replacement. Check that both sensor LEDs glow solid and that nothing blocks the infrared beam between them.
Can I fix a garage door that won’t close myself?
Yes, over 80% of closure issues resolve without professional help. Start with sensor inspection and cleaning, then progress through alignment checks, power resets, and mechanical inspections. Only spring adjustments, cable repairs, and major track replacement require pros.
How do I know if my garage door sensors are bad?
Test by cleaning lenses and verifying alignment. If both LEDs show solid lights but the door still reverses, swap the sensors with known working units from a neighbor or test new sensors. Internal failure sometimes occurs despite normal-looking indicator lights.
Why does my garage door only close when I hold the wall button?
Holding the wall button bypasses the safety sensor system, confirming the problem lies with the photoelectric eyes. Inspect sensor alignment, clean lenses, check for sunlight interference, and verify wiring connections.
What does it mean when the garage door opener flashes six times?
Six flashing lights on LiftMaster and Chamberlain openers indicate a safety sensor fault. Inspect sensor alignment, clean lenses, check wiring, and replace sensors if necessary. Consult your owner’s manual for brand-specific flash code meanings.
Key Takeaways for Fixing Your Garage Door Not Closing

Most garage door closure problems stem from the safety sensor system, making alignment, cleaning, and wiring inspection your first troubleshooting steps. A methodical approach starting with the simplest fixes saves time and prevents unnecessary parts purchases.
Regular maintenance, including monthly sensor cleaning and semi-annual lubrication, prevents the majority of closure issues from developing. Document your opener’s model number and keep replacement sensors on hand for quick repairs.
However, never attempt spring or torsion adjustments yourself due to the extreme tension involved. When mechanical binding, track damage, or electronic failures cause persistent problems, professional service ensures safe and lasting repairs. Your garage door is the largest moving element in your home, and protecting your family by maintaining its safe operation matters most.


