
Is your front door letting in cold drafts, outdoor noise, or rising energy bills? You are not alone. Many homeowners overlook one of the simplest and most cost-effective fixes: installing door weatherstripping. Properly applied weatherstripping seals the gaps between your door and frame, blocking air leaks, improving comfort, and cutting heating and cooling costs by up to 20%. Whether you are dealing with a creaky exterior door or a drafty interior passage, this guide walks you through every step so you can achieve a tight, long-lasting seal without guesswork.
We will cover all major weatherstripping types, tools needed, precise installation techniques, and smart workarounds for tricky situations like non-removable hinges. By the end, you will know exactly how to install door weatherstripping for maximum efficiency, durability, and smooth operation.
Choose the Right Weatherstripping Type
Selecting the correct weatherstripping is critical for performance and longevity. Different materials and designs work best in specific locations and conditions. Prioritize durability for entry doors exposed to sun, rain, or temperature swings.
Match Type to Location and Use
Weatherstripping is not one-size-fits-all. Each type serves a unique purpose:
- Sides and top: V-strip, adhesive foam, or magnetic seals
- Bottom edge: Door sweeps or kerf-mounted seals
- Threshold: Bulb seals or adjustable thresholds
- Interior doors: Foam or felt for low traffic areas
- Exterior doors: Silicone, rubber, or metal-backed options for high durability
Avoid foam tape on exterior surfaces because it degrades quickly in damp or sunny conditions.
Compare Top Weatherstrip Options
Foam tape works well as a quick fix for interior doors or seasonal sealing. It is cheap, easy to apply, and widely available. However, it lasts only one to three years and fails in damp or sunny areas. Use it for temporary fixes, not long-term solutions.
V-strip offers durable sealing for jambs. Also called tension seal, it features two flexible vinyl fins in a metal or plastic channel. It lasts over five years, resists weather, and maintains compression. Cut to size with tin snips.
Door sweeps close the largest air leak at the door base. Screw-on aluminum or vinyl sweeps with rubber, brush, or fin seals are most durable. For pre-hung doors with a factory groove, use a kerf-mounted seal.
Magnetic weatherstripping delivers superior performance by bonding to steel frames. It is self-aligning, low-friction, and lasts eight to ten years. However, it requires a compatible metal frame and precise installation.
Silicone and rubber outperform foam in harsh climates. They resist UV rays, stay flexible from -40°F to +200°F, and last five to ten years.
Prepare the Door and Frame
Skipping prep leads to poor adhesion and early failure. Take time to clean and inspect before installing any seal. Over 70% of adhesive failures stem from poor surface prep.
Remove Old Weatherstripping Completely
Start at the top jamb and pull down. Use needle-nose pliers for spline-type seals stuck in grooves. If paint has sealed the strip, carefully cut it out with a utility knife. Scrape away residue with a putty knife. For adhesive leftovers, use rubbing alcohol or a commercial remover, but test first on a small area.
Warning: Deteriorated seals may signal deeper issues like warping or hinge misalignment. Fix those problems first.
Clean Surfaces Thoroughly
Dust, grease, and moisture are the enemies of adhesion. Wipe all installation areas with isopropyl alcohol and a lint-free cloth. Let dry completely. This step is crucial for foam, magnetic, and silicone tapes.
Inspect Door Alignment and Condition
Check for warping or swelling, loose or worn hinges, gaps at the threshold, and pre-cut kerf in the door bottom. Use a level to verify the door is plumb. If it sags or sticks, adjust hinges or add shims before weatherstripping. A misaligned door will crush seals unevenly or prevent closure.
Measure Accurately for Perfect Fit
Use a metal tape measure to record height of both side jambs, width of the head jamb, and door bottom width for sweeps. Add 1/8 inch if splicing. Never stretch material. Cut precisely with scissors, a utility knife, or tin snips depending on the type.
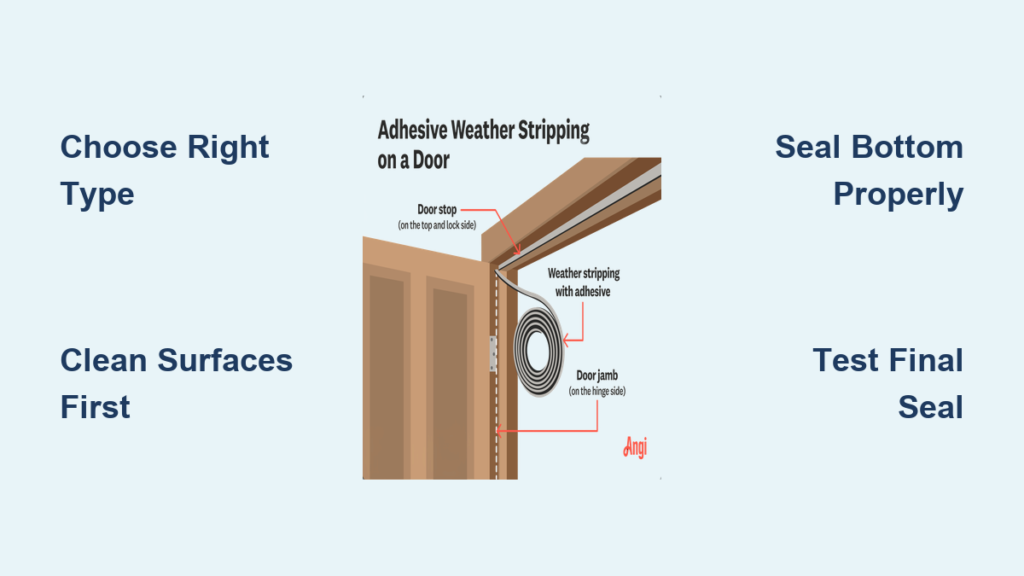
Install Weatherstripping on Sides and Top
Sealing the vertical and top edges prevents air from sneaking around the door. Install on the door stop, not the frame side, for better compression and easier maintenance.
Apply Foam Tape Correctly
Clean the door stop or jamb surface. Cut tape slightly longer than the jamb. Peel the backing slowly and press firmly as you go. Use short sections under three feet to avoid exposed adhesive. Overlap side strips over the top at corners for a continuous seal. Close the door gently to test compression. It should feel snug but not bind. Trim excess with a utility knife.
Install V-Strip with Precision
Cut the channel to match jamb height using tin snips. Position at the top corner so fins compress when the door closes. Secure with 1/2 inch finish nails or #4 screws at top, middle, and bottom. Check that fins contact the door evenly along the full height. Adjust position if gaps remain, but do not overtighten screws.
Use Magnetic Strip for Superior Seal
Clean the steel frame with alcohol. Measure and cut the strip per manufacturer instructions. Peel the liner and press firmly into place. Test the magnetic pull and door closure. Adjust height if the seal is too tight or loose. This method only works on metal frames. Avoid on wood or fiberglass unless reinforced.
Seal the Door Bottom Effectively

The gap under the door is often the biggest source of air leakage. The largest air leak occurs at the base of entry doors.
Choose the Right Bottom Seal Type
Different bottom seals work better for different situations:
- Screw-on sweep: Best for exterior doors, requires drilling into door edge
- Kerf-mounted seal: Best for pre-grooved doors, press-fit into factory groove
- Face-mounted sweep: Best for non-removable hinges, screws into bottom face
- Threshold bulb seal: Best for adjustable thresholds, mounts to threshold not door
Install a Screw-On Door Sweep
Hold the sweep against the door bottom edge. Align it with the door width and mark pilot holes. Pre-drill holes slightly smaller than the screws to prevent splitting. Drive #6 or #8 screws evenly across the width. Test operation. The sweep should lightly touch the threshold without dragging.
On solid-core or composite doors, pre-drilling is essential. A 5/16 inch flange can split wood if not properly prepared.
Fit a Kerf-Mounted Seal
Confirm groove size, common is 1/4 inch by 1/2 inch. Cut the seal to exact door width. Insert into the groove. Tap gently with a rubber mallet if needed. Ensure even protrusion below the door for full threshold contact.
The M-D Building Products 43820 fits many ThermaTru and pre-hung doors with double kerf.
Use a Face-Mounted Sweep When Door Cannot Be Removed
Some modern entry doors use security hinges with non-removable pins, making bottom access impossible. Instead of gluing, install a face-mounted sweep. Attach the sweep to the bottom face of the door. Use a right-angle drill or flexible driver to screw upward into the door edge. This avoids removing the slab while ensuring mechanical fastening.
If you glue it, it will be difficult to replace later. Mechanical fasteners are always better.
Handle Non-Removable Hinges Smartly
:max_bytes(150000):strip_icc()/SPR-how-to-replace-door-sweep-without-removing-door-5195079-Hero-A-e32600b33d0243b790dd6a16a3ae02ce.jpg)
Security hinges prevent door removal, but you still have options. Removing the door gives full access to the bottom edge for stapling or gluing sweeps. It allows use of stronger fastening methods and ensures even alignment. But if hinges lack removable pins, and you are working alone or lack tools, removal may be unsafe or impractical.
Best Workarounds for Inaccessible Doors
Use a face-mounted sweep as the top alternative. It is durable, adjustable, and serviceable. Just ensure you have the right drill attachment.
Delay installation until safe if you are injured, lack help, or the door is too heavy. One user noted they would probably unscrew the hinges when able, with plenty of time before winter.
Avoid construction adhesive like Liquid Nails. While it can hold a sweep, bond strength varies, removal is difficult, and oozing adhesive creates an uneven seal. Mechanical fasteners are always better.
Finish Corners for a Complete Seal
Corners are weak points. Seal them properly to stop leaks. Watch multiple videos on weatherstripping corner installation because many skip this step, but it is critical for performance.
Overlap Strips at Top-Down Junctions
Install the top jamb strip first, then run side strips so they overlap the top at both corners. This creates a continuous barrier and prevents air bypass.
Miter Tape Ends at 45 Degrees
For foam or silicone tape, cut ends at 45 degree angles and butt them together neatly. This reduces bulging and improves appearance. Use a utility knife for clean cuts.
Use Corner Connectors for Bulb Seals
Some tubular or bulb seals come with plastic corner pieces. Snap them in to maintain seal integrity around bends. If not available, compress the material carefully. Avoid kinking.
Test and Adjust the Final Seal
A perfect install means smooth operation and no drafts. Close the door slowly to test.
Check for Air Leaks
Use these methods to detect leaks. Pass your hand around the perimeter and feel for drafts. Hold a lit incense stick or candle near seams and watch for smoke movement. Use a thermal leak detector if available. Focus on the threshold, corners, and top jamb.
Verify Proper Compression
Foam tape should compress by about one-third of its thickness. V-strip fins should deflect slightly but not flatten. Door sweep should touch the threshold lightly with no dragging.
Fix Common Issues
Door will not close? Weatherstrip is too thick. Replace with a thinner model or move it slightly away from the edge.
Gaps remain? Check door alignment. Shim hinges or install an adjustable threshold.
Sweep drags? Trim the sweep, sand the bottom, or install a threshold ramp.
Seal peels off? Surface was dirty or damp. Clean and reapply, or switch to screws.
Maintain Weatherstripping for Long Life
Even the best install fails without upkeep. Inspect all seals before winter.
Inspect Annually
Look for cracks, hardening, or gaps. Check for loose screws on sweeps and adhesive lifting. Replace foam and felt every one to three years. Re-tighten screws on V-strips and sweeps.
Clean Gently
Use a damp cloth with mild soap. Avoid harsh chemicals that degrade rubber or silicone.
Re-Caulk the Door Perimeter
Air can leak behind trim. Re-caulk the exterior door frame every three to five years to block hidden gaps.
Lubricate for Smooth Operation
Apply silicone spray to door edges and sweep contact points to reduce friction and wear.
Frequently Asked Questions About Installing Door Weatherstripping
What is the best type of weatherstripping for exterior doors?
Silicone, rubber, or V-strip weatherstripping works best for exterior doors. These materials resist UV rays, temperature extremes, and moisture. They last five to ten years compared to foam tape which degrades in one to three years.
How do I seal the bottom of a door without removing it?
Use a face-mounted door sweep. Attach it to the bottom face of the door using screws driven upward into the edge. This method works with non-removable hinge pins and provides a durable, adjustable seal.
How often should weatherstripping be replaced?
Foam and felt weatherstripping should be replaced every one to three years. Silicone, rubber, and V-strip materials last five to ten years. Inspect annually and replace when you see cracks, hardening, or gaps.
Can I use adhesive foam tape on exterior doors?
Adhesive foam tape is not recommended for exterior doors. It degrades quickly from UV exposure, moisture, and temperature swings. Use silicone, rubber, or metal-backed options for exterior applications.
Why does my door still draft after installing weatherstripping?
Gaps may persist due to poor measurement, uneven door, or warped frame. Check door alignment with a level. Shim hinges or use an adjustable threshold. Also re-caulk the door perimeter because air can leak behind trim.
Key Takeaways for Installing Door Weatherstripping
Installing door weatherstripping is a small task with big rewards. Choose the right type for each location. Prioritize silicone, rubber, or V-strip for exterior doors. Always prepare surfaces thoroughly because over 70% of adhesive failures stem from poor surface prep.
Use mechanical fasteners like screws wherever possible. They provide superior durability and serviceability compared to adhesive-only methods. For bottom seals, remove the door when you can for the best long-term result. If hinges prevent removal, use a face-mounted sweep instead of glue.
Maintain your seals annually. Inspect before winter, clean gently, re-caulk the perimeter, and lubricate moving parts. When in doubt, wait for help rather than using improper methods that damage the door or create hard-to-replace bonds.


