
You’ve just purchased a sleek new door knob only to discover no visible screws on the surface. Unlike traditional models with obvious fasteners, door knobs with hidden screws use concealed grub screws or internal mechanisms that make installation less intuitive. This guide walks you through every step of installing, securing, and troubleshooting a concealed-screw door knob, whether you’re working with knobs or lever handles. You’ll learn how to locate access holes, use the included Allen key, and ensure a secure fit that lasts.
By the end, you’ll confidently handle any concealed-fixing door knob, from identifying all components to testing smooth operation and maintaining your hardware for years to come.
Gather Required Tools and Components
Before touching your door, collect everything needed for the installation. Concealed-screw knobs come with specialized hardware that’s easy to overlook.
Unbox and Identify All Parts
Lay out the complete contents from your package. Most sets include two door knobs or lever handles, an 8mm mortice bar (also called a spindle), two inner roseplates, plastic washers if applicable, and a small Allen key. The Allen key is often stored in a small hole on the knob neck, so check there before assuming it’s missing.
Verify you have all components before proceeding. If instructions are missing, don’t worry—the process is straightforward once you understand the mechanism.
Confirm Your Door Is Ready for Installation
Ensure your door meets the following requirements before beginning. You need a 2-1/8 inch bore hole through the face of the door, a cross bore on the edge for the tubular latch, and proper cutouts for the roseplate and strike plate.
If you’re installing a new latch, do so now. Slide the tubular latch into the edge bore and secure it with the provided screws. Test that the latch bolt extends and retracts smoothly when pressed.
Insert the Mortice Bar Through the Door
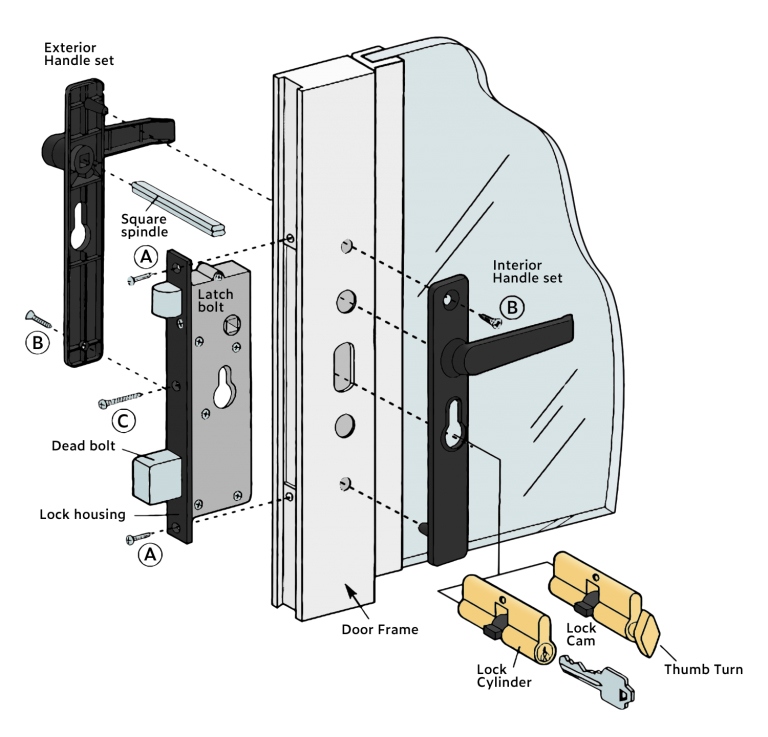
The mortice bar connects both sides of the knob and activates the latch mechanism. Getting this positioned correctly is critical for proper function.
Slide the Spindle Through the Bore Hole
Push the 8mm mortice bar through the center bore hole from one side of the door to the other. It should pass cleanly and align with the slot in the tubular latch.
The ends of the spindle often have grooves or split tips designed to grip the internal mechanism of the latch. Ensure these engage properly with the latch slot.
If the bar doesn’t turn the latch when tested, rotate it 90 degrees. Some spindles only connect in one orientation.
Position Inner Roseplates on Both Sides
The roseplate covers the base hardware and provides a clean, finished appearance against the door surface.
Align Roseplates Flush to the Door
Place one inner roseplate over each end of the protruding mortice bar. Position them so they sit flat against the door with no gaps or wobble.
Some models include splines or tabs that must align with slots in the knob base. Note their orientation before proceeding.
If your model uses a two-piece rose (inner and outer), install the inner section first. The outer cap usually snaps or screws on after the knob is secured.
Slide the Knobs onto the Mortice Bar
Now it’s time to attach the actual knobs or lever handles to the assembly.
Attach Knobs or Levers to the Spindle
Slide each knob onto the exposed end of the mortice bar. Rotate them into the correct position. For lever handles, they should rest horizontally when the door is unlocked.
Watch for alignment marks. Some manufacturers etch dots or lines on the knob and rose to indicate proper positioning.
If the knob resists sliding on, check for obstructions like paint or debris on the spindle. Clean any buildup before forcing the fit.
Tighten the Hidden Grub Screw

This is the core of the concealed-screw system. The grub screw (or set screw) is hidden inside a small access hole and secures the knob to the mortice bar.
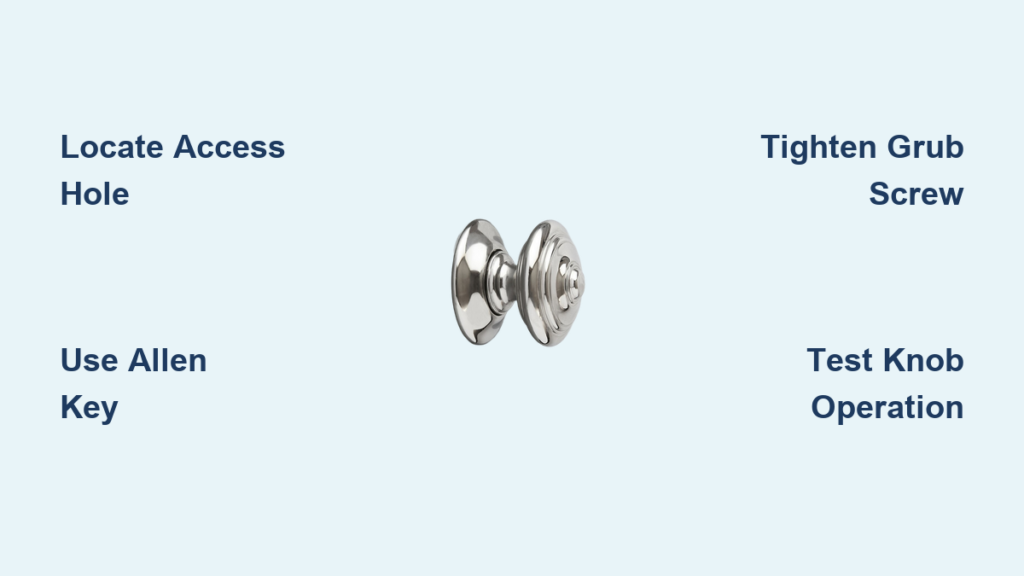
Locate the Access Hole
Look for a tiny hole on the side of the knob neck, usually near the base where the knob meets the rose. This is where the Allen key inserts.
Common locations include the side of the knob stem, the underside of a lever handle, or occasionally the edge of the roseplate. Use a flashlight to confirm the hole isn’t just a decorative dimple.
Insert the Allen Key and Secure the Knob
Take the 1.5mm or 2mm Allen key (usually included with your hardware) and insert it into the hole. Turn clockwise to tighten the internal grub screw against the mortice bar.
Only tighten until snug. Over-tightening can strip the threads or deform the spindle.
Repeat on the opposite side if both knobs have access holes. Some models only require one side to be secured, while the other is friction-fit or held by the spindle design.
Test the Door Knob Operation
Always test the installation before considering the job complete. A secure fit ensures long-term durability.
Rotate the Knob and Check Latch Action
Turn the knob fully in both directions. The latch bolt should retract completely into the door edge with no binding or sticking.
Release the knob and verify the latch springs back smoothly without hesitation.
Inspect for Wobble or Slippage
Grab the knob and try to rotate it without turning the spindle. If it spins loosely, the grub screw isn’t tight enough, the screw isn’t engaging the spindle groove properly, or the spindle is worn or damaged.
Loosen, reposition, and retighten as needed. Apply a drop of thread locker (Loctite 222) to the grub screw after final adjustment to prevent loosening from daily use.
Troubleshoot Common Installation Issues
Even with clear steps, problems can arise. Here’s how to handle the most frequent issues.
Cannot Access Screw Holes? Try the Opposite Side
Some knobs can only be removed or adjusted from one side, usually the non-keyed interior side. On entry sets with a lock cylinder on the outside, the exterior knob may be fixed, requiring you to disassemble the interior side first.
Always inspect both sides before forcing anything.
Hole Feels Like a Dimple: Is It a Real Screw?
If the Allen key won’t engage, clear the hole with a pin or needle to remove debris. Shine a light inside to look for threads, and try a shorter or thinner hex key (some use 1.27mm).
If still no luck, the “hole” might be a pull-off release point rather than a screw access.
Knob Won’t Come Off After Loosening
Once the grub screw is fully out, pull the knob straight off the spindle. Some require a firm tug due to friction or a splined fit.
Do not twist or pry the knob. This can damage the finish and permanently mar the hardware.
Lever Spins Freely After Installation
This means the grub screw isn’t clamping the spindle properly.
To fix this, remove the lever, check that the spindle groove aligns with the screw, and reinsert and tighten securely. A stripped grub screw hole may need repair with a slightly larger screw or epoxy thread restoration.
Handle Unknown or Unbranded Models
No instructions? No problem. Use this detective approach to figure out any model.
Look for Clues in the Design
Search for small holes or indentations, slight seams around the base, or magnetic properties indicating steel screws beneath the surface. Try inserting a 2mm Allen key into any suspicious hole.
Try the Pull-Off Method
After loosening the grub screw, hold the roseplate steady and pull the knob straight off. Some models use spring clips or snap-fit spindles instead of screws.
Take Photos for Support
If stuck, send clear images to the seller or manufacturer showing a full front view, close-up of the access hole, the opposite side, and the edge of the door with the latch. Most companies respond quickly with model-specific guidance.
Maintain Your Concealed-Screw Door Knob
A well-installed knob should last years, but regular care prevents future issues.
Annual Maintenance Routine
Every 12 months, check grub screw tightness using the Allen key, lubricate the spindle with graphite or silicone spray, and test latch alignment. Adjust the strike plate if needed.
Avoid oil-based lubricants like WD-40 for ongoing maintenance. They attract dust and gum up over time.
Prevent Common Failures
Re-tighten screws on high-traffic doors such as front or bathroom doors. Replace stripped screws promptly to avoid further damage. Register the warranty—many brands offer 5 to 10 year coverage.
Keep the Allen key in a labeled baggie taped inside a kitchen drawer. You’ll thank yourself later when maintenance is needed.
Upgrade to Lever Handles with Hidden Fasteners
Many homeowners prefer lever handles for accessibility and modern style.
Install Lever Handles with Concealed Fixings
The same process applies to levers. Loosen the grub screw under the lever base, slide the lever off the post, then reattach and tighten.
Levers are easier to operate for children, elderly, or those with limited hand strength. Choose models with reinforced spindles and stainless steel screws for heavy-use areas.
Frequently Asked Questions About Installing Door Knobs with Hidden Screws
How do I find the hidden screw on my door knob?
Look for a tiny hole on the side of the knob neck, the underside of a lever handle, or occasionally the edge of the roseplate. Use a flashlight to illuminate the area and confirm it’s an access point rather than a decorative dimple.
What if the Allen key won’t fit in the hole?
Try a shorter or thinner hex key. Some concealed screws use 1.5mm or even 1.27mm keys. Clear any debris from the hole with a pin, and ensure you’re inserting the key straight rather than at an angle.
Can I install a concealed-screw knob on any door?
Your door must have a 2-1/8 inch bore hole through the face and a cross bore on the edge for the tubular latch. Most pre-drilled doors for standard locks will work, but verify measurements before purchasing.
Why does my knob still wobble after tightening?
The grub screw likely isn’t engaging the spindle groove properly. Remove the knob, check that the spindle has a groove or flat side where the screw clamps, and reposition before retightening.
Should I use thread locker on the grub screw?
Yes. Applying a small drop of thread locker (Loctite 222) after final adjustment prevents the screw from loosening over time, especially on high-traffic doors.
Key Takeaways for Installing Door Knobs with Hidden Screws

Installing a door knob with hidden screws doesn’t require advanced skills. The key is locating the grub screw access point, using the included Allen key, and understanding that one side often controls disassembly. Always test operation before finishing, checking that the latch retracts smoothly and the knob has no wobble.
For maintenance, re-tighten grub screws annually and keep the Allen key stored in an accessible location. When in doubt, stop and inspect rather than forcing components. With this guide, you’re fully equipped to handle any concealed-screw door knob, branded or generic, with confidence.


