
Installing a sliding glass door transforms your home’s look, improves natural lighting, and enhances energy efficiency. Whether you’re upgrading an old unit or installing one in a new opening, proper installation is crucial for durability, weather resistance, and smooth operation. This guide focuses on how to install a sliding glass door correctly, step by step, whether in new construction or an existing wall. You’ll learn the right techniques for flashing, leveling, sealing, and adjusting the door to ensure it lasts for decades.
Choose the Right Frame Type for Your Wall
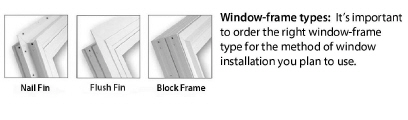
Selecting the correct frame ensures compatibility with your wall structure and long-term performance. The three main frame types serve different installation contexts.
Nail Fin Frame Installation
The nail fin frame works best for wood-frame homes with sheathing. This frame has a built-in flange for direct attachment to studs, making it ideal for new construction or replacing a door with accessible framing. You integrate the flange with weather-resistant barriers using flashing tape, and you must seal it properly to prevent leaks. Use this frame when you can access the studs directly behind the sheathing.
Block or Box Frame Setup
Block frames fit directly into masonry walls made of concrete, brick, or block. You secure this frame with corrosion-resistant anchors or clips. This setup requires precise leveling and full-perimeter sealing with exterior-grade sealant. It’s best used in commercial buildings or high-density residential builds where masonry construction is common.
Flush Flange Frame Fit
Flush flange frames work with clad wood, fiberglass, or vinyl doors installed in masonry openings with wood bucks. Since the frame sits flush, alignment must be exact. You rely entirely on screws driven through the jambs into the buck. This method demands meticulous manual flashing and sealing around all edges.
Prepare for New Construction Installation
New builds give you better control over weatherproofing and structural integration. The timing of door installation affects your flashing strategy.
Install After Building Wrap
Set the door after housewrap is applied. Fasten the nail fin through pre-drilled holes using screws or nails. Apply flexible flashing tape by starting with a continuous strip on the sill, folding up the front edge to create a water pan. Add side flashings, then head flashing, each lapping over the one below in shingle-style fashion. Seal all overlaps with a roller to ensure adhesion. This method protects against water intrusion in standard wood-framed homes.
Work With Water-Resistant Sheathing
When cement board or rigid foam sheathing is already installed, secure the frame directly to the structural framing behind it. Use sealant between the sheathing and frame to bridge any gaps. Flashing must extend from the door flange over the sheathing to direct water outward.
Set Before Applying Weather Barrier
Install the door before wrapping the house. Attach the nailing fin first, then apply the weather barrier over the flange. Finally, install siding so it overlaps the wrap, which in turn overlaps the flange. This creates a seamless drainage plane but requires careful sequencing of each step.
Replace an Existing Door Safely
Retrofitting a sliding glass door involves removing the old unit without damaging surrounding materials. This is the most common scenario for DIYers.
Remove Exterior Trim Carefully
Score along both sides of the trim with a utility knife to cut through paint and caulk. Use a pry bar or oscillating multi-tool to gently lift it off. Try to preserve the trim for reuse, but have replacement cedar or vinyl on hand if damage occurs. Avoid gouging the siding during removal.
Extract the Old Door Unit
Remove any visible screws under weatherstripping or caps. Cut hidden fasteners with a reciprocating saw if needed. Slice through spray foam insulation at the top and sides. Sever nails connecting interior trim to the frame using a multi-tool. Carefully pry the entire assembly out from the opening.
Never perform removal or installation in rain or high wind. Your home will be exposed to the elements, and interior water damage can occur.
Prep the Rough Opening
A clean, structurally sound opening sets the stage for a leak-free installation. This step determines your door’s long-term performance.
Inspect for Damage
Check the header, jambs, and sill for rot, insect damage, or warping. Replace any compromised wood. Confirm the rough opening is level, plumb, and square. Even a 1/8-inch deviation causes operational issues later.
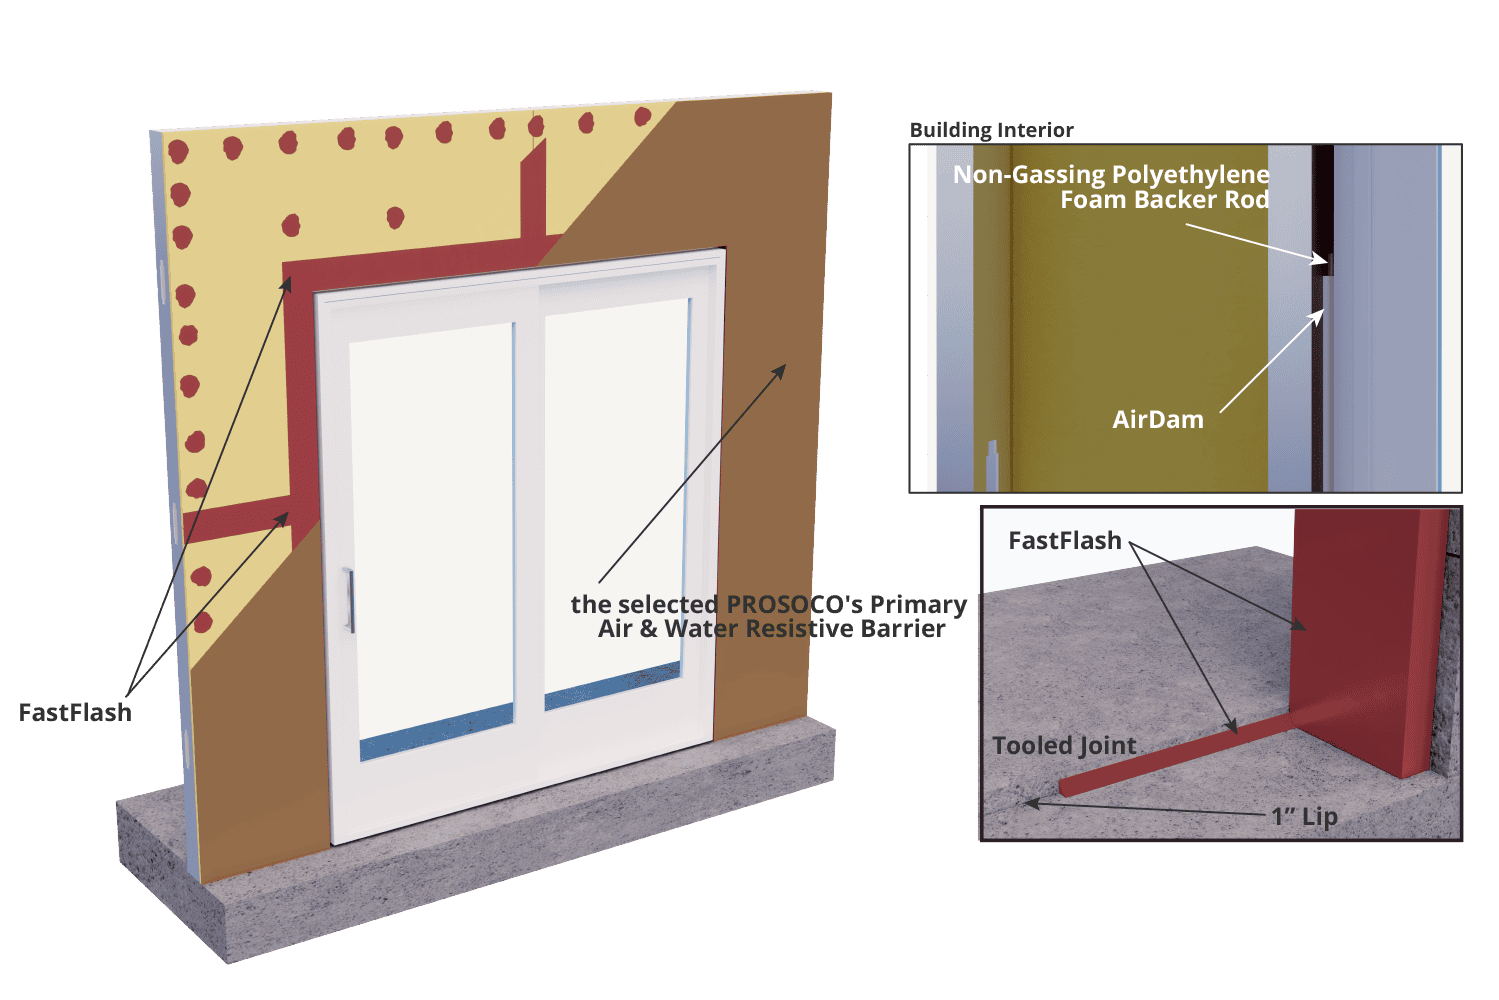
Flash the Opening Thoroughly
Flashing prevents water from entering behind the door, especially critical in retrofits where original flashing may be missing.
Apply Bottom Flashing First
Use self-adhered flashing tape on the threshold. Extend it up the front edge and fold excess upward to form a pan. This catches and redirects any moisture back outside. Never skip this step because it’s your first line of defense against water intrusion.
Use Stretchable Corner Flashing
For inside corners, use premium stretchable membranes. These conform tightly and eliminate weak points at joints. While expensive, they’re worth the investment for long-term protection. Save costs by using standard tape on straight sections and premium flashing only at corners.
Install Side and Head Flashing
Apply vertical strips from bottom to top, lapping each higher piece over the lower one in shingle-style layering. This sheds water effectively. Press seams firmly with a roller to ensure full adhesion.
Set and Secure the New Door
Proper placement ensures structural integrity and smooth sliding action. Take your time with this critical phase.
Apply Sealant to Flange
Run a continuous bead of exterior-grade sealant on the back of the nail flange, just inside the screw holes. This prevents water from wicking behind the flange. Do not seal the bottom because you need to leave it open for drainage.
Position the Door Correctly
With a helper, tilt the door into place. Insert the bottom edge first, then swing the top inward to seat it fully. Make sure the unit is centered and aligned within the rough opening.
Level and Plumb the Frame
Check the top of the frame with a 24-inch level. If uneven, insert composite or wood shims between the frame and rough opening at both ends and the center. Recheck plumb on both vertical jambs. Use the level as a straight edge to confirm the frame lies flat against the wall. Once aligned, temporarily secure with one screw per side through the nailing flange.
Final Fastening Procedure
Drive screws through all flange holes at 12 to 16-inch intervals. Use corrosion-resistant fasteners suitable for your climate and wall type. Do not overtighten because this warps the frame and binds the sliding panel.
Reinstall or Install Trim
Trim finishes the look and seals gaps between the door and wall. Quality trim work makes the installation look professional.
Reattach Interior Trim
If reusing old trim, check for fit. If the new door is shallower, install filler strips to bridge the gap. Nail the filler to the header and jambs, then reattach the original trim over it. Caulk all seams with paintable fast-drying sealant.
Replace Exterior Trim
Install new trim tightly against the door frame. Cedar is popular for durability and aesthetics. Secure with nails or screws, then caulk all joints with exterior-grade sealant. Pay special attention to top corners because they’re common leak points.
Finish and Paint Trim
Fill nail holes and gaps with wood filler. Sand smooth when dry. Prime and paint all trim for weather protection and a seamless finish.
Adjust Door for Smooth Operation
Even a perfectly installed door may need fine-tuning. The adjustment process takes minutes but makes a huge difference.
Tune the Rollers
Locate the adjustment screw at the bottom of the sliding panel. Turn clockwise to raise the door, which pushes wheels down into the track. Turn counterclockwise to lower it. Use this to fix dragging, lifting, or binding.
Test Alignment
Open the door slightly and observe how it rides in the track. It should glide freely without rubbing. Adjust rollers incrementally and test after each turn. Small changes make a big difference.
Meet Egress and Code Standards
Ensure your sliding glass door complies with safety regulations. Building codes exist to protect you and your family.
Can It Be a Primary Exit
Yes, in most areas, a sliding glass door qualifies as a primary egress point in single-family homes. But it must meet International Residential Code requirements. The minimum clear opening width is 20 inches, and the minimum clear opening height is 24 inches. Maximum sill height is 44 inches above the interior floor. The operable panel must provide the full required opening when fully slid open. Always verify local code amendments because some jurisdictions have stricter rules.
Measure Accurately Before Ordering
Getting the size right prevents costly errors. Double-check every measurement before purchasing your door.
Key Dimensions to Take
Measure width inside jamb to inside jamb at top, middle, and bottom. Use the smallest measurement. Measure height from sill to header at left, center, and right. Use the shortest reading. Confirm wall thickness matches the door frame depth. Order a door slightly smaller than the rough opening, typically 1/4 to 1/2 inch less, to allow for shimming and insulation.
Convert Windows to a Door
Turning two windows into a sliding door requires structural work. Remove existing units and framing. Install a properly sized header. Frame a new rough opening per manufacturer specs. In masonry walls, install a lintel or beam. Permits and inspections are usually required for this conversion.
Use the Right Tools and Materials
Having everything ready speeds up the job and reduces mistakes. Gather supplies before starting.
Essential Tools
You need a utility knife for scoring caulk and paint. A pry bar and flat bar help with trim removal. An oscillating multi-tool cuts hidden fasteners cleanly. A 24-inch level levels and checks flatness. A tape measure double-checks all dimensions. A drill/driver drives screws and fasteners. A caulking gun applies sealant. A putty knife and roller press flashing tape. A reciprocating saw cuts metal fasteners if needed.
Critical Materials
Gather your new sliding glass door with the correct frame type. Stock up on self-adhered flashing tape, both standard and corner-specific. Get exterior sealant and fast-drying interior caulk. Purchase wood filler, shims, and corrosion-resistant screws. Have replacement trim and low-expansion spray foam on hand.
Follow Pro Tips for Best Results
Learn from real-world experience to avoid common pitfalls. These insights come from professional installers.
Schedule Installation Wisely
Always work in dry, calm weather. A single rainstorm during removal causes interior water damage. Plan for a full day, because most replacements take 6 to 8 hours with proper preparation.
Donate Old Doors
If the old unit is intact, consider donating it to Habitat for Humanity ReStore. Otherwise, repurpose glass panels for greenhouses or sheds.
Boost Energy Efficiency
Replace old single-pane aluminum doors with modern double-pane, thermally broken units. You gain comfort, reduce drafts, and lower energy bills.
Upgrade Aesthetics
Custom interior trim and exterior cedar trim dramatically increase curb appeal and perceived home value.
Consult Manufacturer Instructions
Always refer to the specific installation manual for your door model. Manufacturer guidelines ensure warranty validity and optimal performance.
Pella Installation Resources
Pella provides detailed installation guides for their 250 Series and Vista Series doors. Supplemental videos are available for visual learners. Instructions cover nail fin, block frame, and flush flange setups. Available in English and Spanish.
Frequently Asked Questions About Installing Sliding Glass Doors
How long does it take to install a sliding glass door?
Most professional installations take 4 to 6 hours. DIYers should plan for 6 to 8 hours with proper preparation. This includes removing the old door, preparing the opening, installing the new unit, and finishing trim work.
Can I install a sliding glass door in a brick wall?
Yes, use a block or box frame designed for masonry walls. Secure it with corrosion-resistant anchors or clips into the brick or concrete. Precision leveling is critical, and full-perimeter sealing with exterior-grade sealant is required.
Do I need a permit to install a sliding glass door?
Permits are typically not required for straightforward replacement in an existing opening. However, if you’re converting windows to a door or modifying the rough opening structurally, permits and inspections are usually required. Always check with your local building department.
How much does professional sliding glass door installation cost?
Professional installation typically costs $300 to $600 for labor, depending on your region and the complexity of the job. The door unit itself ranges from $400 for basic models to $2,500 or more for premium options.
What is the standard rough opening size for a sliding glass door?
Standard sizes range from 5 feet to 6 feet wide, with heights of 6 feet 8 inches or 8 feet. The rough opening should be 1/2 inch larger than the door frame dimensions to allow for shimming and insulation.
How do I know if my sliding glass door meets egress code requirements?
Your door must provide a minimum clear opening of 20 inches wide and 24 inches high when fully opened. The sill height cannot exceed 44 inches above the interior floor. Check your local codes because some areas have additional requirements.
Key Takeaways for Installing Your Sliding Glass Door
Installing a sliding glass door is a high-impact home improvement project that pays dividends in comfort, aesthetics, and energy efficiency. The most critical steps are proper flashing with shingle-style layering, precise leveling and plumbing of the frame, and correct sealant application on the nail flange while leaving the bottom open for drainage. Take time to adjust the rollers after installation because this small step dramatically affects how smoothly the door operates. Follow manufacturer instructions for your specific model, and always verify local building code requirements before starting.
With proper preparation, quality materials, and attention to detail, your new sliding glass door delivers decades of reliable service. The result is a seamless blend of form and function that opens your home to light, air, and beauty.


