
Replacing or installing a prehung door can transform a space, but only if it fits perfectly. Getting the right fit starts with one critical step: accurate measurement. Whether you are upgrading an interior bedroom door or installing a new exterior entry, measuring for a prehung door the right way ensures smooth operation, proper alignment, and a professional finish. Skip this step or do it wrong, and you risk gaps, binding, or even a door that will not close.
This guide walks you through every step, from removing trim to interpreting your numbers, so you can confidently choose and install a prehung door that fits like it was made for the space.
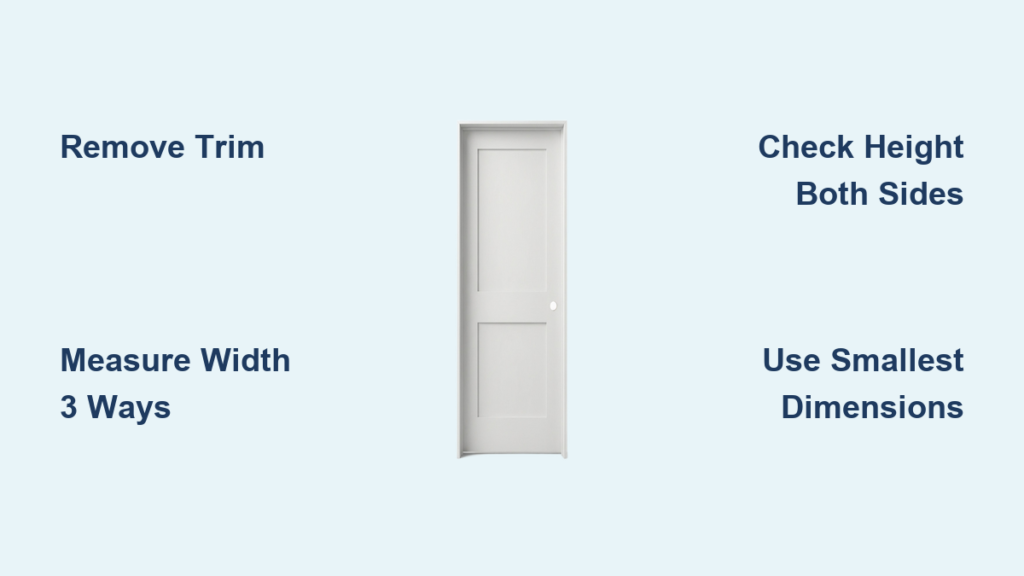
Remove Trim to Expose the Rough Opening
Before measuring for a prehung door, you must access the rough opening. This means removing the existing casing trim around the door.
Use a utility knife to slice through paint or caulk along the trim edge. This prevents wall damage when prying. Then use a pry bar or trim removal tool to gently lift the casing away from the jamb. Work slowly to avoid gouging drywall or plaster.
Only remove trim when measuring for a prehung door. If you are replacing just the slab, leave the frame and trim intact.
Once the trim is off, inspect the opening. Look for rot, water damage, or structural issues, especially with exterior doors. Address any problems before proceeding.
Measure Width at Three Points

Use a tape measure to record the width of the rough opening at three locations. Measure just below the header at the top, at mid-height, and above the floor at the bottom.
Why three points? Walls are not always parallel. One side might bow inward, making the middle narrower than the top or bottom.
Record each measurement in inches and fractions. Then use the smallest value. This guarantees the new door will fit without forcing.
Example measurements:
– Top: 32 1/2 inches
– Middle: 32 3/8 inches
– Bottom: 32 1/4 inches
– Use 32 1/4 inches as your width
Measure Height on Both Sides
Now measure the height from the header to the finished floor on both the left and right sides. Do not measure to subfloor or underlayment. Use the final floor surface, whether hardwood, tile, carpet, or another material.
If the existing jamb extends below the floor, measure to the actual floor level. Take two readings and use the smallest height to ensure clearance.
Example measurements:
– Left side: 79 1/2 inches
– Right side: 79 3/4 inches
– Use 79 1/2 inches as your height
Compare to Standard Door Sizes

Most prehung doors come in standard sizes. Use your smallest recorded dimensions to find the closest match.
Interior prehung door rough openings follow a standard pattern. Add 2 inches to the door width and 2 inches to its height for the rough opening. So a 30-inch wide by 78-inch tall door needs a 32-inch by 80-inch opening.
If your measured rough opening is slightly smaller, a standard prehung door will still fit with careful installation and minimal trimming. One installer replaced 15 interior doors and found that prehung units often fit even in openings up to 1/2 inch undersized.
Standard sizes include:
– 24-inch door: 26 by 80 inch rough opening
– 28-inch door: 30 by 80 inch rough opening
– 30-inch door: 32 by 80 inch rough opening
– 32-inch door: 34 by 80 inch rough opening
– 36-inch door: 38 by 80 inch rough opening
Handle Non-Standard Measurements
Not all openings fit the standard mold. If your measurements do not align with standard sizes, here is how to adapt.
Opening Too Short
If your height is less than 80 inches, do not panic. You have options.
For hollow-core doors, trim no more than 3/4 inch total. Cut equally from top and bottom to prevent imbalance and warping. Solid-core or wood doors can usually handle 1 to 2 inches of trimming. Check manufacturer specs.
After cutting the door, trim the jamb to match. Use a circular saw with a straight edge for clean cuts. Reattach door stops if needed.
For exterior doors, place shims under the threshold to elevate the unit if the floor is low. Avoid stacking more than two shims to prevent instability.
Determine Door Swing and Handing
Getting the swing wrong means your door could block furniture or swing into a wall. Determine handing before ordering.
Stand on the hinge side of the door. Open the door toward you. The hand near the knob determines the swing. Left hand means left-handed. Right hand means right-handed.
Alternatively, if hinges are on the left and door opens inward, it is a left-hand inswing. If hinges are on the right and opens inward, it is a right-hand inswing.
Inswing opens into the room and is most common for interior doors. Outswing opens outward and prevents interference in tight spaces. It is often used for storm doors or security entries.
Pro tip: Mock the swing with a cardboard template. Hold it in place and open it to see how it interacts with nearby furniture, vents, or walls.
Account for Jamb Depth and Wall Thickness
Jamb depth must match your wall thickness. Standard interior walls use 2×4 studs with 1/2-inch drywall on each side, totaling 4-9/16 inches.
Most prehung doors come with 4-9/16-inch jambs. For exterior walls with thicker insulation or sheathing, verify jamb depth before ordering.
A jamb too shallow or deep creates gaps behind the stops. This affects trim fit and weatherproofing for exterior units.
Trim Prehung Door Safely
Sometimes you will need to trim the door or jamb. Follow these guidelines.
Hollow-core doors have limited solid material, only about 1 inch at top and bottom. Maximum trim is 3/4 inch total. Always split the cut between top and bottom. Never cut more than 1 inch from one end.
Solid-core or wood doors typically allow 1 to 2 inches of trimming. Check manufacturer label or documentation. Use a circular saw with masking tape on the cut line to reduce splintering.
For trimming the jamb, use a table saw or circular saw with guide. Cut both side jambs to match door height. Reinstall door stops after cutting.
Use Shims for Perfect Alignment
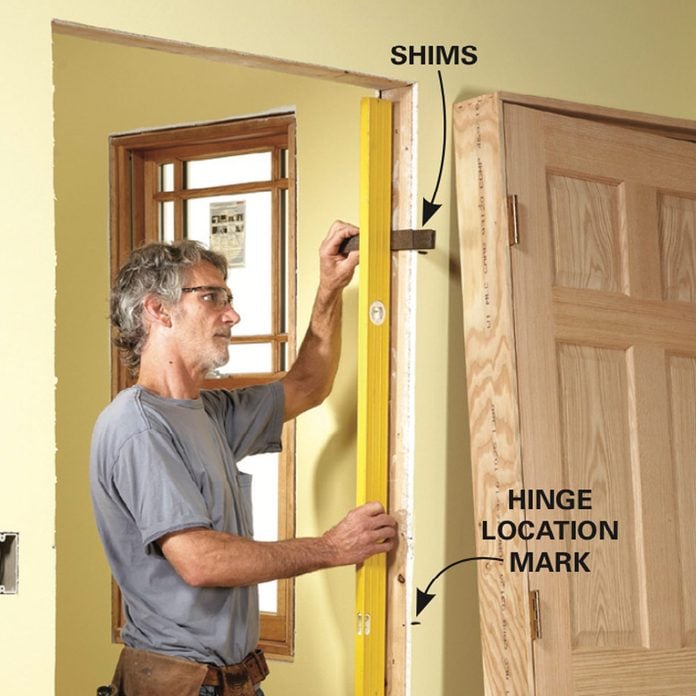
Shims are essential for a square, plumb installation. Place shims at key points. These include top corners near hinges, below each hinge on side jambs, latch side near strike plate, and along threshold for exterior doors.
Alternate sides when driving nails or screws to keep the frame aligned. Use a 4-foot level to check vertical plumb on both jambs and horizontal level across the head jamb.
Avoid over-tightening fasteners. This can warp the frame and cause binding.
Install with Best Practices
Follow these techniques for a flawless result.
Use 6d or 8d casing nails or screws. Drive fasteners through shims into jack studs. Stay at least 1 inch from jamb edge to prevent splitting. Stagger nail locations vertically to avoid weakening the jamb.
For exterior doors, flash the head and sill before installation. Use integrated weatherstripping. Caulk all exterior joints after setting.
Reinstall or replace trim to cover gaps. Adjust hinges or plane edges if the door sticks. Paint primed doors before final mounting to avoid wall scuffs.
Solve Common Installation Problems
Several problems can arise during installation. Here are solutions for the most common issues.
If the floor is uneven or jamb sits below the surface, measure to actual floor and trim jamb or add shims. If the opening is out of square, shim the frame into square before fastening. For limited headroom, trim door minimally or consider low-height custom doors. If a hollow-core door is too tall, order custom or modify the opening. If the swing direction is wrong, verify handing early and use a cardboard mockup.
Choose the Right Door
Most retailers stock standard sizes at The Home Depot, Lowes, and similar stores. If your opening is non-standard, custom prehung doors are available but have longer lead times and higher costs.
Interior hollow-core prehung doors range from $100 to $250. Solid-core interior doors cost $200 to $400. Exterior doors using fiberglass, steel, or wood range from $300 to $1,500.
Look for primed white finish, pre-machined hinge mortises and lock bores, and limited lifetime warranty on frame.
Frequently Asked Questions About Measuring for a Prehung Door
What is the rough opening size for a 36-inch prehung door?
A 36-inch prehung door requires a rough opening that is 38 inches wide and 80 inches tall. The general rule is to add 2 inches to both the door width and height.
Do I need to remove trim to measure for a prehung door?
Yes, you must remove the casing trim to expose the rough opening. This gives you accurate measurements of the actual framed space where the prehung unit will install.
What if my door opening is not exactly 80 inches tall?
If your opening is slightly shorter than 80 inches, you can trim a hollow-core door by up to 3/4 inch or trim the jamb. Solid-core doors allow more trimming. Alternatively, use shims under the threshold to raise the door unit.
How do I determine if I need a left-hand or right-hand door?
Stand on the hinge side of the door. Open the door toward you. The hand near the knob indicates your handing. Left hand means left-handed door. Right hand means right-handed door.
Can I install a prehung door myself?
Yes, with accurate measurements and proper shimming, DIYers can install prehung doors successfully. The process requires basic tools and careful attention to leveling and squaring the frame.
What measurements do I need to provide when ordering a prehung door?
Provide the smallest width measurement from your three width readings and the smallest height measurement from your two height readings. Also specify the door swing direction and your wall thickness to ensure correct jamb depth.
Key Takeaways for Measuring Your Prehung Door
Accurate measurement is the foundation of a successful prehung door installation. Take your time, double-check your numbers, and always use the smallest dimensions to ensure fit. Measure width at three points and height at two points, then use the smallest values when selecting your door.
Remember to determine door swing before ordering and verify that jamb depth matches your wall thickness. Plan for trimming or shimming if your opening falls slightly outside standard sizes. With the right prep, even DIYers can achieve a professional-grade result, saving time on finish work and enjoying a door that opens smoothly for years.


