
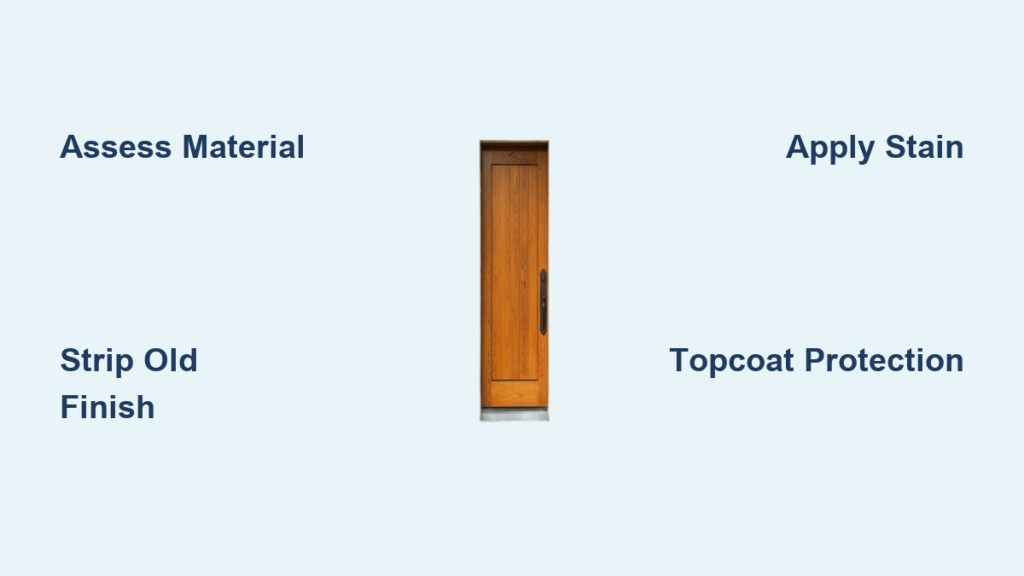
A worn, faded, or damaged front door can drag down your home’s entire curb appeal. But replacing it is not always necessary—refinishing a front door is a cost-effective, high-impact upgrade that restores beauty, protects the wood, and enhances durability. Whether your door has sun damage, peeling finish, or an outdated color, this guide gives you everything you need to transform it like a pro.
From identifying your door material and choosing between paint and stain, to sanding, repairing, and applying a long-lasting protective finish, we will walk through every phase of the process. You will learn expert techniques for both in-place and removed-door refinishing, avoid common mistakes, and select the best products for lasting results.
Assess Your Door Material Before Starting
Before lifting a sander, know what you are working with. Your door’s material dictates how aggressively you can sand and what finishes will last.
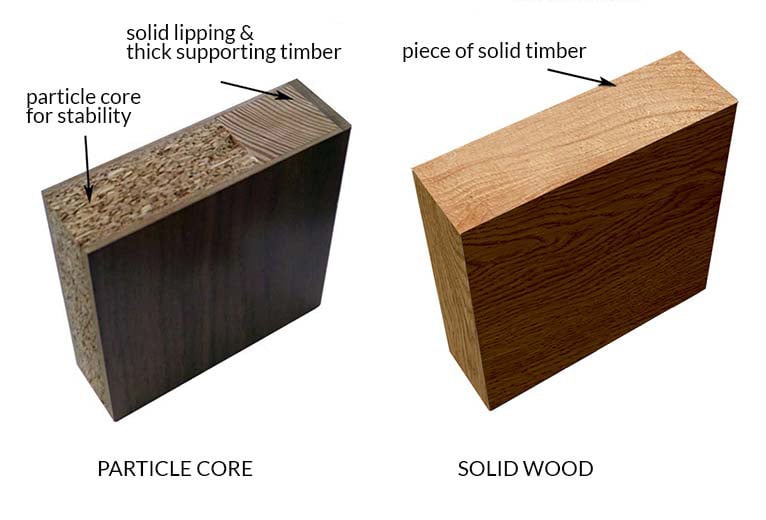
Solid Wood vs. Veneer Doors
Solid wood doors made from pine, fir, oak, mahogany, or alder can be sanded and refinished multiple times. They respond well to stain and develop rich character over time. Plywood, MDF, or veneer doors have a thin surface layer. Sand too deep and you will expose the core, leading to uneven absorption and finish failure.
Look at the edge or end grain to determine your door type. Solid wood shows continuous grain while veneer reveals layered construction or a smooth, uniform surface beneath the finish.
Fiberglass and Composite Doors
Fiberglass or composite doors with a wood-veneer skin require gentle prep. Strip only with fine sandpaper ranging from 120 to 180 grit maximum, or use chemical stripper instead of aggressive sanding. If the grain looks too perfect or repeats in a pattern, it is likely a manufactured door. In that case, opt for paint or light restoration rather than deep sanding.
Evaluate the Existing Finish Condition
The condition of the current finish determines whether you need a light refresh or a full strip.
Sun-Faded Finish: Light Sand and Re-Coat
If the finish is intact in recessed areas but faded on flat surfaces, a light refresh may suffice. Lightly sand with 180 to 220 grit to remove chalkiness. Clean with mild soap and water, then apply two to three coats of spar urethane to restore UV protection. There is no need to restain unless color correction is desired.
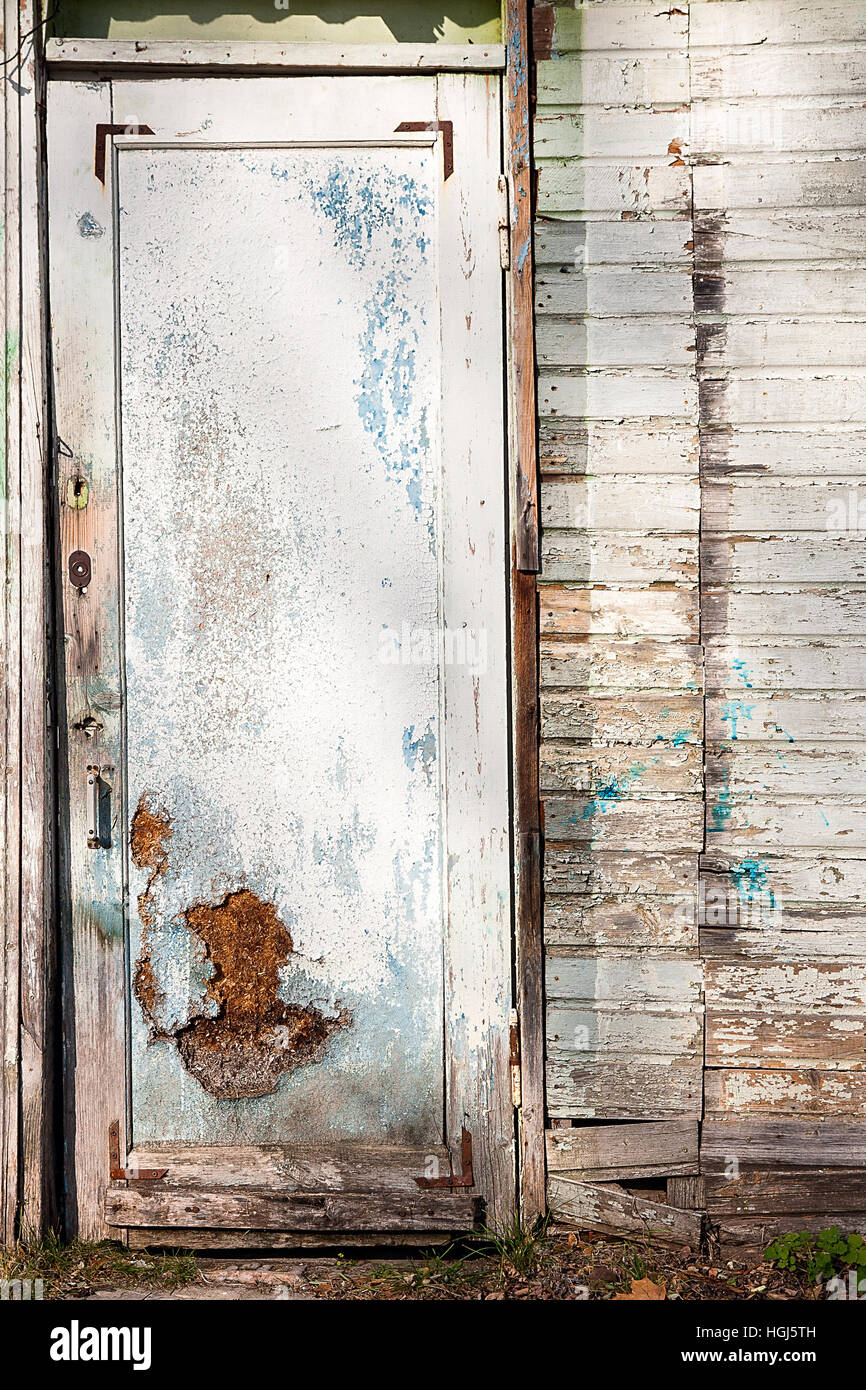
Peeling or Cracking: Strip to Bare Wood
Flaking, bubbling, or alligatoring means the finish has failed and complete removal is required. Use chemical stripper or progressive sanding, moving from 80 to 220 grit. Never apply new finish over peeling layers because it will fail quickly. If you see bare wood peeking through, the bond is broken and full prep is mandatory.
Choose Between Paint and Stain
Your decision affects durability, maintenance, and final appearance.
Stain: Natural Beauty with More Maintenance
Stain enhances grain and provides a timeless look ideal for solid wood doors. However, it requires reapplication every two to five years, especially in direct sun. This option works best for traditional homes, shaded entries, or if you love the wood’s natural character. South- or west-facing doors fade faster, so use UV-resistant gel or marine-grade stain for these exposures.
Paint: Durable and Modern
Paint hides flaws, lasts longer in sun, and makes touch-ups easier. It covers the grain and may crack over time if not flexible. This option works best for composite doors and modern aesthetics. Use 100 percent acrylic exterior paint for flexibility and weather resistance.
Plan for Ideal Weather and Timing
Timing matters. Refinishing in bad conditions leads to poor adhesion and slow drying.
Best Conditions for Refinishing
Ideal temperature ranges from 60 to 80 degrees Fahrenheit with low to moderate humidity. Partial shade works best because full sun dries too fast while deep shade slows curing. Calm wind keeps dust out of wet finish. Spring and fall offer the most stable conditions. Avoid rainy or humid days entirely.
Estimated Timeline
Plan for three to seven days total. Preparation including sanding and repair takes one to two days. Staining requires one to three days. Topcoating with three coats takes two to four days. Never close the door at night until fully cured because wet finish sticks to the jamb and ruins the job.
Gather Essential Tools and Supplies
Having the right gear ensures a smooth, professional result.
Must-Have Tools
An orbital sander with dust collection handles flat areas while a palm or detail sander works on carvings. You will need high-quality brushes—natural bristle for oil-based products and synthetic for water-based finishes. Stock up on steel wool in 0000 grade or gray Scotch-Brite pads, tack cloths, and microfibers. Do not forget your respirator, goggles, and gloves.
Sandpaper Grit Progression
Start with 80 to 100 grit for heavy removal. Move to 120 to 150 grit for general smoothing. Finish with 180 to 220 grit before stain. Use 320 to 400 grit between topcoats.
Key Materials Needed
You will need exterior-grade stain or paint, spar urethane or marine varnish with UV protection, wood filler or epoxy for repairs, and painter’s tape with drop sheets. Use a shop vacuum after sanding because dust is the enemy of a smooth finish.
Remove the Door or Work In-Place
Working on a horizontal surface gives you full access and prevents runs.
How to Remove the Door
Remove hinge pins with a hammer and punch. Have a helper support the door while lifting it off the hinges. Place on sawhorses in a shaded, dry area. Cover the opening with three-quarter-inch plywood screwed into the frame. This temporary barrier is safe for one to two days.
When to Refinish In Place
Refinish in place if the door is in decent shape and only needs light sanding. This approach also works if you lack access to remove the door due to security concerns. The limitation is that you cannot fully sand edges or the bottom rail.
Strip and Sand the Old Finish
Choose the right method based on your door’s condition.
Sanding: Best for Most DIYers
For flat areas, use an orbital sander progressing through 80, 120, 180, and 220 grit. Switch to hand sanding with blocks for details and panels. Lightly scuff recessed areas rather than stripping them completely if the finish is intact. Mark recessed areas with pencil and sand until the mark disappears, then stop.
Chemical Stripping: For Thick or Painted Layers
Apply citrus-based stripper and cover with plastic wrap to slow drying. Wait 15 to 30 minutes, then scrape with a plastic or metal scraper. Wipe residue with mineral spirits and lightly sand with 220 grit. Work in a well-ventilated area and wear nitrile gloves plus eye protection.
Repair Damaged Wood
Fix dents, cracks, and rot before applying finish.
Fill Small Gouges and Dents
Use wood filler or epoxy putty. For vertical surfaces, thicken epoxy with colloidal silica to prevent sagging. Press in, smooth, and cover with packing tape while curing.
Fix Delaminated Bottom Rail
Remove loose wood and apply epoxy consolidant to stabilize fibers. Fill with epoxy filler, shape, and sand smooth. Alternatively, install a brass kick plate to cover and protect the lower section.
Plug Screw Holes
Insert toothpicks in epoxy or wooden dowels into holes. Sand flush after drying.
Apply Stain Evenly
Work efficiently for a uniform finish.
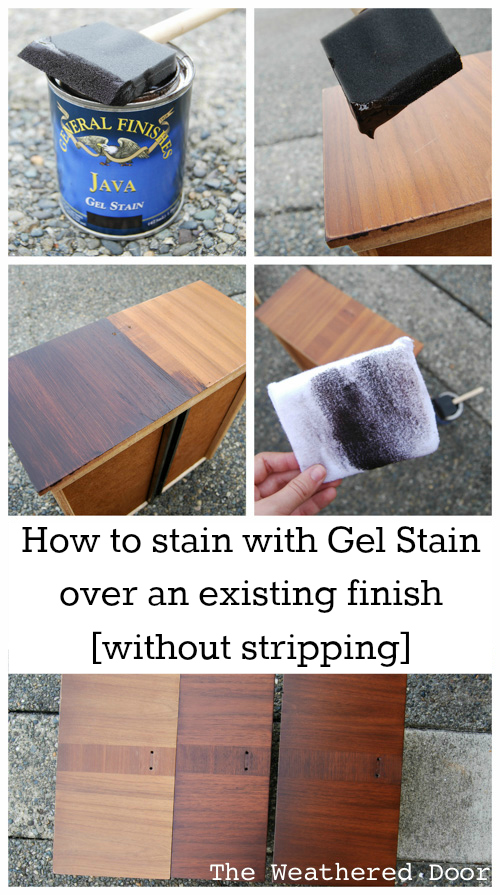
Prepare and Test First
Wipe the surface with a tack cloth. Wear nitrile gloves. Test stain in a hidden spot like the top edge or behind hardware. Let it dry 24 hours and view in natural light because color may surprise you.
Application Steps
Use a lint-free rag or foam brush. Work in sections with the grain. Apply, then wipe off excess after five to ten minutes for gel stain. Avoid over-wiping because it removes color. Wait 24 hours minimum before topcoating. One coat is usually enough, though a second coat can be applied if a lighter color is desired.
Apply Protective Topcoat

This is what defends against sun, rain, and wear.
Choose the Right Topcoat
Marine spar urethane like Minwax Helmsman or Epifanes provides the best UV protection. Satin or matte sheen hides imperfections. Test sheen on a sample because some satin finishes look semi-gloss. Never use interior-only products outdoors because they fail quickly.
Application Process
Thin the first coat 10 percent with mineral spirits. Use a soft-bristle brush and apply with the grain. Stop at grain direction changes and do not cross-brush. Let dry all day without closing the door. Lightly sand rough spots with 320 to 400 grit or Scotch-Brite. Apply a second coat thinned 5 percent, then a third coat at full strength. Three coats minimum are required for exterior protection.
Reinstall Hardware
Wait until the finish is fully cured.
Timing and Preparation
Wait 72 hours, or up to seven days for full hardness. Clean hardware before reattachment. Polish brass with Brasso, clean chrome or nickel with mild soap and water, and treat iron or steel for rust with naval jelly. Lubricate the lock with graphite powder before reassembly.
Choose: Surface Film or Penetrating Oil
Two philosophies exist—only one lasts decades.
Surface Film: Easy but Temporary
Polyurethane and varnish form a hard shell that is easy to apply but sits on the surface. The problem is that rigid films cannot flex with wood movement. They crack, flake, and fail within three to five years, especially at corners and joints where stress is highest.
Penetrating Oil: Professional Choice
Penetrating oil soaks into the wood and becomes part of its structure. It moves with the wood, resists cracking, and lasts 10 to 15 years or more with maintenance. When it is time to renew, simply clean and reapply without stripping. TotalBoat Teak Shield or TWP 1500 Series are excellent options.
Maintain Your Refinished Door
Proper care extends life and beauty.
Annual Checkup
Inspect for cracks, peeling, or dullness. Clean with mild soap and water. Reapply one coat of spar urethane if needed.
Long-Term Maintenance by Finish Type
Polyurethane needs yearly recoating using clean and one coat method. Marine varnish lasts three to seven years with inspection and renewal. Penetrating oil endures three to five or more years with simple cleaning and reapplication. Never apply new finish over failing poly—strip and restart instead.
Avoid These Common Mistakes
Skip these errors and your finish will last longer.
Skipping sanding leads to poor adhesion. Closing the door too soon ruins the finish. Using interior products outdoors causes rapid failure. Over-sanding veneer damages the surface. Ignoring UV protection results in fading and graying. Applying thick coats creates runs and bubbles. Not testing stain leads to unexpected color. Topcoating too soon creates a sticky surface.
Troubleshoot Finish Problems
Peeling or Cracking
Cause: rigid film plus wood movement. Fix: strip completely and switch to penetrating oil.
Uneven Stain
Cause: no pre-conditioner on softwood. Fix: sand down, condition, and re-stain.
Runs or Drips
Cause: too much finish applied. Fix: sand smooth and reapply thin coats.
Dull or Faded Finish
Cause: UV exposure. Fix: lightly sand and apply fresh spar urethane.
Frequently Asked Questions About Refinishing a Front Door
How long does it take to refinish a front door?
The complete process takes three to seven days. Preparation including sanding and repair takes one to two days. Staining requires one to three days. Topcoating with three coats takes two to four days. Weather conditions and drying times affect the overall timeline.
Can I refinish my front door without removing it?
Yes, you can refinish in place if the door is in decent shape and only needs light sanding. However, you cannot fully access edges or the bottom rail. Build a dust containment booth using polyethylene sheeting to keep dust out of your home. Remove all hardware first for best results.
What is the best finish for a sun-exposed front door?
Marine spar urethane or penetrating oil provides the best UV protection. Gel stain with UV inhibitors also works well. Avoid interior products and standard polyurethane because they fail quickly under sun exposure. Reapply topcoat every three to seven years depending on the product.
Why is my stain coming out blotchy?
Blotchy stain usually occurs on softwoods like pine, alder, birch, or poplar that absorb stain unevenly. Apply a pre-stain conditioner before staining to prevent this problem. Sand out unwanted stain with 150 to 220 grit, then recondition and reapply.
How often should I recoat my refinished front door?
Maintenance frequency depends on your finish type. Polyurethane needs yearly recoating. Marine varnish lasts three to seven years. Penetrating oil endures three to five or more years. South- or west-facing doors fade faster and may need more frequent maintenance.
Should I use paint or stain on my front door?
Choose stain for solid wood doors where you want to preserve the natural grain and character. Choose paint for composite doors, modern aesthetics, or high-sun exposures where you want maximum durability and easier touch-ups. Paint hides flaws better while stain enhances natural beauty.
Key Takeaways for Refinishing Your Front Door
Taking your time produces the best results. Rushing leads to rework and a finish that fails prematurely. Remember that prep is everything—sanding, cleaning, and conditioning make or break the job.
Choose flexible, penetrating finishes over rigid surface films because wood moves with temperature and humidity changes. Apply two to three thin coats rather than thick ones to avoid runs and ensure proper curing. Pay special attention to the bottom rail and edges because these areas are most vulnerable to moisture damage.
With the right preparation, products, and patience, your front door will make a stunning first impression for years to come. A well-refinished door not only enhances your home’s curb appeal but also protects your investment for a decade or more with proper maintenance.


