
A broken garage door torsion spring can leave you with a door that won’t open, a loud bang that startles the whole neighborhood, or an expensive emergency repair bill. These springs hold over 200 pounds of tension and are responsible for lifting your entire garage door, making them critical components that fail typically after about 10,000 cycles or roughly seven years of use. If your door is stuck, sagging on one side, or making unusual grinding noises, you likely need a torsion spring replacement.
This guide walks you through the complete replacement process using proper safety protocols, exact measurements, and step-by-step procedures gathered from professional technicians and experienced DIYers. We’ll cover identifying your spring type, gathering the right tools, measuring for correct replacements, and the precise winding technique that keeps you out of the emergency room.
Identify Your Torsion Spring System First
Confirm It’s a Torsion Spring Setup
Before you order parts or grab tools, verify you have a torsion spring system and not an extension spring setup. Stand inside your garage and look up at the spring assembly. Torsion springs mount horizontally above the door on a steel shaft and rotate when the door moves. Extension springs, by contrast, hang along the side tracks and stretch linearly when the door opens.
Torsion systems are standard on modern residential doors with electric openers and typically use two springs for balanced lifting. These springs operate under extreme tension and require completely different repair procedures than extension springs. Never attempt to apply torsion spring techniques to extension springs or vice versa.
Single vs. Double Spring Configurations
Most residential garage doors use dual torsion springs, with one spring mounted on each side of the center bearing plate. This dual setup provides even weight distribution and smoother operation. Single-spring systems exist for narrower doors under 16 feet wide, but dual configurations are more common and provide better balance.
Replace both springs at the same time, even if only one is broken. The remaining spring is near the end of its service life and will likely fail within months, forcing you to repeat the entire repair process.
Recognize When Replacement Is Needed
Common Signs of Spring Failure
A broken torsion spring often announces itself with a loud bang similar to a gunshot, caused by the sudden release of stored energy. Other clear indicators include a door that won’t lift manually, one side rising faster than the other, visible gaps in the coil of one to two inches, rust or corrosion on the spring, or grinding noises during operation.
Inspect your springs every six to twelve months. Look for cracks, gaps in the coils, rust buildup near the cones, loose set screws on drums or cones, and damaged cables. Early detection prevents emergency repairs and protects other components from secondary damage.
Why Torsion Springs Are So Dangerous
Torsion springs store extreme mechanical energy, equivalent to over 200 pounds of force. This makes torsion spring replacement one of the most hazardous DIY home repairs. Professional technicians have lost fingers, suffered facial trauma, and experienced violent cone ejections even with years of experience. The energy releases explosively when tension changes, and one mistake can result in serious injury or worse.
Essential Safety Rules Before Starting
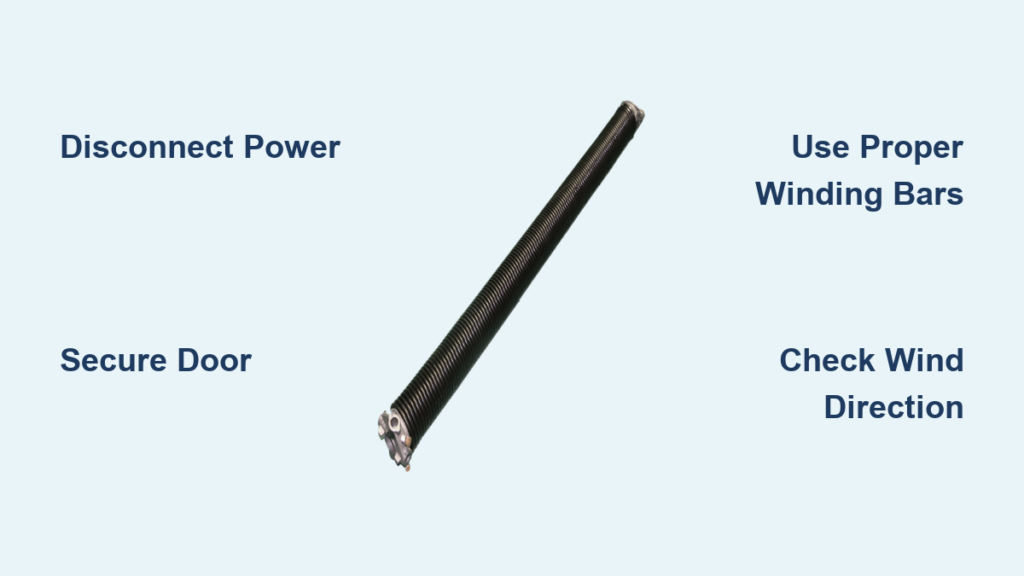
Disconnect Power and Secure the Door
Start by unplugging your garage door opener or turning off its circuit breaker. Then disengage the opener using the trolley disconnect, typically a red cord hanging from the rail. This prevents accidental activation while you’re working on the door.
Next, secure the door in the fully closed position. Clamp a set of vice grips into the vertical track above a roller. This stops the door from flying open if tension releases unexpectedly. Never attempt to work on a torsion spring system with any tension still applied.
Wear Proper Protective Equipment
Safety glasses are non-negotiable, as small metal fragments can cause serious eye injuries during winding. Wear work gloves, steel-toed boots, and long sleeves to protect your arms. Even experienced technicians follow these protocols without exception.
Work with a partner when possible. One person can stabilize the door while the other handles the winding bars. If you must work alone, proceed with extreme caution and never rush through any step.
Tools Required for Spring Replacement

Essential Equipment List
You need specific tools designed for this task. Never substitute with improvised items.
You will need two 18-inch winding bars with half-inch diameter, a 7/16-inch wrench or socket for drum and cone set screws, a 9/16-inch wrench or socket for center bearing plate bolts, adjustable wrenches as backup, vice grips to lock the door, a steel ruler or tape measure for measurements, a file or deburring tool to clean the shaft, and a marker to mark alignment points.
The most critical tool is proper winding bars. Buy half-inch rebar from Home Depot, cut to 18 inches, and ensure the ends have sharp 90-degree edges. Never use screwdrivers, socket wrenches, pipes, or rounded rebar. One user suffered permanent eye damage when a screwdriver shattered during winding.
Measure the Old Spring Correctly
Only Measure an Unwound Spring
Never attempt to measure a wound spring under tension. Wait until you have fully released the tension or work with the broken pieces.
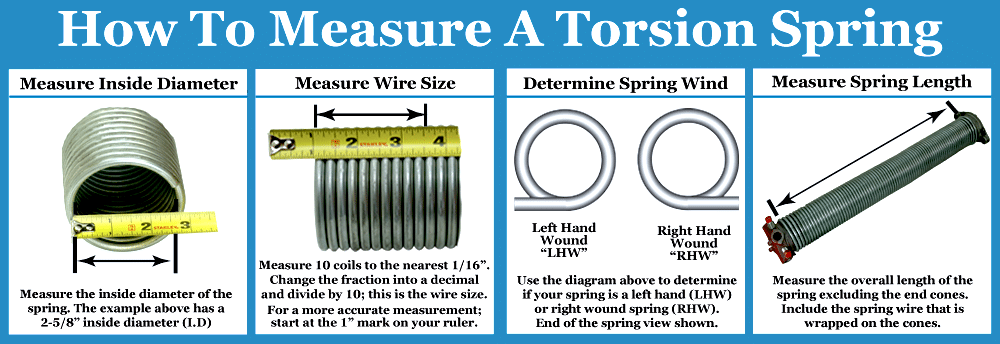
Measure the length of the coiled section only, excluding the cones. Measure wire diameter by counting 20 coils and dividing by 20. The inside diameter is typically two inches and must match your shaft. Determine wind direction by observing which way the wire end points when facing the spring.
Understand Wind Direction
Facing the end of the spring, if the wire points to the right, you have a right-wind spring that installs on the left side. If it points to the left, you have a left-wind spring that installs on the right side. Color codes help confirm this: red paint on the cone indicates right-wind, black paint indicates left-wind.
The critical mnemonic is “right on the left, left on the right.” Installing springs on the wrong sides causes them to spin loose after approximately six turns, creating a dangerous situation.
Purchase the Correct Replacement Springs
Match Exact Specifications
Order springs that match your measurements exactly. Use your length, wire diameter, inside diameter, and wind direction to find a match. Suppliers like Clopay, The Garage Door Supply Co., and Home Depot offer online calculators where you input your door dimensions and weight.
Provide your door height, width, weight if known, and old spring dimensions. Industry data suggests roughly 10% of garage doors have incorrect springs installed, leading to poor performance and safety hazards.
Consider High-Cycle Springs
Standard torsion springs last approximately 10,000 cycles, roughly seven years with typical use. High-cycle e-coated springs last up to 50,000 cycles and resist rust better. They cost slightly more but reduce long-term maintenance and the frequency of replacements.
Remove the Old Spring Safely
Unwind Before Disassembly
With the door locked and opener disconnected, insert your first winding bar into the cone and push until it clicks, seating it fully. Loosen the set screw less than one turn, then slowly lower the bar a quarter turn to release tension. Insert your second bar into the next hole, prop it against the door, and slide out the first bar.
Continue this process until no tension remains, typically about 30 quarter turns for a seven-foot door and 34 for an eight-foot door. Always keep one bar in the cone until fully unwound. Rest the bar against the door between turns for stability.
Take Springs Off the Shaft
Remove the center bearing plate bolts using a 9/16-inch wrench. Loosen the drum set screws with a 7/16-inch wrench; the cables will go slack as you do this. Slide the drums off the shaft. File the shaft to remove burrs or set-screw marks, then slide the springs off. Clean the shaft thoroughly, as rough spots prevent smooth installation.
Install New Springs Step by Step
Mount Springs in Correct Order
Slide the new spring onto the shaft from the drum side. The stationary cone with the larger hole goes on first, followed by the winding cone. Slide the spring to the center bracket, then reinstall the drum and slide the shaft into the bearing.
Verify that wire ends point down at the center bracket and up at the winding cones before proceeding. Reattach cables by feeding them up from the bottom brackets, over the drums, and into the drum notches. Bend the cable end 90 degrees with pliers to prevent it from catching behind the bearing plate, then pull taut and rotate the drum to take up slack.
Wind the Springs Correctly
Winding Procedure
Mark the shaft a quarter inch beyond the winding cone with tape or a file. As you wind, the cone should cover this mark, confirming correct growth. Insert your bar fully into the cone, listening for the click. Push upward a quarter turn, which feels like unscrewing the cone. Insert your second bar, remove the first, and repeat.
Count your quarter turns carefully. A seven-foot door requires 29 to 31 turns. An eight-foot door requires 33 to 34 turns. After the final turn, push the bar up approximately one millimeter to disengage it. Keep your hands and head completely clear of the spring path throughout this process.
Test Door Balance and Reconnect Opener
Rebalance the Door
Remove the vice grips. Lift the door manually to mid-height, around three to four feet. Let go. If it stays in place, your springs are properly balanced. If it rises, the springs are too tight. If it falls, they’re too loose.
Adjust by loosening the set screws a quarter turn at a time, then retest. The door should stay halfway up without falling or shooting up. This balance test is critical before reconnecting your opener.
Reconnect the Opener
Reattach the trolley or drawbar arm. Plug in the opener and run a few test cycles manually and with the remote. Adjust the force settings if the opener reverses or struggles. The door should open and close smoothly, stay in place at any height, and reverse on contact with obstacles.
Avoid These Common Mistakes
Wrong Tools and Rushed Work
Using screwdrivers, skipping personal protective equipment, or rushing the winding process leads to disaster. One slip can result in emergency room bills exceeding $1,800 or permanent injury. Only use solid winding bars designed for this task.
Incorrect Spring Placement
Putting the right-wind spring on the right side causes it to unscrew itself after a few turns, releasing violent energy. Double-check your wind direction before winding anything. Never skip the rebalancing test, as an unbalanced door strains the opener, damages tracks, and increases failure risk.
When to Call a Professional
Consider the Risks Honestly
Professional spring replacement costs $140 to $300, minimal compared to potential medical bills. Call a pro if you lack proper tools, have no mechanical experience, feel uneasy at any point, or notice damaged cones, bent shafts, or excessive play in the components.
The Clopay EZ-Set Torsion Conversion Kit allows you to wind springs with a drill, eliminating manual winding bars and reducing the perceived danger. However, the fundamental risks remain the same. If you can afford $140, it’s genuinely not expensive to have someone else do it safely.
Key Takeaways for Replacing Garage Door Springs

Replacing a torsion spring requires precise measurements, proper tools, and strict safety protocols. Always disconnect power, secure the door with vice grips, and keep one winding bar in the cone until tension is fully released. Match your spring specifications exactly and remember the mnemonic “right on the left, left on the right” for wind direction. Test door balance before reconnecting your opener.
This project carries real danger even when done correctly. If you lack mechanical experience, proper tools, or complete confidence, hire a licensed technician. Your safety is worth more than the cost of professional installation.
Frequently Asked Questions About Garage Door Spring Replacement
How do I know if my garage door has torsion or extension springs?
Stand inside your garage and look up. If the spring runs horizontally above the door on a metal shaft and rotates when the door moves, you have torsion springs. If the springs hang along the side tracks and stretch when the door opens, you have extension springs.
How long do garage door torsion springs last?
Standard torsion springs last approximately 10,000 cycles, which is roughly seven years with typical household use of four cycles per day. High-cycle e-coated springs can last up to 50,000 cycles.
Can I replace just one torsion spring?
It’s strongly recommended to replace both springs at the same time. The remaining spring is near the end of its service life and will likely fail soon, forcing you to repeat the repair.
What happens if I install springs on the wrong sides?
Installing springs on the wrong sides causes them to spin loose after approximately six turns, creating an explosive safety hazard. Always verify wind direction: right-wind goes on the left side, left-wind goes on the right side.
How many turns does a torsion spring need?
A standard seven-foot door requires 29 to 31 quarter turns. An eight-foot door requires 33 to 34 quarter turns. Always refer to your specific spring manufacturer’s specifications.
Is it worth hiring a professional for spring replacement?
Professional replacement costs $140 to $300, which is minimal compared to potential injury costs or emergency repairs if something goes wrong. If you lack mechanical experience or proper tools, hiring a pro is strongly recommended.


