
Assembling window blinds might sound intimidating, but it is one of the most beginner-friendly home improvement projects you can tackle. With the right tools and a little patience, you can transform any room’s look and functionality in under an hour per window. Whether you are upgrading a bedroom with blackout cellular shades or adding vertical blinds to a sliding door, knowing how to assemble window blinds correctly ensures smooth operation and a clean, professional finish.
This guide breaks down the entire process into clear, actionable steps. You will learn how to choose the right mount type, take accurate measurements, install brackets, and handle assembly for different blind styles. By the end, you will have the confidence to complete your project without calling a professional.
Choose Your Mount Type
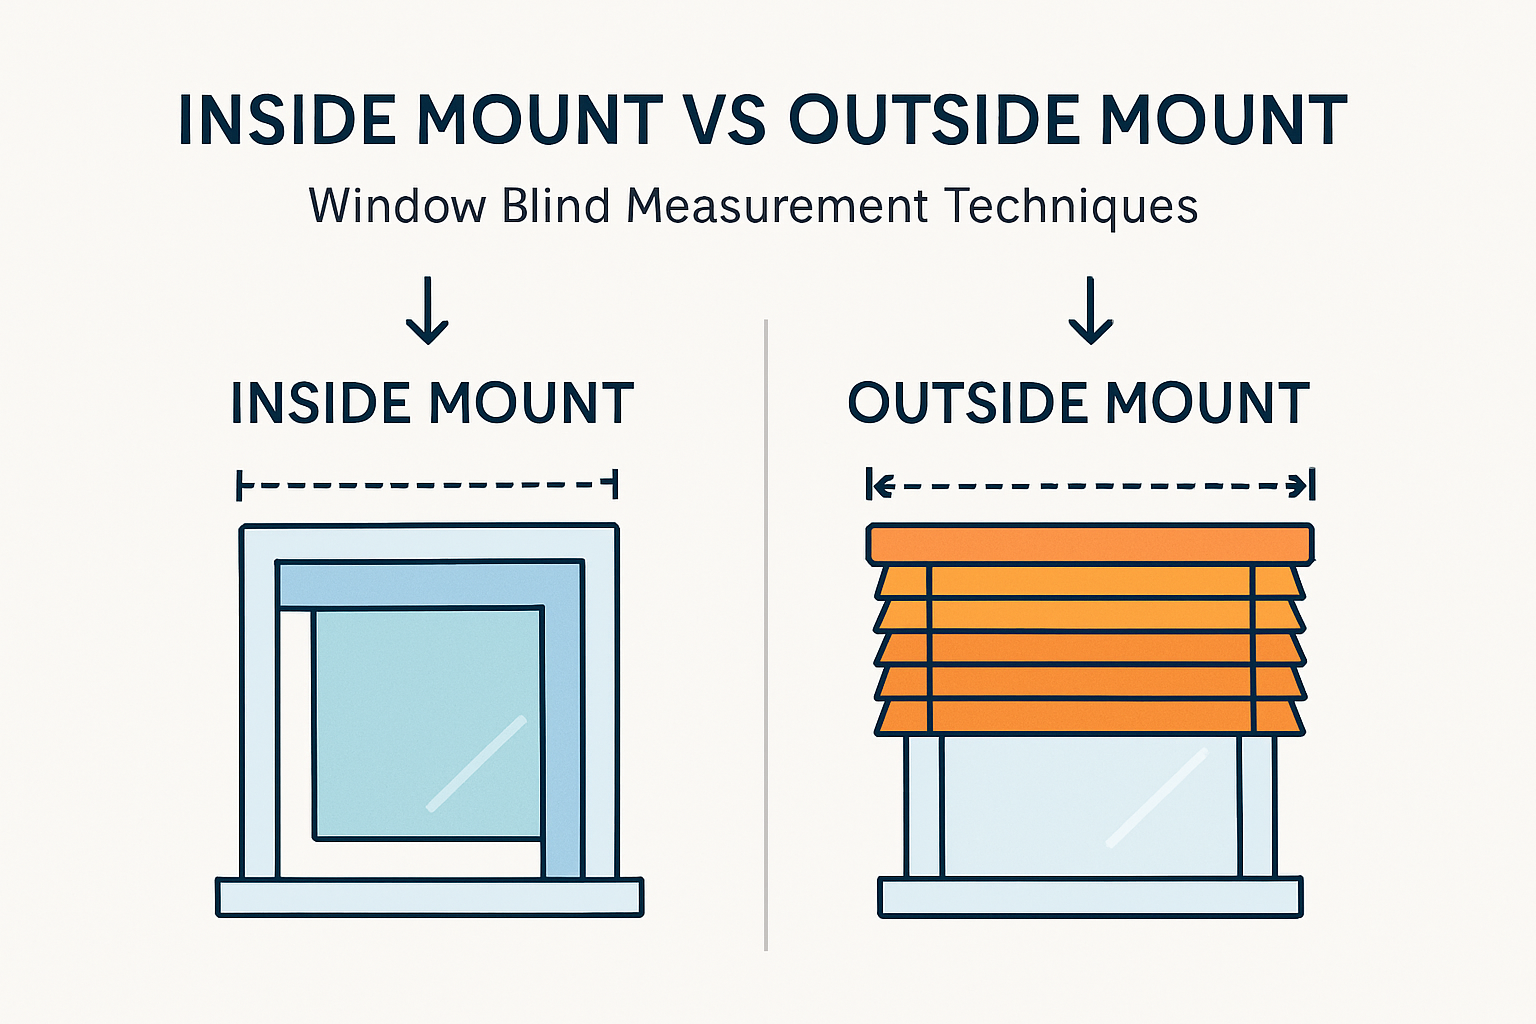
Inside vs. Outside Mount
Your mounting choice affects both appearance and performance. An inside mount installs within the window frame, offering a sleek, built-in look that works best with deep recesses. An outside mount attaches to the wall or trim above the window, covering the full frame and improving light control. For full coverage with an outside mount, add 3 inches to both width and height during measuring.
Which Mount Is Right for You?
Choose an inside mount if your window recess has at least 2 inches of depth and you prefer a minimalist style. Choose an outside mount if the frame is shallow, damaged, or you want maximum light blockage. Always check manufacturer specifications, since some cellular or solar shades require specific clearance.
Gather Tools and Materials
Essential Tools Checklist
Before you begin, gather these basic tools:
– Metal tape measure (fabric tapes stretch and cause errors)
– Level (or use equal top-frame measurements as a substitute)
– Power drill with 1/8-inch bit
– Pencil for marking bracket positions
– Screwdriver or drill driver for final tightening
Required Hardware
Most blinds include mounting hardware, but confirm you have:
– Brackets and screws
– Wall anchors for drywall
– End caps and support brackets for wide units
– Safety brackets for vertical blinds
For brick or plaster walls, purchase masonry-specific anchors. Keep an assorted pack of drywall anchors on hand since they are not always included.
Measure Accurately

Inside Mount Measurement Steps
Precision is critical for inside mounts. Measure three times per dimension:
– Width: At the top, middle, and bottom of the frame. Record the smallest width rounded down to the nearest 1/8 inch for custom orders.
– Height: At the left, center, and right. Record the longest height for top-mount, or shortest for exact clearance.
– Depth: Ensure the recess is deep enough for the headrail. Most inside-mount blinds need at least 2 to 2.5 inches.
Press the tape firmly against the frame and avoid sagging. Even 1/8 inch too wide can prevent installation entirely.
Outside Mount Measurement Steps
For outside mounts, aim for full coverage:
– Width: From outside trim to outside trim. Record the longest measurement and add 3 inches total for better light blocking.
– Height: From mounting point to sill or floor. Record the longest measurement and add 3 inches to the bottom if needed.
Mark these dimensions clearly before purchasing your blinds.
Install Brackets
Position and Mark Brackets
Hold the first bracket in place, inside the frame for inside mounts or above the trim for outside mounts. Press it flush and mark screw holes with a pencil. Repeat on the opposite side.
For vertical or cellular shades, position brackets 2.5 to 3 inches in from each end. If installing a valance, adjust bracket depth to allow clearance.
Level and Align
Use a level across both marks to ensure they are horizontal. No level available? Measure from the top of the window frame to each mark and confirm the distances match. Misaligned brackets cause binding and uneven operation.
Drill and Secure
Drill pilot holes slightly smaller than the screws. If hitting a stud, use longer screws. For drywall without studs, insert anchors first and tap them gently with a hammer if needed.
Screw in brackets tightly but avoid over-tightening, which can strip drywall or crack plastic. For inside mounts, a slight inward angle can improve grip.
Mount the Headrail and Components
Attach the Headrail
Slide or click the headrail into the brackets. Some systems require pushing up and snapping in, while others slide horizontally. Ensure it clicks or locks securely, then test by gently tugging.
For blinds wider than 60 inches, install a center support bracket to prevent sagging. Offset it slightly to avoid interfering with lift cords on wood or faux wood blinds.
Install End Caps
Most cellular and mini blinds require end caps on the headrail before mounting. Snap them on firmly to keep cords contained and improve aesthetics.
Assemble by Blind Type
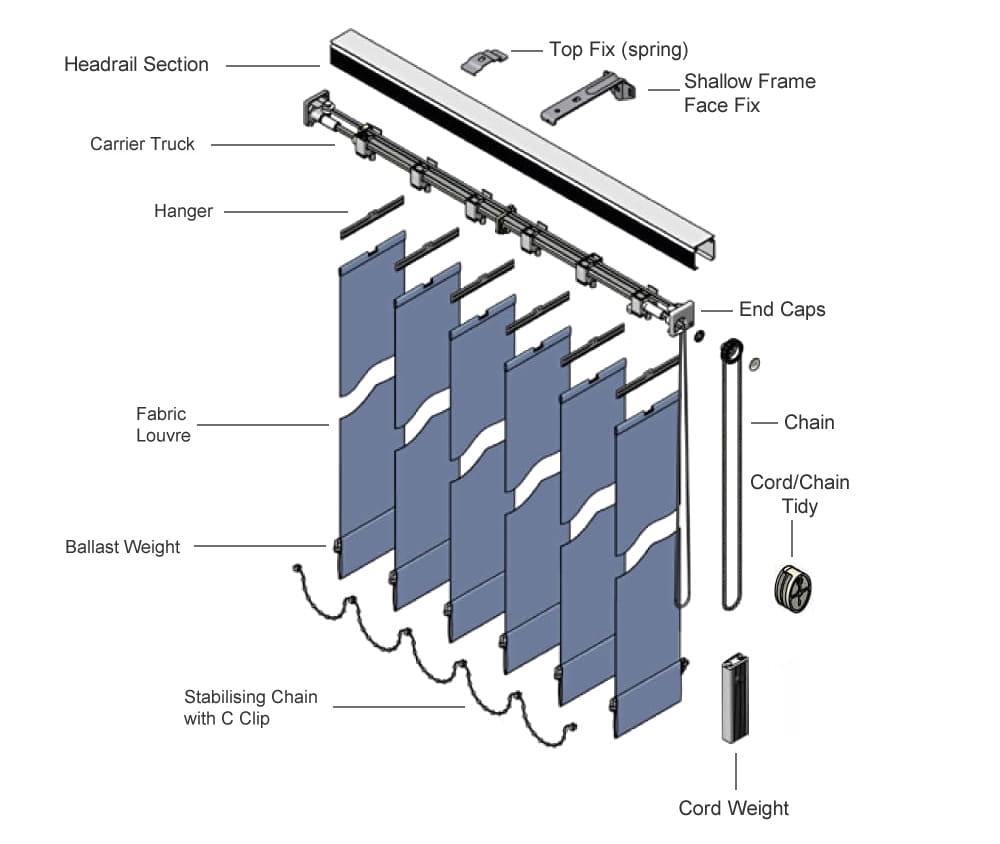
Vertical Blinds
Attach the headrail to brackets first. Pull the control chain to evenly space carriers, then slide each vane into its plastic stem at the top until it clicks. Work from one end to the other.
Install a safety bracket near the bottom of the window frame to keep the chain taut. This prevents entanglement hazards, especially in homes with kids or pets. Operate the pull cord to open and close, then use the wand to rotate vanes.
Cellular Shades
These often use a push-up mount where the rail clicks into brackets. Ensure end caps are in place first.
Many modern models feature self-leveling mechanisms. Pull from the center or use two hands, and the system corrects uneven lifting over time. Clip a handle to the bottom rail for safer, centered operation.
If the shade is too long, adjust the stop mechanism so it does not bind at the sill.
Faux Wood and Wood Blinds
These heavier blinds need secure bracket installation. Follow standard leveling and drilling steps, then test the tilt wand and lift cord once hung.
Wood blinds may need a break-in period as cords tighten with use. Avoid moisture in bathrooms and kitchens by choosing faux wood instead, since real wood can warp. Aluminum blinds install the same way, just handle carefully to avoid bending slats.
Sheer and Woven Wood Shades
For sheer shades, ensure even fabric tension. If the shade hangs crooked, check bracket alignment and adjust before final tightening.
Woven wood shades are lightweight but can have slight weight imbalances. Hang them, then test lift and tilt functions. Make micro-adjustments to brackets if the roll is uneven.
Drapery Rods and Panels
Measure vertically from desired bottom length up to full panel height. Mark the top point, then extend half the rod length left and right. Subtract 6 inches from total rod length to determine bracket spacing.
Install brackets using the manufacturer method, slide rings or grommets onto the rod, hang on brackets, and arrange fabric to remove wrinkles.
Add Finishing Touches
Install Valances
Valances hide headrails and hardware for a polished look. Attach valance clips to the top of the headrail, then snap the valance into place with clips spaced evenly.
Ensure the valance does not interfere with raising or lowering the blind. Trim or adjust if needed.
Secure Safety Features
Always install safety brackets for vertical blinds and tension devices for corded systems. Keep cords out of reach of children and pets. Consider upgrading to cordless or motorized options for high-traffic areas.
Test and Adjust

Check Operation
Raise and lower the blind fully. Rotate slats if applicable. Look for binding, sticking, uneven lifting, or sagging in the center.
Fix Common Issues
- Blind sticks? Recheck window depth and smallest width measurement.
- Sags in middle? Add or reposition a support bracket.
- Hangs uneven? Verify brackets are level. For cellular shades, use center pull to activate self-leveling.
- Shutter gaps? Adjust side frames or hinge pins until flush.
Make small adjustments since sometimes a 1/16-inch shift fixes alignment.
Maintain and Care
Clean Regularly
Dust blinds weekly with a microfiber cloth or vacuum brush attachment. For deeper cleaning:
– Faux wood and aluminum can be wiped with a damp cloth
– Wood requires dry dusting or wood-safe cleaner
– Cellular and woven shades need spot cleaning only, never soaking
Never use abrasive cleaners or submerge components.
Prevent Damage
Avoid letting children or pets pull on cords or hang on blinds. Repair broken slats or frayed cords immediately to prevent further damage to the lift system.
Frequently Asked Questions About Assembling Window Blinds
How long does it take to assemble window blinds?
Installation time varies by type. Pre-cut cellular shades can be installed in as little as 5 minutes per window using a 5-step process. Custom or complex setups typically take under two hours for an entire room.
What is the most common mistake when assembling blinds?
The most common mistake is inaccurate measuring. Always measure three times per dimension and record the smallest width for inside mounts to prevent the blind from binding.
Do I need a drill to install window blinds?
A power drill is recommended for clean pilot holes, but you can use a hammer to tap screws and create pilot divots if a drill is unavailable. A drill makes the job faster and more precise.
Can I install blinds without a level?
Yes. Measure from the top of the window frame to each bracket mark and confirm the distances are identical. This achieves the same alignment as a level.
Are cordless blinds worth the extra cost?
Cordless blinds are highly recommended for homes with children and pets. They eliminate strangulation hazards and prevent the uneven lifting common with corded systems. Many users rate them higher for ease of use.
When should I hire a professional?
Consider professional installation if you are unsure about measurements, installing motorized or smart blinds, working with historic or irregular windows, or mounting on brick, stone, or plaster surfaces.
Final Takeaways for Successfully Assembling Window Blinds
Assembling window blinds comes down to three essentials: precise measuring, proper bracket alignment, and following type-specific steps. Take your time during the measuring phase since errors there cause the most headaches. Use a metal tape measure, check for level, and always record the smallest dimension for inside mounts.
Once your brackets are secure, the rest of the assembly is straightforward. Whether you choose vertical blinds for a patio door or cellular shades for a bedroom, the process rewards patience with a clean, professional result.
Ready to get started? Gather your tools, measure your windows, and pick up your blinds. With this guide in hand, you have everything you need to upgrade your space one window at a time.



