
Rain starts pouring, you press the window switch, and nothing happens. No sound, no movement, just silence as water seeps into your car. A failed window regulator is one of the most frustrating car problems, especially when it strikes at the worst possible moment. This small mechanical component controls the up and down motion of your side windows, and when it breaks, your glass stops working entirely.
Learning how to change a window regulator yourself saves hundreds of dollars in shop labor and gives you full control over the repair quality. This guide walks you through every stage of the process, from confirming the diagnosis to reassembling your door panel. With basic hand tools and a few hours of free time, you can restore smooth window operation and avoid future weather-related headaches.
Diagnose the Window Regulator Problem First

Before tearing anything apart, confirm the regulator is truly the culprit. Many people assume a bad motor when the window stops moving, but the regulator itself fails more often than people realize.
Spot the Common Failure Signs
Watch for these symptoms that point directly to regulator failure:
– The window refuses to move even though you hear the motor running
– Glass tilts, wobbles, or slides unevenly along its track
– Grinding, clicking, or snapping noises come from inside the door
– The window drops completely into the door cavity
If the motor hums but the glass stays still, the regulator likely detached from the window or has a snapped cable.
Rule Out Electrical Issues First
Grab a multimeter and check for power at the motor connector while pressing the switch. No voltage means the problem lies elsewhere, such as a blown fuse, bad switch, or broken wire. If power reaches the motor but nothing moves, you have confirmed mechanical failure inside the regulator assembly.
Pro Tip: Some vehicles combine the motor and regulator into one sealed unit, while others keep them separate. Check your specific model before buying parts.
Gather Tools and the Right Replacement Part

Walking into a job with the correct tools and matching parts prevents frustrating delays and costly mistakes.
Tools You Will Need
Stock your workspace with these essentials:
– Socket set and ratchet (commonly 8mm, 10mm, and 13mm)
– Flathead and Phillips screwdrivers
– Plastic trim removal tools
– Panel clip remover or a bent nail
– Wrench or nut driver
– Wide masking tape
– Safety glasses and shop gloves
A power drill with socket bits, a torque wrench, and a small flashlight make the job easier but are not strictly required.
Choose a Quality Replacement Regulator
Aftermarket regulators vary widely in build quality. Pick a name-brand or OEM-compatible unit with metal gears and reinforced cables for long service life. Cheap plastic-heavy models often fail within months and leave you repeating the same repair.
Match the part to your exact vehicle year, make, model, and door side (driver front, passenger rear, and so on). Cable routing differs between sides, so side-specific regulators matter.
Remove the Door Panel Without Breaking It
The interior door panel covers everything you need to reach. Removing it carefully protects both the panel and the hidden clips holding it in place.
Find and Remove Every Screw
Look for hidden screws in these common locations:
– Inside the door handle cup
– Beneath or beside the armrest
– Behind the manual door lock knob
– Along the outer edge of the panel
Keep each screw in a separate container or label them by location to avoid confusion during reassembly.
Pop the Retaining Clips Loose
Slide a plastic trim tool between the panel and the door frame. Apply steady, even pressure around the entire perimeter until each clip releases with an audible pop. Work slowly to avoid cracking the panel.
Once every clip is free, lift the panel slightly upward to clear the window channel, then pull it away from the door.
Unplug the Electrical Connectors
Disconnect these harnesses before setting the panel aside:
– Power window switch connector
– Door speaker wires (if equipped)
– Courtesy light plug
Lay the panel face-down on a clean surface to prevent scratches.
Secure the Window Glass Before Disassembly
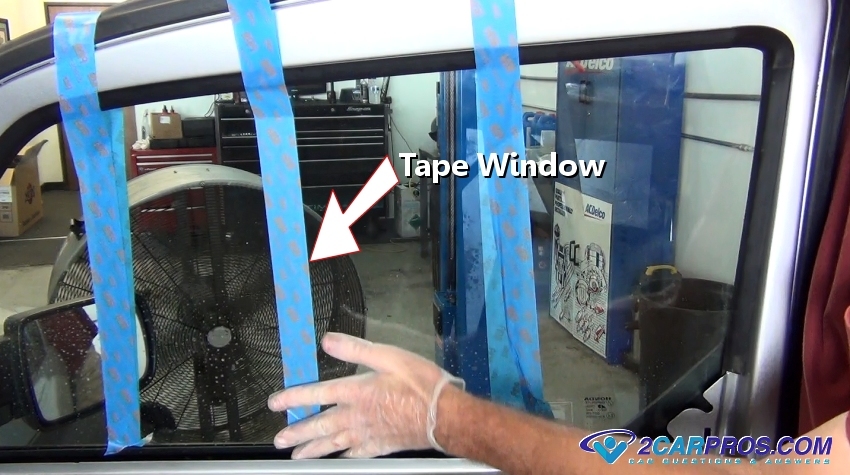
An unsecured window can slide down into the door cavity the moment you disconnect the regulator, potentially cracking the glass.
Tape the Glass in Position
Apply two or three horizontal strips of wide masking tape across the inside of the window. Press the tape firmly against the top of the door frame to hold the glass steady.
This simple step prevents costly glass damage during the rest of the repair.
Expose the Regulator Mounting Bolts
Lower the glass slightly if needed to access the bolts that connect the regulator lift arms to the bottom edge of the window. Take a photo or mark the alignment with a marker before loosening anything. These reference points make reinstallation much faster.
Disconnect and Remove the Old Regulator

With the window safely taped in place, you can now unbolt and extract the failed regulator.
Separate the Motor from the Regulator
On most vehicles, three or four bolts (usually 8mm or T20 Torx) hold the motor to the regulator. Remove these bolts and set the motor aside if it still works properly. Reusing a functional motor saves money.
Skip this step if your vehicle uses a combined motor and regulator assembly.
Unbolt the Regulator from the Door Frame
Remove the three to six bolts (typically 10mm or 13mm) that secure the regulator to the inner door structure. Support the regulator with your free hand as you remove the final bolt, since it can shift unexpectedly and scratch the door interior.
Detach the Lift Arms from the Glass
Unscrew the bolts connecting the regulator arms to the window. These bolts are often reached through small access holes or by lowering the glass a bit more. Once disconnected, carefully maneuver the entire regulator out through the door opening.
Install the New Window Regulator
Reverse the removal process with the new regulator, paying close attention to alignment and cable routing.
Position the New Regulator Correctly
Feed the replacement regulator into the door cavity and align it with the mounting holes. Thread the frame bolts in loosely at first so you can adjust the position. Make sure the cable drum or gear mechanism faces the same direction as the old unit.
Reattach the Lift Arms to the Glass
Reconnect the lift arms to the window using the original or new bolts. Tighten them firmly but avoid excessive force, since overtightening can crack the glass. Confirm the window sits level and glides smoothly through the tracks before final tightening.
Reconnect the Motor
If you kept the original motor, align it with the new regulator gear and reinstall the mounting bolts. Tighten them evenly to keep the gear mesh aligned. Turn the motor gear by hand briefly to confirm smooth cable movement before applying power.
Test the Window Before Reassembling

Skipping this step risks damaging the new regulator or the glass if something is misaligned.
Briefly Power the Window
Plug the window switch connector back in and tap the switch for a short test cycle. Watch for these signs of proper operation:
– Smooth, even movement up and down
– No grinding, clicking, or hesitation
– Glass tracking straight in the channel
Cut power immediately if the window binds, stalls, or moves crookedly.
Make Final Alignment Adjustments
Loosen the lift arm bolts slightly and reposition the glass if movement looks uneven. Retest until the window travels straight and consistently. Once satisfied, fully tighten every regulator and arm bolt to specification.
Reinstall the Door Panel and Run Final Checks
With the regulator working properly, reassemble the door and verify every related feature.
Refit the Door Panel
Align the panel window channel with the glass edge and slide the panel downward into position. Press firmly around the perimeter until every plastic clip snaps into place. Reinstall all screws and any trim covers you removed earlier.
Reconnect Every Electrical Connector
Plug in the window switch, speaker, and courtesy light harnesses. Make sure no wires are pinched, stretched, or routed across sharp edges. Test the door handle and lock mechanisms for smooth operation.
Run a Complete Function Test
Operate the window several times through its full range. Listen for unusual noise and watch for hesitation. Verify auto-up and auto-down features work if your vehicle has them. Also test the door locks, speakers, and interior lights to confirm nothing was disturbed during reassembly.
Prevent Future Window Regulator Failures
A properly installed regulator should last many years. A few simple habits extend its life even further.
Lubricate Moving Parts Once a Year
Apply white lithium grease to the window tracks, regulator guide rollers, and lift arm pivot points. Avoid oil-based sprays, which attract dust and grime that accelerate wear.
Keep the Window Up Before Slamming the Door
Hard impacts can bend regulator arms or crack mounting brackets. Always raise the window fully before closing the door firmly.
Address Early Warning Signs Quickly
If you notice sluggish movement, unusual noise, or uneven glass travel, inspect the regulator right away. Catching wear before total failure prevents glass damage and saves you from repeating the entire repair.
Frequently Asked Questions About Window Regulator Replacement
How long does it take to change a window regulator?
Most DIYers complete the job in two to four hours, depending on vehicle design and experience level. Complex door panels or rusted bolts can extend the time.
Can I replace a window regulator without removing the window glass?
In most cases, no. The glass must be secured with tape or fully removed to access the regulator mounting bolts safely. Some vehicles offer limited access through service holes, but full removal is the standard approach.
Is it worth replacing a window regulator myself?
Yes, for most vehicle owners. DIY replacement saves between $200 and $500 in shop labor costs. The repair requires only basic hand tools and moderate mechanical skill.
What causes window regulators to fail?
Common causes include worn cables, broken plastic pulleys, snapped lift arms, and corroded mounting points. Age, frequent use, and cold weather accelerate these failures.
Do I need to replace the motor at the same time?
Not always. If the motor still runs and tests good with a multimeter, reuse it with the new regulator. Replace it only if it shows signs of failure or comes integrated with the regulator assembly.
Should I disconnect the battery before starting?
Yes, disconnecting the negative battery cable is a smart safety step, especially if your vehicle has side airbags in the door. This prevents accidental airbag deployment during the repair.
Key Takeaways for a Successful Window Regulator Replacement
Knowing how to change a window regulator puts you in control of one of the most common car door repairs. Start by confirming the diagnosis, gather the correct tools and matching parts, and work methodically through each disassembly step. Always secure the glass with tape before unbolting anything, and test the new regulator thoroughly before snapping the door panel back into place.
Your next step is to consult your vehicle-specific service manual for torque specifications and any model-specific quirks. With patience and attention to detail, you can finish the job in under four hours and enjoy smooth, reliable window operation for years to come.



