
Installing an egress window in your basement is more than a renovation project. It is a critical safety upgrade that can transform a dark, unused space into code-compliant living square footage. A proper egress window installation must meet strict building code requirements, including a minimum net clear opening of 5.7 square feet, with at least 24 inches of height and 20 inches of width. Whether you are converting a basement into a bedroom or simply improving ventilation, this guide walks you through every phase using proven methods and professional insights.
In the sections ahead, you will learn how to locate underground utilities, cut through your foundation safely, build a watertight window well, and finish the project to professional standards. You will also discover which tasks are DIY-friendly and when it makes sense to call in experts. With the right planning, your new egress window will provide decades of light, fresh air, and peace of mind.
Call 811 Before Any Excavation Begins
Locate Underground Utilities Safely
Before a single shovel hits the ground, contact your local utility locator service by calling 811. This free national service alerts utility companies to mark buried gas, electric, water, and internet lines in your work zone. Striking an underground utility can cause serious injury, death, or expensive property damage.
In one documented project, a homeowner discovered an irrigation line with a hidden copper elbow during excavation. The line had to be cut, capped with a crimp-off fitting, and buried safely away from the work area. Even shallow digging at 33 inches deep can encounter buried lines, so waiting for all utility marks is non-negotiable.
Excavate the Window Well Site Properly
Determine the Correct Dimensions
Your excavation must allow room for framing, insulation, and drainage. Dig 12 inches wider and deeper than the window frame on all sides, which typically creates a hole roughly 4.5 feet wide by 5 feet long. Leave 2 feet of clearance on the far side of the foundation wall to accommodate concrete cutting tools and ensure safe access.
Choose the Right Excavation Tools
Hand digging is possible but extremely labor-intensive. Renting a mini excavator dramatically reduces physical strain and improves precision. One project required hauling nearly 10 cubic yards of soil to a compost site, far more than initially estimated. Use a wheelbarrow or dump trailer to transport dirt to a disposal area.
Manage Weather and Soil Conditions
Rain can cause minor collapses in trench walls, though loose debris is usually easy to clear. Avoid working in heavy rain, and lay down plywood to protect the base if conditions turn wet. Tamp the bottom lightly once excavation reaches final depth, typically around 33 inches.
Cut the Foundation Safely and Structurally
Install a Structural Header First
Never cut the foundation without first supporting the wall above. Use three plies of 2×10 pressure-treated lumber glued and bolted together as a header. If the rim joist counts as one structural layer, add two additional plies. Secure the header with lag screws and construction adhesive, cutting nails or removing blocks as needed to fit snugly.
Select the Right Concrete Cutting Method
Professional Wet Saw Option
Hire contractors with diamond-tipped wet saws for clean, fast cuts. They complete the job in hours with minimal dust and fumes.
DIY Chainsaw with Diamond Blade
For better indoor air quality, cut from outside to inside using a chainsaw fitted with a diamond blade. This approach avoids bringing water or exhaust into the basement.
Angle Grinder Alternative
A battery-powered angle grinder with a diamond wheel works for small sections. Score both sides deeply before breaking out the center material.
Manual Breakout Technique
If the saw cannot reach full depth, drill a series of holes along the cut line using a concrete bit, score the surface with a cold chisel, and use a sledgehammer to break out blocks cleanly. After removal, fill core holes of adjacent blocks with concrete to restore structural strength.
Build and Install the Window Buck

Size the Frame Correctly
Measure your window precisely and add 4.25 inches to both width and height to account for shims, insulation, and the pressure-treated wood buck. Use 2×12 pressure-treated lumber to build a sturdy box frame that resists moisture and rot.
Secure the Buck to the Foundation
- Fasten the top buck to the sill plate.
- Level the bottom buck, tilting it slightly outward (about 1/4 inch per foot) for drainage.
- Anchor the frame to filled concrete blocks using Ramset 22-caliber concrete spikes, which are faster and more reliable than Tapcon screws that often snap under stress.
- Seal all joints between the buck and foundation with Loctite polyurethane sealant.
Waterproof and Insulate the Opening

Install Drainage Infrastructure
Water is the enemy of any basement opening. Prevent pooling with a layered drainage system:
- Lay 1 to 2 inches of clear rock (crushed stone) at the base.
- Place an irrigation tube from the well bottom to the home’s drain tile system.
- Trench under the foundation to connect the lines.
- Cover rock with geotextile fabric to stop soil infiltration.
- Add another 6 to 8 inches of rock over the fabric.
For extra protection, dig three 4-foot-deep rock-filled holes around the perimeter to enhance groundwater absorption.
Apply Flashing and Sealants
Waterproofing must be meticulous to prevent future leaks:
- Apply 6-inch-wide flexible flashing tape over the sill, up the sides, around corners, and over the top of the frame.
- Seal edges with exterior-grade silicone caulk.
- Install a drip cap over the window top.
- Where the well meets stucco, cut stucco a few inches above the wall, slide flashing behind the water-resistive barrier, and install a 2×6 cedar drip ledge with an 8-degree bevel to shed water.
Add Frost-Resistant Insulation
Because the well exposes the foundation footing, protect against frost heave with 4 inches of 25 psi rigid foam insulation against the wall. Position the window box proud of the block wall to allow 2 inches of insulation between the wall and glass. Hold foam in place with 2-inch pressure-treated cleats and seal panel joints with sheathing tape.
Construct the Window Well Retaining Wall

Choose Between Modular and Custom Builds
Modular System Option
Products like Wall Craft, available at major home improvement stores, offer stackable, durable egress wells with built-in drainage channels. They are fast to install, easy to adjust, and ideal for DIYers.
Custom Timber Retaining Wall
For custom aesthetics, use pressure-treated timbers and start with a level first course. Stack additional courses, alternating corners like log cabin joints, and fasten with 8-inch timber screws every 12 inches.
Reinforce Against Soil Pressure
Soil exerts significant lateral force, so reinforcement is essential. Install zinc-coated steel angle brackets by drilling pilot holes with a hammer drill and fastening brackets to the foundation using concrete screws and adhesive. Do not attach timber directly to the bracket; allow slight movement to avoid stress cracks. Line the interior with geotextile fabric, folding the top edge over to prevent soil migration.
Backfill and Finish the Exterior
Protect the Window During Backfill
Cover the glass with a plywood sheet before backfilling to prevent impact damage from rocks and debris.
Layer Materials Properly
Follow this sequence for long-term drainage performance:
- Push the drain line flush with the gravel base.
- Add 1 inch of pea gravel or clear rock just below trim level.
- Fill with 8 inches of river rock or clear crushed stone, keeping it 1 inch below the window trim to allow airflow.
- Cover rock and fabric with topsoil, sloping it away from the window at a 6-inch drop over 10 feet.
- Tamp soil in layers to prevent settling.
Avoid sand or pea gravel alone, as they can shift and trap water. Clear rock drains better and stabilizes the wall.
Set and Secure the Window Unit

Prepare the Window for Installation
Before installation, remove the screen, detach the crank mechanism, and unlock the locking hardware. Check for embedded nails or debris in the old frame.
Position and Level the Window
With a helper, lower the unit into the opening and tip it up until the nailing flange meets the buck. Hold the head inside while raising, and use the half-inch gap left by concrete cutters for alignment. Shim for plumb, level, and square, tilting the bottom slightly outward if not already done via the buck.
Fasten and Insulate
Nail the flange with roofing nails, then fill gaps around the frame with expanding spray foam for an airtight seal. Avoid overfilling, as foam can expand up to 30 times its original size.
Finish Interior and Exterior Trim
Install Exterior Trim
Use 1×3 polyurethane trim or rip wood to 1.25 inches wide. Fasten on edge with composite decking screws or brad nails. Trim may slide into a pre-cut channel for a flush look. Seal all joints with silicone caulk.
Line the Well Interior
For durability and appearance, install vertical furring strips every 2 feet to create an air gap. Line with fiberglass screen mesh to block pests, then cover with cedar deck boards. Build corner steps using 2x4s cut at 30-degree and 60-degree angles, and fasten with timber screws. Finish cedar with multiple coats of tung oil for weather resistance and rich color. Cap the top of the retaining wall for a polished look.
Test Operation and Final Inspection
Verify Emergency Access
In an emergency, follow these steps to open the window:
- Unlock the window.
- Flip up the four corner tabs.
- Remove the screen (gently pry if needed).
- Open with the crank.
Never break the glass first. Use the normal opening method unless the window is obstructed.
Check for Code Compliance
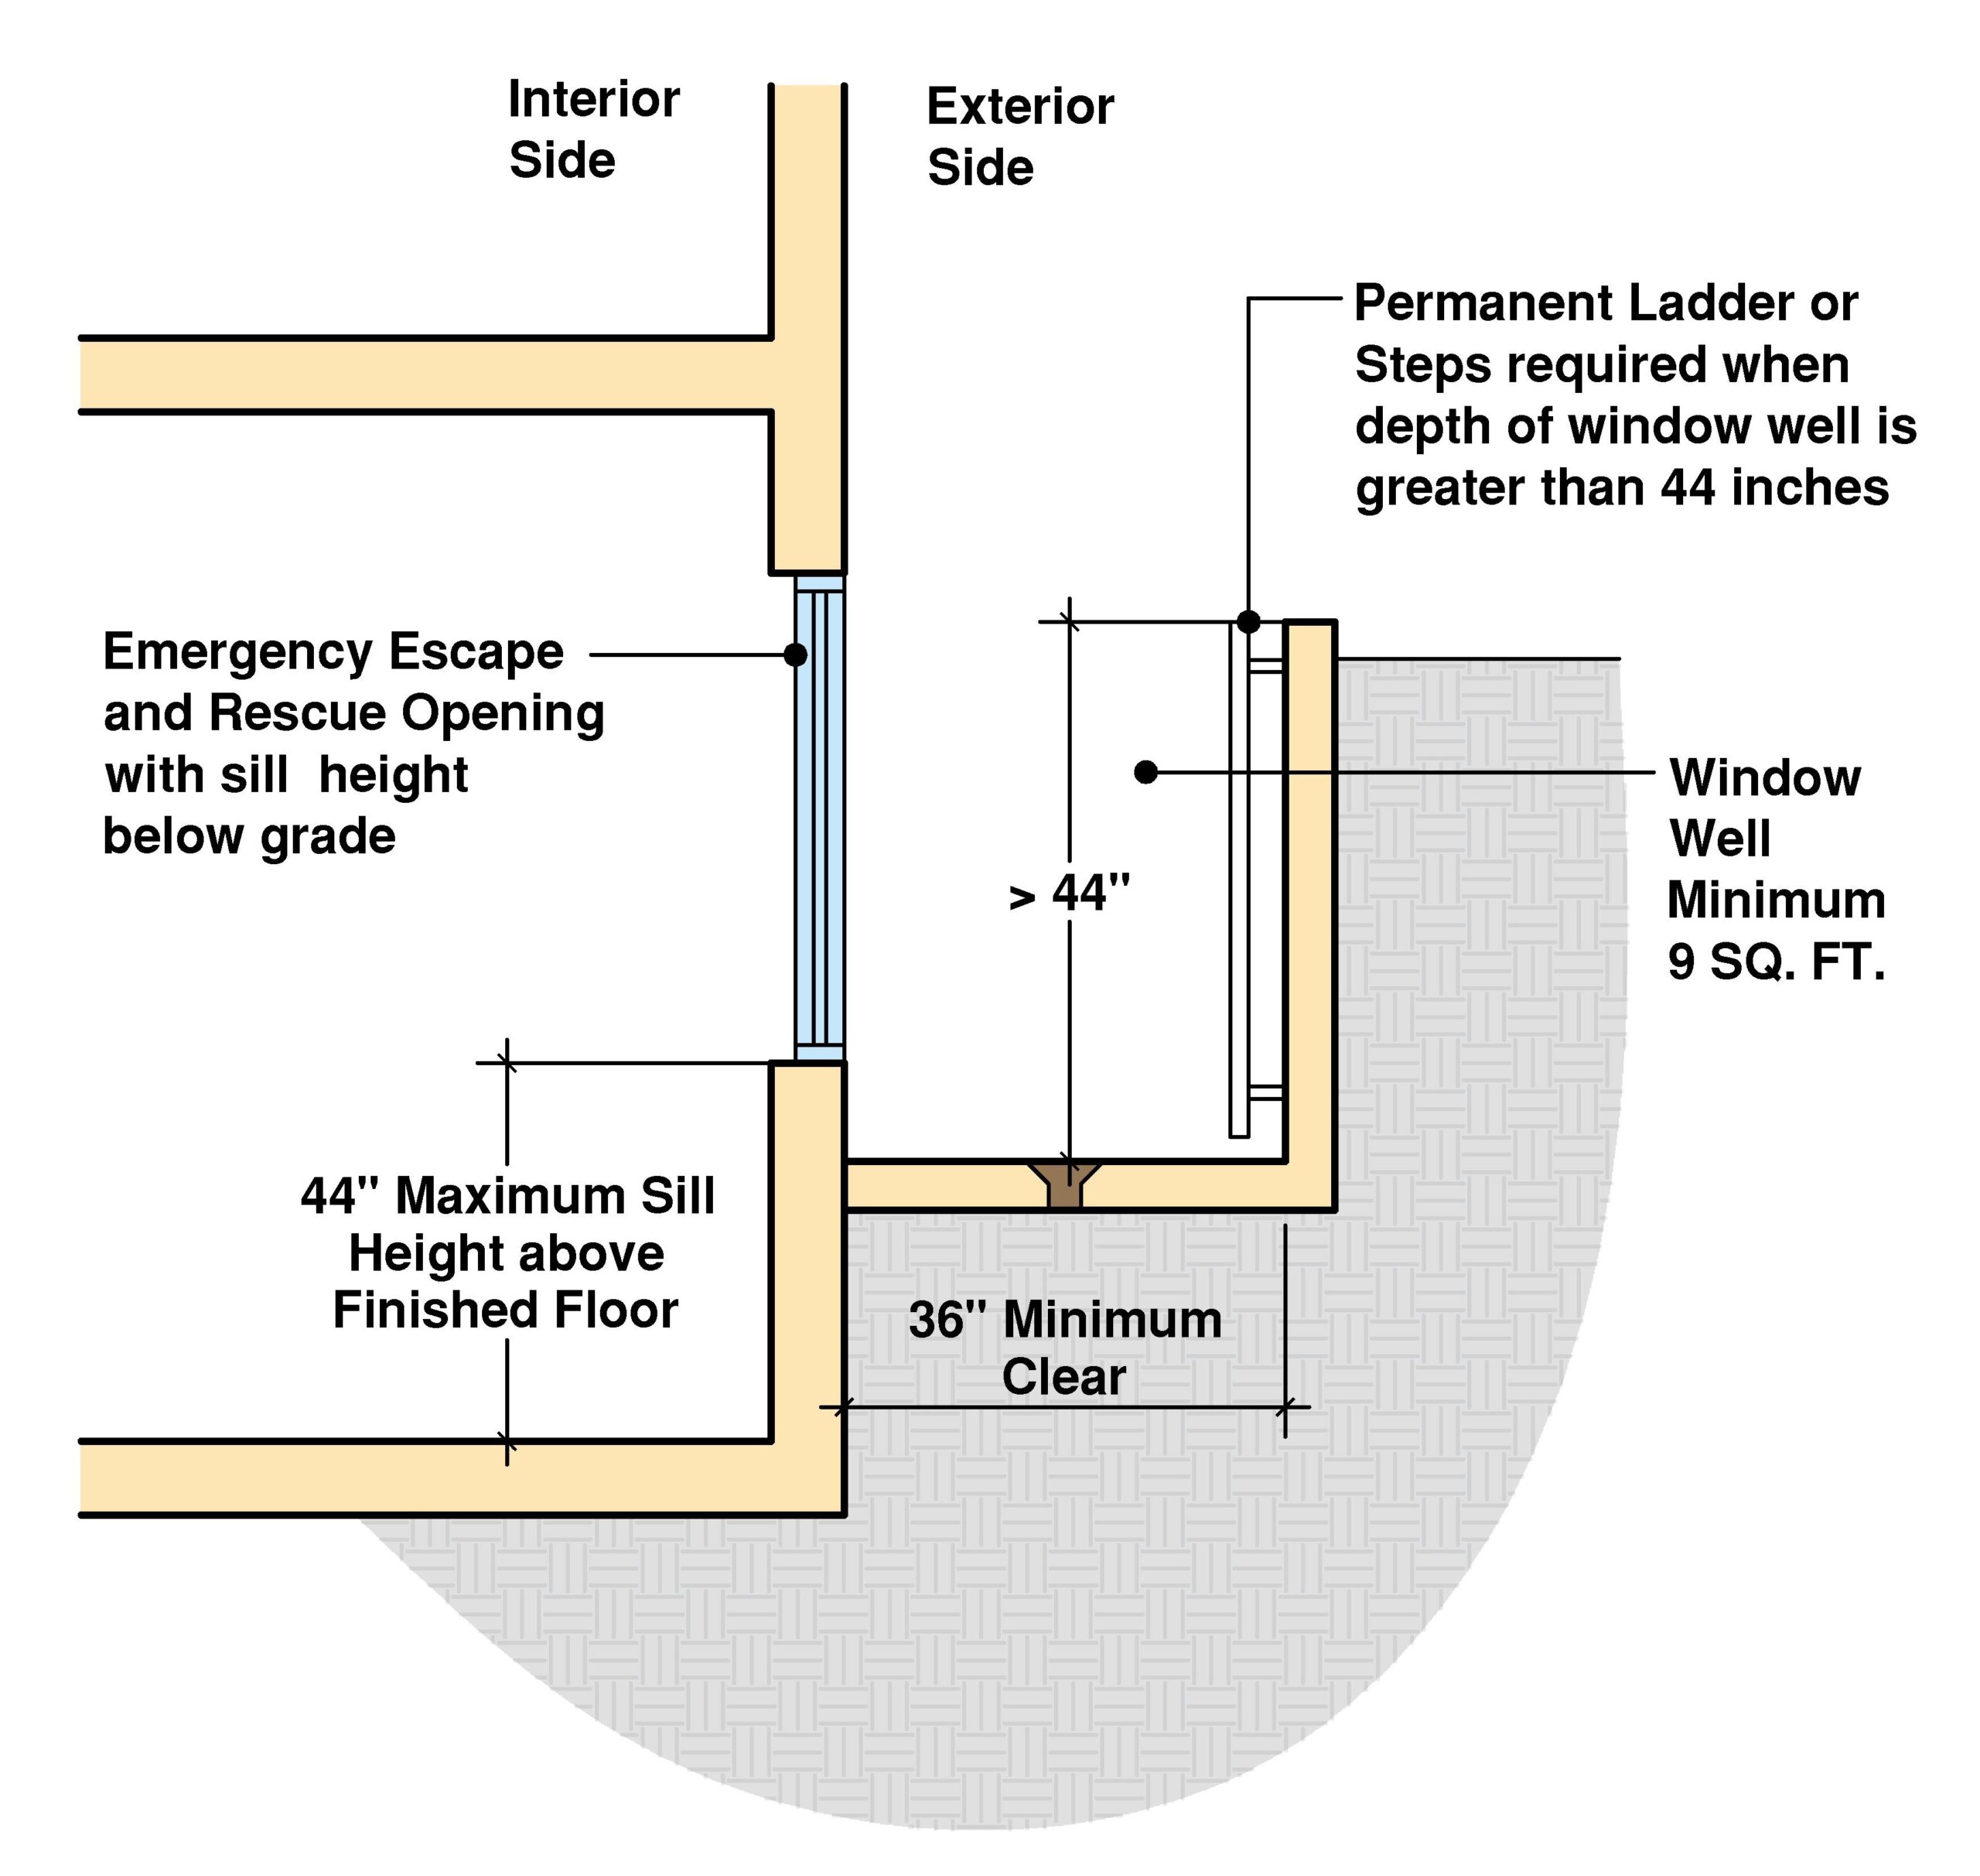
Ensure your installation meets local codes with these minimum requirements:
- Net clear opening: 5.7 square feet
- Minimum height: 24 inches
- Minimum width: 20 inches
- Sill height from floor: 44 inches or less
- Operational without tools
Meeting these standards allows the basement to count as livable square footage, increasing your home’s value.
Maintain Long-Term Performance
Winter Protection
Install a plexiglass cover over the well during winter to block snow, ice, and debris while still allowing light transmission.
Prevent Water Issues
Keep the drainage rock clear of soil buildup and inspect geotextile fabric annually for tears. Ensure soil slope directs water away from the window and trim nearby plants to reduce moisture retention.
Monitor for Damage
Check periodically for cracks in sealant or flashing, rust on brackets or fasteners, and shifting rock or settling soil. Address issues early to prevent costly repairs.
When to DIY and When to Hire a Pro
DIY-Friendly Tasks
- Excavation with a mini excavator rental
- Backfilling and landscaping
- Installing modular wells
- Trim and cladding work
Hire a Professional For
- Concrete cutting for safety and precision
- Structural header installation
- Waterproofing and flashing details
- Drain tile tie-in
Cutting concrete without experience risks injury and structural failure. Professionals deliver faster, safer results.
Cost-Saving Tips and Tool Advice
Rent, Don’t Buy Heavy Equipment
A mini excavator rental costs $200 to $400 per day but saves days of labor. A Ramset 22-caliber tool priced at $100 to $150 is cheaper and more effective than buying a hammer drill for occasional Tapcon use.
Avoid Tapcon Screws in Critical Areas
Tapcon screws frequently snap under stress. Use Ramset spikes or lag screws with adhesive for window bucks and brackets.
Compare Modular vs. Custom Costs
Modular wells run $300 to $600 with quick installation. Custom timber walls cost $500 to $800 in materials but require higher labor if DIY. Modular systems offer better drainage integration and are less error-prone.
Frequently Asked Questions About Egress Window Installation
What size opening does an egress window require?
Building codes typically require a minimum net clear opening of 5.7 square feet. The opening must also be at least 24 inches tall and 20 inches wide, with a sill height no more than 44 inches from the floor.
Can I install an egress window myself?
Yes, many parts of the project are DIY-friendly, including excavation, backfilling, and trim work. However, concrete cutting, structural header installation, and waterproofing details are best left to professionals due to safety and code concerns.
How deep should I excavate for an egress window?
Dig at least 12 inches wider and deeper than the window frame on all sides. Final depth is typically around 33 inches, depending on your foundation height. Leave 2 feet of clearance on the far side for tool access.
What is the best material for a window well?
Modular systems like Wall Craft offer quick installation and built-in drainage. Custom timber retaining walls allow for aesthetic matching but require more labor. Both options work well when properly reinforced and drained.
How do I prevent water from pooling in the window well?
Install a layered drainage system with clear rock, geotextile fabric, and a drain line connected to your home’s drain tile. Slope the exterior soil away from the window and keep drainage rock clear of debris.
Do egress windows add value to a home?
Yes. A code-compliant egress window allows your basement to count as livable square footage, which directly increases your home’s market value and appeal to buyers.
Key Takeaways for a Successful Egress Window Installation
A successful egress window installation transforms a dark basement into a bright, safe, and legally livable space. The three most important factors are proper drainage, meticulous waterproofing, and correct fastening methods. Calling 811 before excavation prevents dangerous and costly utility strikes, while a structural header protects your foundation during concrete cutting.
Your next step is to assess your basement layout, check local building codes, and decide which tasks you will tackle yourself versus hiring out. Start by scheduling the 811 utility marking and planning your excavation timeline. With careful preparation and the right tools, your new egress window will provide decades of safety, comfort, and added home value.



