
Filling a window box the wrong way leads to wilted plants, sagging containers, and soil that washes out after the first rain. Most people grab a bag of garden soil, toss in some flowers, and hope for the best. That approach usually fails by midsummer.
This guide shows you exactly how to fill a window box using a layered method that promotes drainage, controls weight, and keeps plants thriving all season. You’ll learn the right materials, plant placement strategies, watering routines, and maintenance habits that turn a basic box into a curb-appeal showpiece.
Choose the Right Window Box Before Planting
The container you select determines everything that follows. A poorly sized or built box limits plant choices and creates structural problems once filled with wet soil.
Size and Placement Guidelines
Your window box should extend 2 to 3 inches wider than the window frame on each side. This creates a balanced, anchored look rather than a cramped appearance. Depth matters just as much. A minimum depth of 9 inches supports healthy root systems and allows proper layering of drainage materials and soil. Shallow boxes restrict plant options and dry out too quickly.
Pick a Durable, Draining Material
Vinyl is the top choice for most climates because it resists heat and slows soil drying. Avoid untreated wood, which rots over time, and overly heavy materials like thick ceramic. Drainage holes are non-negotiable. Without them, roots drown and plants die. Look for containers with pre-drilled holes to avoid guesswork with drill bits.
Self-watering boxes work well for busy gardeners. They feature a built-in reservoir that feeds water upward, reducing watering frequency. Just make sure they have an overflow hole to prevent waterlogging during heavy rain.
Secure with Proper Brackets
Never rely on flimsy mounts. Use L-shaped structural brackets attached directly to the box itself, not just to the house. These prevent warping caused by the weight of wet soil, especially in sunny locations where heat expands materials. Mount to sturdy surfaces like siding or porch railings following manufacturer instructions.
Build the Drainage Layer with Perlite
The bottom third to half of your window box should be filled with perlite, a lightweight, porous volcanic material. It provides three critical benefits:
– Reduces overall weight
– Prevents waterlogging
– Allows roots to grow deep into moist zones
Avoid these common mistakes:
– Rocks or gravel add dangerous weight and bake roots by trapping heat
– Styrofoam or cornstarch-based foams break down over time, causing soil to sink
– Plastic bags or packing peanuts attract ants and degrade poorly
Perlite does not decompose, does not harbor pests, and maintains structure season after season.
Install a Weed Barrier Over the Perlite
Lay a permeable weed barrier fabric directly over the perlite. This stops fine soil particles from washing down and clogging drainage holes, which leads to root rot and poor performance.
The fabric lets water pass through while keeping layers separate. Without it, you will eventually need to unclog holes manually, often with a pencil or skewer.
Pro Tip: Some gardeners use broken clay pot shards to improve airflow, but perlite alone is superior for weight control and consistent drainage.
Add Quality Potting Mix and Boosters
Fill the remaining space above the barrier with a light, high-quality potting mix. A moisture-control formula like Miracle-Gro Moisture Control Potting Mix supports vigorous growth even with inconsistent watering. Never use garden soil. It compacts in containers and restricts root development.
Before planting, mix in:
– Slow-release fertilizer (such as Osmocote) for steady feeding all season
– Water-retaining gel or granules to reduce drying, especially in hot or windy areas
For annuals, replace soil each spring. Old soil is depleted of nutrients. Repurpose it in garden beds or around shrubs.
Select Plants Using the Thriller, Filler, Spiller Method
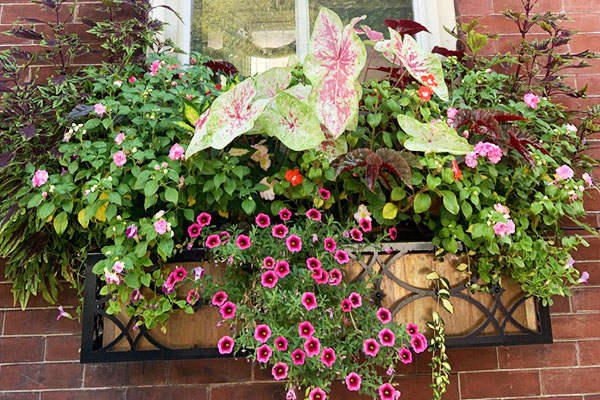
Create depth and drama with this professional formula.
Centerpiece (Thriller)
Plant one tall, eye-catching specimen in the center or slightly off-center:
– Crepis for airy, architectural height
– Salvia for vertical spikes that attract pollinators
– Fiber Optic Grass for compact, textural elegance around 14 inches tall
Mid-Height (Filler)
Surround the thriller with bushy plants for volume:
– Dala Petunias (10 to 12 inches) for full blooms and reliable color
– Violas for long-lasting, cold-tolerant displays in a wide color range
Trailing (Spiller)
Plant cascading varieties along the edges:
– Lemon Cello Supertunia for bright yellow flowers
– Royal Velvet Supertunia for deep purple drama
– Sweet Potato Vine or Illusion Midnight Lace for lush foliage
Design Tip: Combine contrasting colors like purple and yellow and mix fine grasses with bold leaves for maximum curb appeal.
Match Plants to Your Light Conditions
:max_bytes(150000):strip_icc()/window-boxes-lush-purple-flowers-grasses-A_Kz6101KXO8jaHrar2V-Y-a72ed7da84d245729a5adbdba307689f.jpg)
Full Sun (6+ Hours Daily)
Choose heat-lovers such as Wave Petunias, Cosmos, Salvia, and Crepis.
Part Sun or Afternoon Sun
Best performers include Fiber Optic Grass, Dala Petunias, Supertunias, and Violas.
Seasonal Swaps
- Spring and Summer: Violas, Cosmos, Salvia
- Fall (October): Pansies, Mini Pumpkins, Dwarf Boxwoods for evergreen structure
Note: Illusion Midnight Lace Potato Vine is not cold-hardy. Avoid it if nighttime temperatures drop below 35°F.
Plant Correctly for Strong Growth
Handle Roots with Care
Remove plants from nursery pots gently. If roots are bound in circles, tease them apart to encourage outward growth.
Position for Visual Impact
Place tallest plants first, then fillers, then trailers. Tilt stems slightly outward so flowers face viewers, not straight up. This enhances visibility from street level.
Space and Settle
Leave small gaps between plants. They will fill in fast. Top off with compost if needed. Then lightly firm soil around each root ball to eliminate air pockets. Do not pack soil tightly. Roots need oxygen.
Soil should sit just below the rim, leaving room for watering.
Water Smartly to Prevent Stress
Know How Often to Water
Containers dry out fast. In dry, windy climates, a 3 to 6 foot box may need 1 to 2 gallons daily.
- Normal conditions: Water once each morning



