A snapped lift cord, a stuck tilt wand, or slats that refuse to rotate can turn a simple window covering into a daily frustration. When blinds stop working properly, you lose control over privacy, natural light, and even the comfort of your living space. The encouraging part is that most blind problems respond well to basic DIY repairs using common household tools.
Learning how to fix broken window blinds empowers you to handle everything from cord replacements to bracket adjustments without calling a professional. This guide walks you through diagnosing the issue, repairing cords and slats, restoring tilt mechanisms, and maintaining your blinds for long-term performance. You’ll find clear steps, practical warnings, and expert tips designed to save you both time and money.
Diagnose Your Broken Window Blinds Before Grabbing Tools
Jumping straight into repairs often wastes effort and can cause additional damage. A quick functional check narrows down the exact problem and points you toward the right fix. Most blind issues fall into four categories: lift cords, tilt mechanisms, damaged slats, or mounting hardware.
Test the Lift Cord Behavior
Pull the cord gently and watch how the blinds respond. Does the shade rise unevenly or fall on its own once lifted? A cord that feels slack or won’t retract usually points to a faulty spring or cord lock inside the headrail. If one side lifts while the other stays put, the ladder cord may have detached or a bracket has broken.
Check the Tilt Wand and Mechanism
Rotate the tilt wand or pull the tilt cord to see if the slats respond. A wand that spins freely without moving the slats suggests a stripped gear or disconnected tilt rod. Slats that rotate only partially often indicate a bent tilt rod or worn ladder tape needing attention.
Inspect the Mounting Brackets
Look closely at where the headrail meets the window frame or wall. A loose bracket causes sagging, while a cracked bracket may need full replacement. Sometimes a simple screwdriver tightening solves the entire problem.
Repair a Snapped or Frayed Lift Cord

A damaged lift cord prevents your blinds from raising or lowering properly. Depending on the severity, you can apply a quick fix or perform a full restringing.
Patch a Frayed Cord End
If only the bottom portion of the cord is frayed:
1. Snip off the damaged section with sharp scissors.
2. Carefully melt the fresh tip with a lighter to seal the fibers.
3. Thread the cord back through the bottom guide and cord lock.
This approach offers a temporary solution. For lasting results, plan a full cord replacement.
Replace a Severed Lift Cord Completely
Full cord replacement requires headrail disassembly:
1. Take the blind down from its brackets.
2. Open the headrail to locate the cord wrap drum.
3. Cut the old cord and unwind it from the drum mechanism.
4. Route the new cord along the original path, following the manufacturer layout.
5. Tie a secure knot at the end and reattach to the drum.
6. Reassemble the headrail and remount the blind.
Pro Tip: Photograph each step during disassembly. Cord routing varies significantly between brands, and photos prevent confusion during reassembly.
Fix Stuck, Cracked, or Bent Slats

Damaged slats affect both appearance and function. Whether you have aluminum, vinyl, or wooden slats, most can be repaired or individually replaced.
Swap Out a Cracked Horizontal Slat
Replacing a single slat is straightforward:
1. Lower the blind fully to access the broken piece.
2. Slide the damaged slat toward one side to disengage it from the ladder cords.
3. Insert a replacement slat of matching width.
4. Adjust the ladder cord tension to lock everything in place.
Warning: Never yank a slat sideways with force. Excessive pressure can tear the ladder tape and create a bigger repair.
Straighten a Slightly Bent Slat
For minor bends, gentle reshaping works well:
1. Remove the slat if your blind design allows it.
2. Wrap plier jaws in soft cloth to protect the finish.
3. Carefully bend the slat back toward its original shape using your hands or padded pliers.
4. Reinstall and test alignment.
Deep creases or kinks usually mean replacement is the smarter choice.
Mend Torn Ladder Cord
The ladder cord holds slats evenly spaced. When it tears:
1. Trim away the damaged section.
2. Join the two ends using a ladder splice connector.
3. Slide the connector into position and verify the slats sit level.
Without a connector on hand, replacing the entire ladder tape may be necessary, especially if multiple sections show wear.
Restore the Tilt Mechanism on Broken Window Blinds
When the tilt wand turns but slats stay still, the internal mechanism has failed. Repairs range from simple wand swaps to gear replacements.
Replace a Stripped Tilt Wand
A worn tilt wand is one of the most common tilt failures:
1. Remove the blind from the window.
2. Locate the tilt gear housed inside one end of the headrail.
3. Slide the old wand out of its housing.
4. Insert a replacement wand matching the original shape and size.
5. Test the rotation before remounting the blind.
Tip: Match the wand profile precisely. Round, square, and oval wands each fit specific gear designs.
Reconnect a Dislodged Tilt Rod
If the ladder tape moves but the tilt rod has slipped:
1. Remove the end cap from the headrail.
2. Inspect the tilt rod connection to the gear.
3. Reseat the rod firmly or install a new gear strip if teeth are stripped.
Some models feature a ladder lock that must be fully engaged for proper operation.
Solve Common Vertical Blind Problems
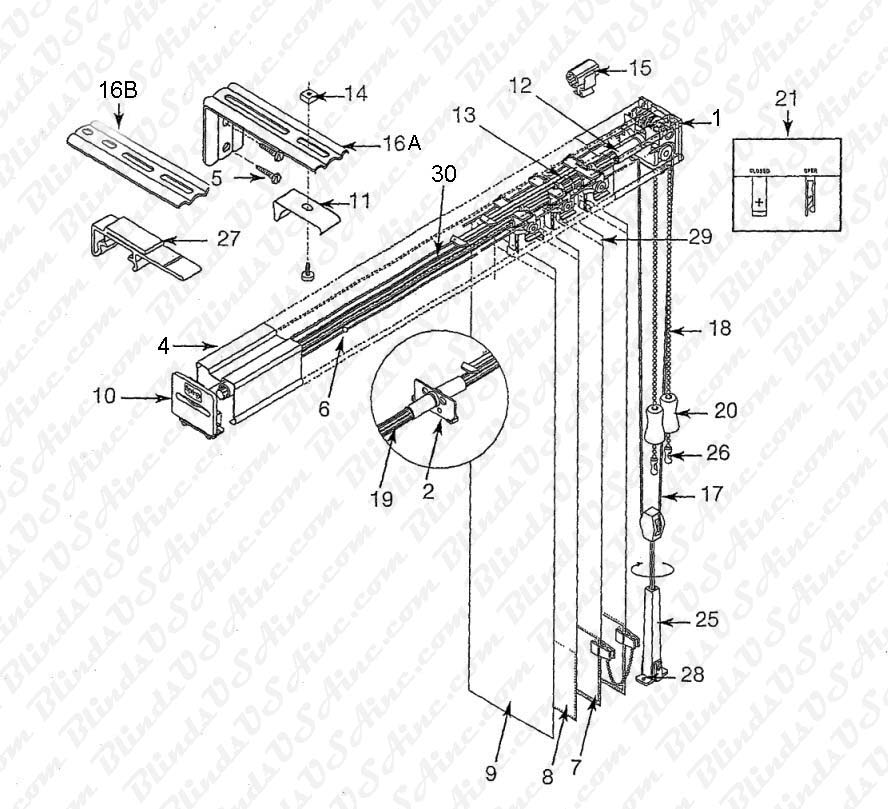
Vertical blinds face unique issues including falling blades, jammed carriers, and broken wands. Each problem has a targeted solution.
Reinsert a Detached Vertical Blade
Blades pop free when carriers loosen over time:
1. Rotate the blade to a sideways position.
2. Align the top pin directly over the carrier slot.
3. Press down gently until you hear a click.
If the blade refuses to stay seated, the carrier itself likely needs replacement.
Swap Out a Worn Carrier
Carriers wear down with regular use:
1. Remove the blade from the faulty carrier.
2. Squeeze the carrier release tab to free it from the track.
3. Slide a new carrier into position.
4. Reattach the blade and test movement.
Pro Tip: Keep spare carriers available. They’re affordable and often fit multiple vertical blind models.
Clear a Jammed Vertical Track
Dust buildup causes blades to stick:
1. Remove all blades from the track.
2. Wipe the track with a slightly damp cloth and dry completely.
3. Apply a light silicone spray for smooth gliding.
4. Reinsert blades and confirm free movement.
Avoid oil-based lubricants since they attract dust and create sticky residue.
Tighten or Replace Loose Mounting Brackets
Sagging blinds usually trace back to bracket problems. Addressing these early prevents the entire blind from falling.
Tighten Loose Bracket Screws
A screwdriver is often all you need:
1. Check both headrail brackets for movement.
2. Tighten any loose screws firmly.
3. Confirm the blind hangs level across the window.
Screws that won’t hold indicate a stripped wall anchor underneath.
Install New Wall Anchors
Drywall anchors wear out over time:
1. Remove the blind and bracket from the wall.
2. Extract the old anchor completely.
3. Insert a heavy-duty toggle bolt or fresh anchor.
4. Reattach the bracket and tighten securely.
For tile or plaster walls, choose anchors rated for those surfaces to prevent cracking.
Maintain Blinds to Prevent Future Breakage

Routine care dramatically extends blind lifespan and reduces repair frequency. A few minutes each week makes a noticeable difference.
Dust Your Blinds Weekly
Regular dusting prevents grit from working into mechanisms:
– Close the blinds fully and wipe each slat with a microfiber cloth.
– Vacuum vertical blades on both sides using a brush attachment.
This simple habit keeps lift cords and tilt gears running smoothly.
Lubricate Moving Parts Annually
Once per year, apply silicone spray to tilt rods, lift cords, and tracks. Avoid oil-based products since they attract dust and stain nearby surfaces.
Warning: Less is more with lubrication. Excess spray can drip onto walls or window sills and cause staining.
Know When Replacement Beats Repair
Some conditions make repair impractical or uneconomical:
– Multiple broken slats across the blind
– Severely warped or bent headrail
– Discontinued replacement parts
– Blinds older than 7 to 10 years
In these scenarios, investing in new blinds delivers better long-term value than repeated repairs.
Frequently Asked Questions About Fixing Broken Window Blinds
Can I fix broken window blinds without removing them from the window?
Many simple repairs, including tightening brackets and patching frayed cords, can be done while the blind remains mounted. However, cord replacements, tilt mechanism repairs, and slat swaps typically require removing the blind for proper access and safety.
What tools do I need to fix broken window blinds at home?
Most repairs require only basic tools: a screwdriver, scissors, pliers, a lighter, and a replacement cord or slat. For vertical blinds, a silicone spray helps maintain track movement. Specialty parts like gear strips or carriers can be ordered online based on your blind brand.
How long does it take to repair broken window blinds?
Simple fixes like tightening brackets or reinserting a vertical blade take just a few minutes. More involved repairs such as restringing a lift cord or replacing a tilt mechanism usually require 30 to 60 minutes depending on experience and blind type.
Are broken window blinds a safety hazard?
Yes, especially in homes with children or pets. Looped cords pose strangulation risks and should be replaced with cordless designs or secured with cord cleats. Always address damaged cords promptly to maintain a safe environment.
Where can I buy replacement parts for window blinds?
Replacement cords, slats, carriers, and tilt wands are available through manufacturer websites, home improvement stores, and online retailers. Bring measurements and brand details when ordering to ensure proper fit.
Key Takeaways for Repairing Broken Window Blinds Successfully
Fixing broken window blinds starts with accurate diagnosis, so always test the lift cord, tilt mechanism, and brackets before beginning repairs. Most issues, including frayed cords, bent slats, and loose brackets, respond well to straightforward DIY methods using basic tools.
Keep a small stock of spare parts like cords, slats, and carriers so you can address problems quickly when they appear. Regular dusting and annual lubrication prevent the majority of common blind failures and extend the life of your window coverings.
Your next step is simple: identify the specific issue affecting your blinds using the diagnostic checklist above, gather the right tools, and follow the targeted repair steps. With this knowledge in hand, you can confidently restore your blinds and avoid the cost of professional service or full replacement.