
A dark, drafty basement window can drain energy and lower your home’s comfort. Many homeowners hesitate to tackle this project because it involves concrete, waterproofing, and potential structural work. The good news is that learning how to install basement window units correctly saves money and delivers lasting results.
This guide breaks down every phase of the process, from initial measurement through final inspection. You will discover pro techniques for removing old frames, building custom bucks, flashing properly, and meeting egress codes when needed.
Measure the Rough Opening Accurately

Accurate measurement is the foundation of a successful install. Most basement openings are not standard sizes, especially in older homes where frames were cast directly into the concrete.
Take Interior and Exterior Measurements
Measure the height and width at the top, middle, and bottom of the opening. Concrete walls often bow or taper, so recording the smallest dimension ensures a proper fit. Check the cavity depth carefully, because many older foundations use a 1.5-inch bottom plate rather than standard 3.5-inch lumber.
Remove the old window first whenever possible. This reveals the true cavity shape and prevents costly ordering mistakes.
Size Your Replacement Window Correctly
New windows must be slightly smaller than the rough opening. Leave a 1/4 to 1/2 inch gap on each side to accommodate shims, flashing, and expansion foam.
For new egress openings cut into the foundation, add 4.25 inches to both width and height. This extra space allows room for a wood buck frame, insulation, and shimming adjustments.
Remove the Old Window Safely
Extracting an embedded window requires the right approach. Rushing this step can damage surrounding concrete or interior finishes.
Cut the Top Frame First
Start by slicing through the center of the top frame using a reciprocating saw with a metal-cutting blade. This weakens the structure and makes the rest of the removal easier.
Work from the top down. Insert a pry bar between the frame and concrete once the top is cut. Wiggle the sides outward while applying pressure at the bottom to break the unit free.
Handle Glass and Wood Frames Carefully
If glass is intact, remove it whole before demolition. Cut through old caulking with a utility knife, then lift the pane out carefully. This prevents shards from embedding in surrounding drywall.
For wood frames, cut through the material in sections to create leverage points. Peel the frame back piece by piece rather than yanking it out whole.
Prepare the Opening for Installation
A clean, properly prepped opening ensures a watertight, energy-efficient result. Skipping this step leads to failed seals and moisture problems.
Remove Drywall Returns and Corner Beads
Many basements feature drywall returns where the wall extends flush to the frame. Use a drywall hammer or claw hammer to gently pry behind the metal corner bead.
Wear gloves during this step. Galvanized edges are sharp, and small nails are numerous throughout the bead.
Clear Debris and Concrete Obstructions
Vacuum all dust and loose fragments from the opening. Then inspect for a concrete trough running through the sill. This ridge blocks insulation and must be removed.
Use a chisel and hammer to chip away the obstruction. Your goal is a smooth, continuous cavity that allows expansion foam to fill completely.
Build a Custom Wood Buck Frame

When the opening does not match standard window sizes, a pressure-treated wood buck adapts it perfectly. This frame bridges the gap between irregular concrete and your new window.
Cut and Fit Pressure-Treated Lumber
Use 2x4s or 2x12s depending on cavity depth. Construct a rectangular frame that fits snugly into the concrete opening. Cut the side and bottom plates to match your measured dimensions.
Apply construction adhesive to the bottom plate before setting it in place. This bonds wood to concrete for long-term stability.
Secure the Frame with Concrete Screws
Drill pilot holes using a masonry bit, then fasten the frame with 3- or 4-inch concrete screws. Use a countersink bit so screw heads sit flush and do not interfere with window placement.
Shim the base plate to level it before tightening screws fully. Check with a spirit level across both directions.
Install a Structural Header for Egress Openings
Creating a new egress window requires cutting through foundation blocks. This is structural work that demands proper reinforcement.
Cut and Install a Load-Bearing Header
For openings wider than 3 feet, install a header made of three plies of 2x10s. One may be the existing rim joist, with two additional plies added for support.
Fasten with lag screws and construction adhesive. Cut out obstructing blocks carefully and remove any nails in the way.
Fill Block Cores with Concrete
After installing the header, pour rapid-setting concrete into the hollow cores beneath it. This restores strength and prevents settling over time.
Cut the Foundation Wall for Egress
When enlarging or creating a new opening, the right tools make all the difference.
Use a Diamond-Blade Chainsaw
A chainsaw with a diamond blade is safer and more precise than a handheld concrete saw. It allows a single clean cut from the exterior, minimizing fumes and dust inside the home.
Cut along the marked perimeter, then use a sledgehammer and chisel to remove the block section.
Modify and Flash the New Window
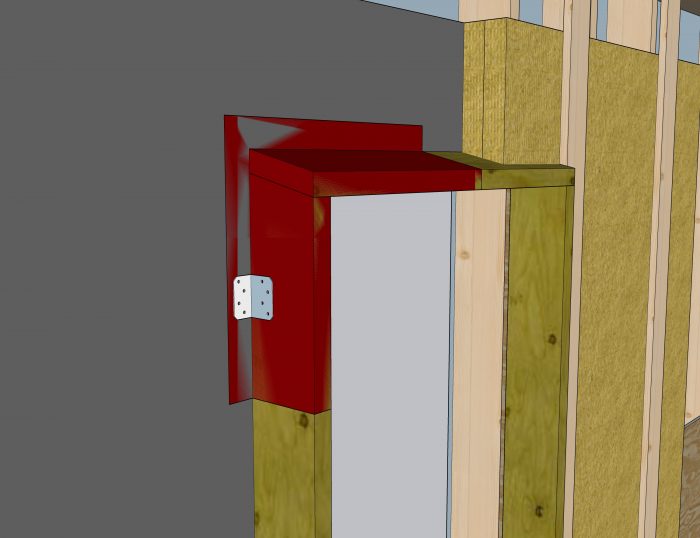
Most replacement windows include mounting flanges that do not work in basement installations. Proper flashing prevents water infiltration and protects your investment.
Remove Mounting Flanges
Score the flange with a utility knife, then use metal snippers to cut and bend it off. Your goal is a flush frame that sits tight against the wood buck or concrete.
Apply Interior Flashing Tape
Use 6-inch flexible flashing tape on the wood buck before installing the window. Wrap the tape over the sill and up the sides at least 6 inches.
Stretch it tightly around corners to avoid wrinkles. Seal the top edge and overlap seams for complete coverage.
Install an Exterior Drip Cap
After the window is in place, add a drip cap over the top exterior edge. This directs water away from the frame and prevents infiltration.
Set and Align the Window Properly
Precision alignment ensures smooth operation and airtight sealing. Even small errors here create binding sashes and air leaks.
Dry Fit Before Securing
Place the window in the opening without fastening. Check for full contact with the sill and even gaps around the frame.
Level and Shim the Frame
Use a spirit level to verify the window is plumb and level at the top, middle, and bottom. Check diagonal corners for squareness on larger units.
Insert wood shims on all sides to center the window. Avoid over-tightening screws, because this can warp the frame and prevent opening.
Clamp and Lock During Installation
Temporarily clamp the window in place. Then close and lock it before applying foam. This keeps the sash square as the foam expands.
Insulate with Low-Expansion Foam
Insulation prevents drafts, condensation, and energy loss. Choosing the wrong foam can bow your frame and ruin the installation.
Choose the Right Foam
Use low-expansion foam rated for windows and doors. High-expansion foam exerts enough pressure to distort frames and render them inoperable.
Apply Foam in Stages
Shake the can well and cut the nozzle at a 30 to 45-degree angle for a 3/8-inch bead. Apply foam to the exterior side first to stop air infiltration, then to the interior to complete the thermal barrier.
Angle the nozzle to reach under and behind the frame. Stop when foam reaches the insulation line and avoid overfilling. Wait 2 to 4 hours for full cure before trimming. Wipe uncured foam with acetone immediately.
Install Rigid Insulation for Egress Wells
For excavated egress windows, rigid foam provides frost protection and thermal performance.
Add Base and Wall Insulation
Place 4 inches of 25 psi rigid foam at the bottom of the excavation to protect the footing. Press 2-inch rigid boards between the wood buck and foundation wall.
Seal all seams with sheathing tape to block air and moisture infiltration.
Seal and Caulk for Waterproofing
Water management is critical in below-grade applications. The right sealant and technique prevent costly moisture damage.
Use Cold-Weather Caulk in Winter
Choose polymer-based or polyurethane sealant rather than standard silicone. Silicone becomes brittle below -7°C (20°F) and fails in freezing conditions.
Clean the frame and concrete thoroughly before application. Apply a continuous 3/8-inch bead around the perimeter and let the caulk flow naturally without smoothing with fingers.
Seal Bottom Gaps with Concrete
For gaps at the sill, mix rapid-setting concrete and pour it in. Smooth the surface and let it cure completely. Paint to match the foundation for a finished appearance.
Build the Egress Window Well
Excavation and well construction protect your window from soil pressure and water pooling.
Excavate with a Mini Excavator
Plan to remove nearly 10 cubic yards of soil. Renting a mini excavator saves significant time compared to hand digging.
Slope the grade away from the house to manage runoff effectively.
Construct a Timber Retaining Wall
Use pressure-treated timbers for durability. Start with a perfectly level base by tamping rock.
Stack with alternating joints and fasten every 12 inches with 8-inch timber screws. Wrap geotextile fabric inside to prevent soil clogging.
Anchor the wall with a galvanized steel angle bracket secured to the foundation, but do not fasten the timber to the bracket. Allow slight movement for settling.
Install Drainage and Cover

Without proper drainage, water pools and damages the well over time. A quality cover keeps debris out year-round.
Add Gravel and Connect to Drain Tile
Lay a base of clear rock and cover with geotextile fabric. Fill the space behind the wall with more gravel.
Trench under the foundation and connect the well to the existing drain tile system. This prevents frost heave and water buildup.
Install a Window Well Cover
Place a clear polycarbonate cover over the well. Apply a bead of caulk around the edge and press it into place. This keeps out snow, ice, and debris.
Finish Interior Trim and Drywall
Restoring the interior to match your basement finish completes the project professionally.
Repair Drywall Returns
Fill any holes with expansion foam, then trim flush. Apply two coats of joint compound, sand smooth, and paint.
Install New Casing
Use cedar or composite trim for moisture resistance. Cut jambs to size, install with wood glue and nails, then fill holes with wood filler.
Sand, prime, and paint to match your existing decor.
Add Interior Well Cladding
Attach furring strips every 2 feet to the well walls. Line with fiberglass screen to block pests, then cover with cedar deck boards.
Build steps from 2x4s cut at 30- and 60-degree angles, then cover with cedar decking. Seal trim with tung oil for long-lasting durability.
Final Inspection and Testing
Before considering the job complete, test every element of the installation.
Perform the Two-Finger Test
Open and close the window. It should operate smoothly and open with just two fingers. If it binds, check for frame warping or misalignment.
Check for Drafts
Run your hand around the frame perimeter. If you feel air movement, re-caulk the exterior seal.
Clean Up Thoroughly
Vacuum dust, wipe surfaces, and dispose of debris. A clean finish demonstrates professional quality and attention to detail.
Frequently Asked Questions About Basement Window Installation
How long does it take to install a basement window?
A standard replacement takes 4 to 8 hours for an experienced DIYer. Egress installations with excavation require 2 to 3 days, including curing time for concrete and foam.
Do I need a permit to install a basement window?
Most jurisdictions require permits for new egress openings or structural modifications. Simple replacements in existing openings may not need permits. Check with your local building department before starting.
What is the standard basement window size?
Older homes often have non-standard sizes, but common dimensions include 32×16 inches and 48×24 inches. Always measure your specific opening rather than assuming a standard size.
Can I install a basement window in winter?
Yes, but use polymer-based or polyurethane caulk rather than silicone. Avoid temperatures below -7°C (20°F) for best adhesion. Interior work can continue year-round.
How much does it cost to install a basement window?
Standard replacements range from $200 to $600 for materials. Egress installations with excavation typically cost $2,500 to $5,000 including the window well and drainage system.
What is the minimum size for an egress window?
Building codes typically require a minimum opening of 5.7 square feet with at least 20 inches of width and 24 inches of height. Check local codes for specific requirements in your area.
Key Takeaways for Installing a Basement Window Successfully
Learning how to install basement window units properly protects your home from moisture damage while improving comfort and value. The three most critical factors are accurate measurement, proper flashing, and correct foam application.
Start by measuring the actual cavity after removing the old window. Build a pressure-treated wood buck when dimensions do not match standard sizes. Apply flexible flashing tape and low-expansion foam to create a watertight, airtight seal.
For egress projects, invest in proper drainage and a quality window well cover. These elements prevent water pooling and extend the life of your installation significantly.
Ready to begin? Gather your tools, measure your opening, and follow each step carefully. Your new basement window will deliver light, safety, and efficiency for decades to come.



