

A cracked, sagging, or rotting window sill is more than an eyesore. It is an open invitation for moisture to seep into your wall cavity, where it can quietly destroy framing, spawn mold, and drive up repair costs. Learning how to change a window sill the right way protects your home, boosts energy efficiency, and instantly refreshes your interior or exterior.
Most homeowners can complete this project in 2 to 4 hours for under $100 in materials, saving hundreds in professional labor. In this guide, you will learn how to remove the old sill safely, treat hidden rot, take precise measurements, cut a perfect replacement, and seal everything for decades of protection.
Gather Tools and Materials First
Walking back and forth to the hardware store mid-project wastes time. Set up everything before you make the first cut.
Hand Tools You Will Need
A utility knife slices through old caulk and paint cleanly. A putty knife and chisel help pry stubborn pieces loose. A pry bar lifts casing and sills without splitting wood. You will also need a hammer, diagonal pliers, a carpenter’s pencil, measuring tape, a level, and 120-grit sandpaper.
Power Tools That Speed Up the Job
A table saw handles straight cuts with precision. A jigsaw shapes curves and angles. An oscillating multitool cuts through thick caulk layers without damaging the wall. A brad nailer makes trim work fast, though a hammer works fine for small jobs.
Materials Checklist
Pick up pressure-treated lumber or cedar boards for exterior sills. Interior sills can use cedar or pre-milled millwork. Grab 2-inch finishing nails, corrosion-resistant screws for treated wood, wood filler, low-expansion spray foam, exterior-grade caulk, primer, and semi-gloss paint with UV protection. Do not forget safety glasses, gloves, and a dust mask.
Remove the Old Sill and Trim
Careful removal protects your wall and gives you a perfect template for the new piece.
Cut Through Old Caulk and Paint
Run a utility knife along both sides of the side casing and around the entire sill perimeter. Slice deep enough to break the paint and caulk seal completely. Multiple shallow passes work better than one deep cut. This step prevents drywall tearing when you start prying.
Take Off the Side Casing
If the trim sits on top of the sill, it has to come off first. Place a wood block against the wall as a fulcrum, then slide a pry bar behind the casing. Work slowly from one end to the other, lifting gently to avoid snapping the wood. Pull out nails with pliers and set the casing aside if it is in good shape.
Pry Out the Damaged Sill
Slide a putty knife under the sill edge to break any adhesive. Insert the pry bar and lift gently, tapping with a hammer if needed. Most jambs are nailed at the bottom, so watch for hidden fasteners. If the sill refuses to budge, cut a vertical line down the center with a reciprocating saw and pry out sections. Never cut into the outer window frame.
Inspect the Frame and Treat Any Rot
A new sill installed over rotted framing will fail within a few years. Always inspect first.
Clean the Installation Surface
Scrape away old caulk, paint chips, and debris with a utility knife. Sand rough spots with 120-grit paper. Vacuum out dust and wipe the frame with a damp cloth. A clean surface ensures caulk and foam bond properly.
Identify and Repair Rotted Wood
Press the wood with a screwdriver. Soft, crumbly, or discolored spots signal rot. For minor damage, dig out all decayed material with a chisel, coat the cavity with wood hardener, and fill it with epoxy-based wood filler. If structural framing is compromised, stop and call a professional. Rot always returns if you skip fixing the moisture source first.
Seal Hidden Gaps
Spray low-expansion foam into any voids behind the sill area to block air leaks and water intrusion. Let it cure, then trim the excess flush with a utility knife. Avoid high-expansion foam, which can warp the frame.
Measure and Build a Template
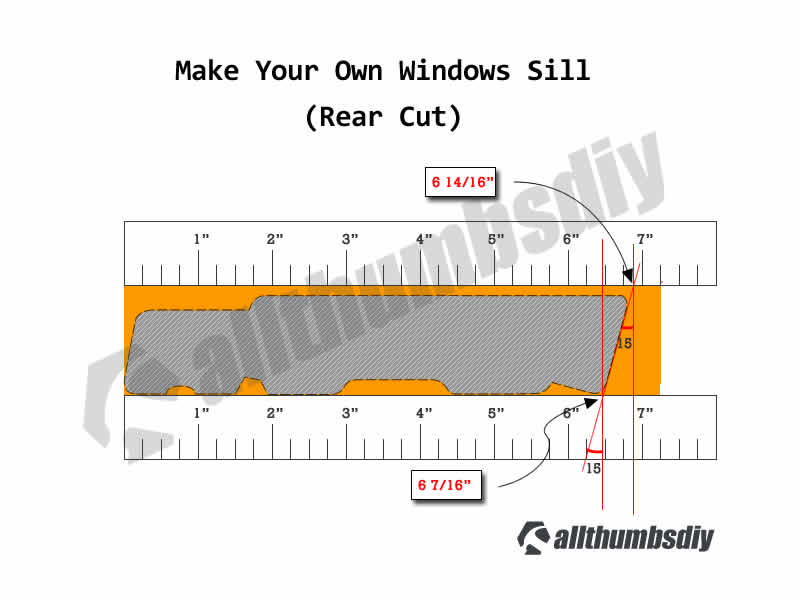
Accurate measurements are the difference between a tight, weatherproof fit and a leaky disaster.
Use the Old Sill as a Pattern
Whenever possible, keep the old sill intact. Lay it flat on your new board and trace the outline with a carpenter’s pencil. This captures the exact width, depth, and any decorative profile without guesswork.
Measure Directly If No Template Exists
Measure the opening depth and width if the old sill crumbled beyond saving. Cut a test piece slightly oversized since trimming down is easier than adding material back. For exterior sills, determine the slope using a protractor to measure the existing angle, typically 14 to 15 degrees, or calculate a 1/8-inch drop per foot of length.
Cut and Shape the New Sill
Precision cutting ensures the new sill sheds water and looks professional.
Make Your Straight Cuts
Use a table saw for clean, straight cuts along the grain. Cut the board slightly wider than your template, about 1/8 inch extra, to leave room for fine-tuning. Always cut length first, then width. Wear safety glasses and a dust mask throughout.
Shape Edges and Angles
For interior sills, use a router with a roundover bit to create a smooth bullnose front edge. For exterior sills, set your miter saw to 14 to 15 degrees or use a jigsaw with a guide to cut the downward slope. Test fit frequently and sand all cut edges with 120-grit paper to remove splinters.
Install and Secure the New Sill
Proper placement and fastening guarantee long-term durability.
Position and Level the Sill
Slide the new sill into the opening and check for level across its length. For exterior sills, confirm the slope directs water outward, never inward. Use shims underneath to adjust height or tilt as needed. Remove the sill temporarily once everything lines up.
Fasten Interior and Exterior Sills Differently
For interior sills, drive 2-inch finishing nails or brad nails into the wall studs below, spacing them every 6 inches. Skip the glue since nailing allows easier future repairs. For exterior sills, use corrosion-resistant screws rated for pressure-treated wood, spaced 6 inches apart along the outer edge. A thin bead of low-expansion foam under the sill before final placement adds waterproofing.
Reattach Trim and Seal All Seams

Trim and caulk protect the joint and deliver a finished look.
Reinstall the Side Casing
Place the saved or new trim back over the sill, aligning it flush with the wall. Secure with brad nails or staples every 8 to 12 inches. Avoid overdriving nails, which can split the wood.
Caulk Every Exterior Seam
Apply a continuous bead of exterior-grade, water-repellent caulk where the sill meets the frame and the wall. Smooth the bead with a damp finger for a clean seal. Interior sills only need caulk if visible gaps remain after painting. Let caulk cure for 24 hours before painting.
Finish and Protect the Surface
:max_bytes(150000):strip_icc()/filling-nail-holes-in-trim-1822793_04_sandpaper_3229-a7ae8404a26246a9be1cb6eb5734fe86.jpg)
The final steps lock in durability and give your work a polished appearance.
Fill Holes and Sand Smooth
Apply wood filler to every nail hole, gap, and imperfection. Thin the filler slightly with water for better penetration in tight spots. Let it dry, then sand the entire surface with 120-grit paper. Wipe clean with a damp cloth.
Prime and Paint for Long-Term Protection
Seal the wood with a coat of primer first. Follow with two coats of semi-gloss or satin paint featuring UV protection. These finishes resist moisture, fading, and everyday wear far better than flat paint. For high-traffic interior sills or harsh exterior exposures, add a polyurethane topcoat for extra durability.
Prevent Future Sill Damage
A well-installed sill can last decades with minimal upkeep.
Choose Rot-Resistant Materials
Always use cedar or pressure-treated lumber for exterior sills. Avoid pressboard or particleboard, which swell and crumble when exposed to moisture.
Maintain the Proper Slope
Exterior sills must slope at 1/8 inch per foot to shed water effectively. Even small flat spots trap moisture and invite rot over time.
Inspect and Re-Caulk Annually
Check caulk lines every year, especially in regions with heavy rain or freeze-thaw cycles. Reapply caulk at the first sign of cracking or peeling to keep water out.
Never Glue the Sill in Place
Construction adhesive makes future repairs nearly impossible. Nails or screws allow easy replacement when the time comes.
Frequently Asked Questions About Changing a Window Sill
What is the difference between a window sill and a window ledge?
A sill is the structural bottom piece that supports the window assembly. A ledge usually refers to a decorative shelf, often mounted at the top of a window or inside the home.
How do I fix peeling paint on a window sill?
Scrape off all loose paint, sand with 120-grit paper, vacuum the dust, and wipe clean. Apply two coats of durable, moisture-resistant paint for a lasting finish.
Why do window sills rot in the first place?
Rot develops when moisture and fungi combine, often entering through cracked caulk, failed seals, or leaks above the window. Fixing the moisture source is always the first repair step.
What is the best paint finish for a window sill?
Semi-gloss or satin paint with UV protection offers the best defense against moisture, fading, and wear. Add a polyurethane topcoat for high-traffic or exposed exterior sills.
Can I replace a sill without removing the trim?
Generally, no. If the casing sits on top of the sill, it must come off to access the sill. If the casing sits behind the sill, removal may not be necessary, though this setup is rare in modern homes.
How much slope does an exterior sill need?
A slope of 1/8 inch per foot, or roughly 14 to 15 degrees, keeps water flowing away from the window and prevents pooling.
Key Takeaways for a Long-Lasting Window Sill Replacement
Changing a window sill is a manageable DIY project that delivers major returns in protection, efficiency, and curb appeal. Focus on three priorities: remove the old sill carefully to preserve the frame, measure and cut with precision to ensure a tight fit, and seal every seam with quality caulk and paint. Use real wood, maintain the proper slope, and inspect caulk annually. With the right tools and attention to detail, your new sill will perform flawlessly for decades. Grab your tools this weekend and tackle that damaged sill before small problems turn into costly repairs.



