Is your window air conditioner blowing warm air or leaving your room feeling stuffy? A clogged filter is often the reason. Dust, pollen, and pet dander build up over time, forcing your unit to work harder and driving up energy costs. Knowing how to clean filter on window air conditioner units is the fastest way to restore cool, fresh airflow.
The best part? You do not need special tools or professional help. In just 10 to 20 minutes with basic household supplies, you can clean your window AC filter and notice an immediate difference. Most manufacturers recommend monthly cleaning during heavy use, but even a seasonal deep clean makes a big impact. This guide covers every step, from safety prep to reassembly, so you can keep your unit running like new.
Safety and Preparation Before You Start
Before touching any part of your AC, put safety first. Water and electricity are a dangerous combination, and a live unit poses real shock risks.
Cut the Power Completely
Always unplug the air conditioner from the wall outlet before doing anything. If your unit is hardwired into your home’s electrical system, flip the correct circuit breaker instead. Do not rely on the unit’s power button alone, since it does not fully disconnect the electrical supply.
Position the Unit for Easy Access
If possible, slide the unit forward or remove it from the window sleeve entirely. Because window AC units are heavy and awkward, two people should handle removal. Place the unit on a flat, stable surface like a deck or sturdy table. If cleaning in place, make sure you can safely reach both the front and back.
Remove the Front Cover
Look for clips, tabs, or screws holding the front panel in place. Use a Phillips or flathead screwdriver if needed, and store screws in a safe spot. Gently unclip or slide the cover off. Avoid forcing it, as plastic parts can crack with too much pressure.
Remove and Dry Clean the Filter
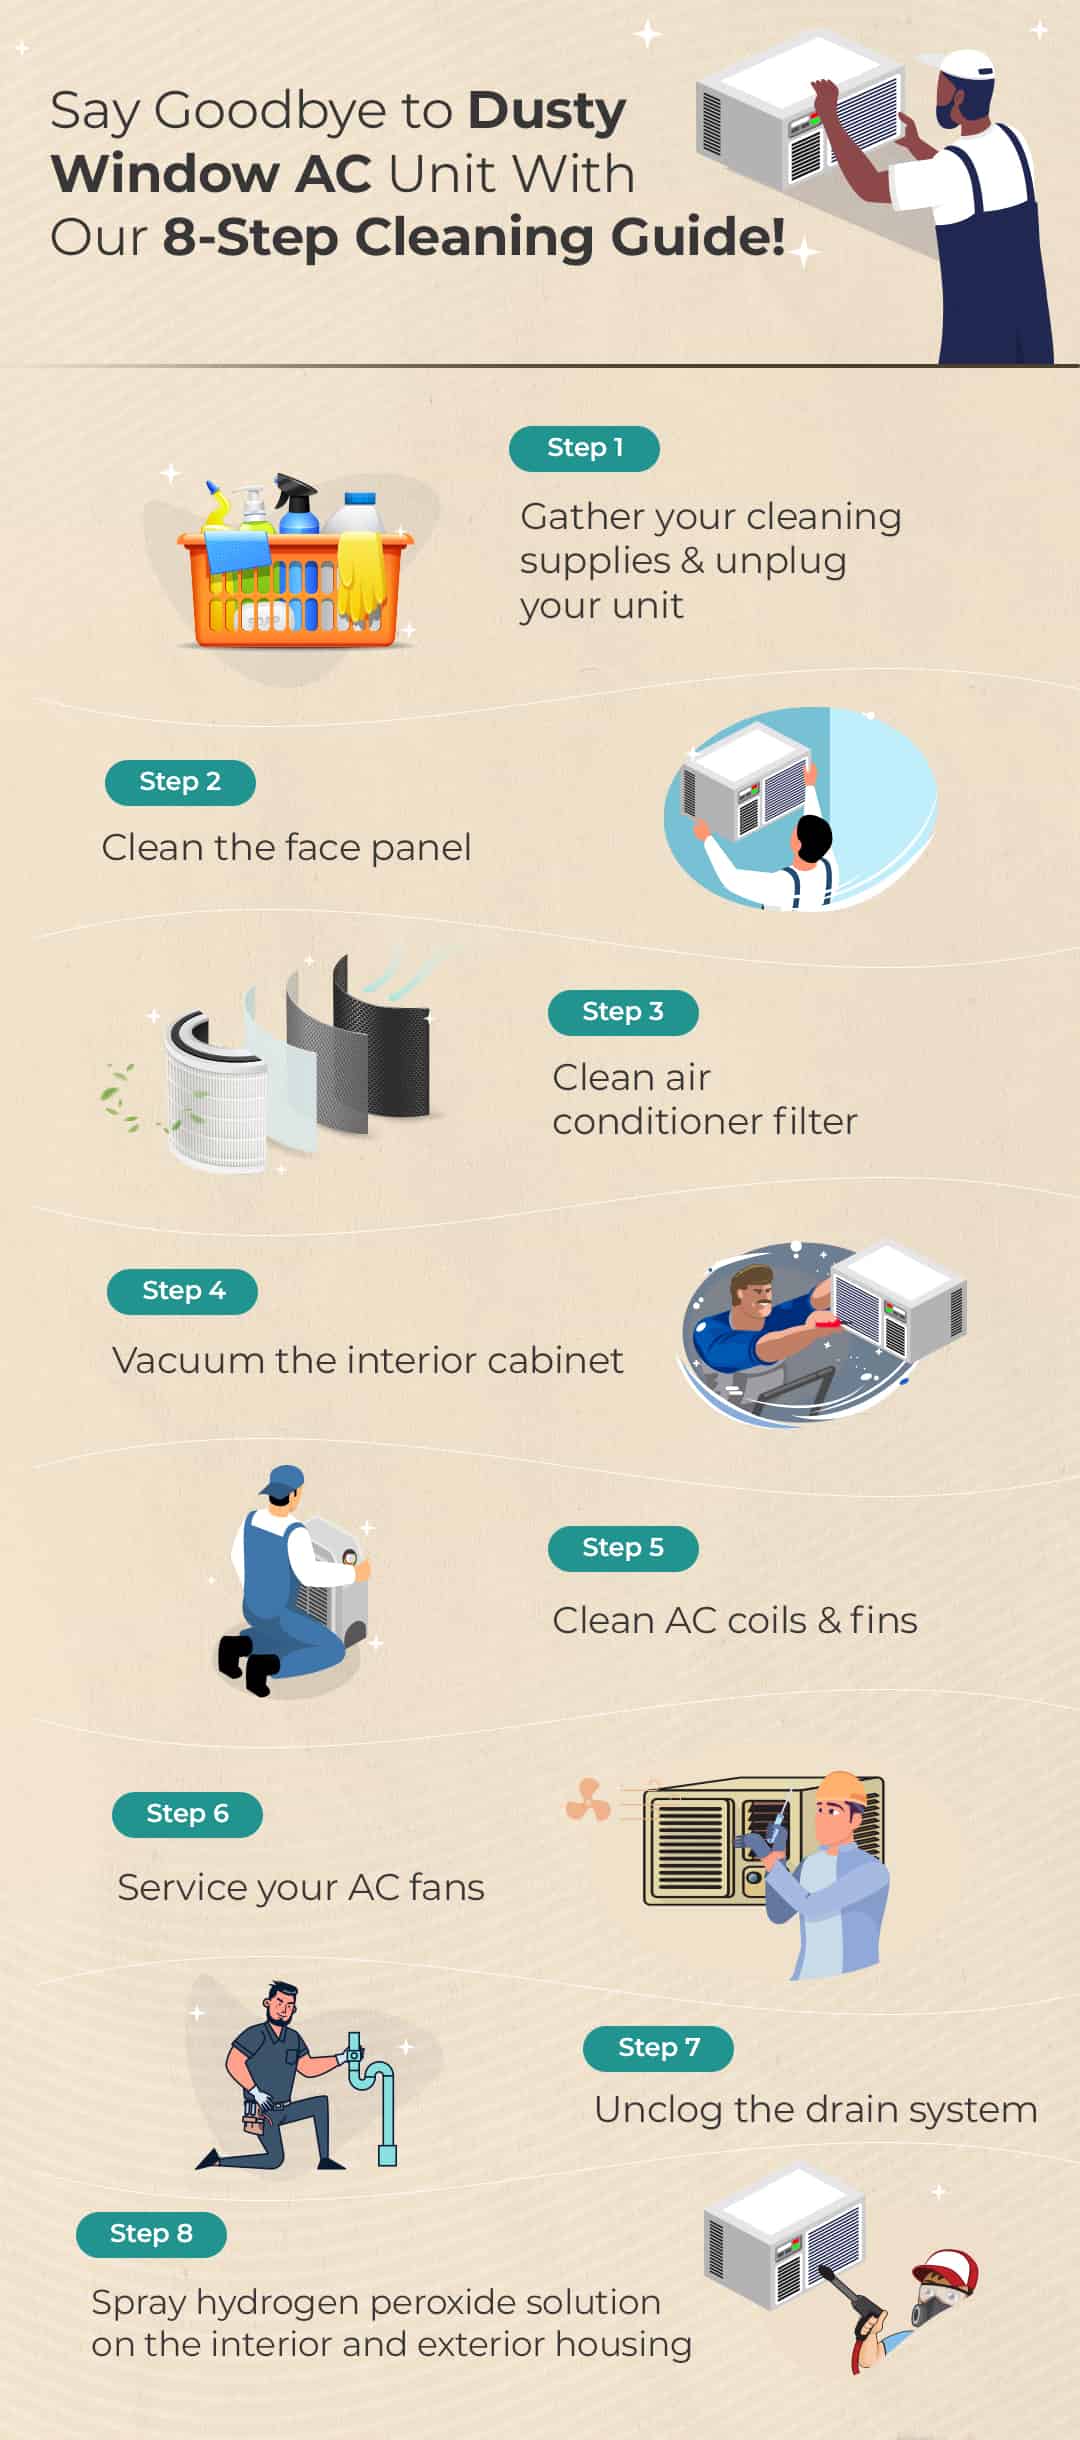
With the cover off, the filter sits right behind the front grille and is easy to spot.
Extract the Filter Carefully
Slide or lift the filter out of its housing notches. Handle it gently. Bent or torn filters lose effectiveness and usually need replacement rather than cleaning.
Vacuum Both Sides Thoroughly
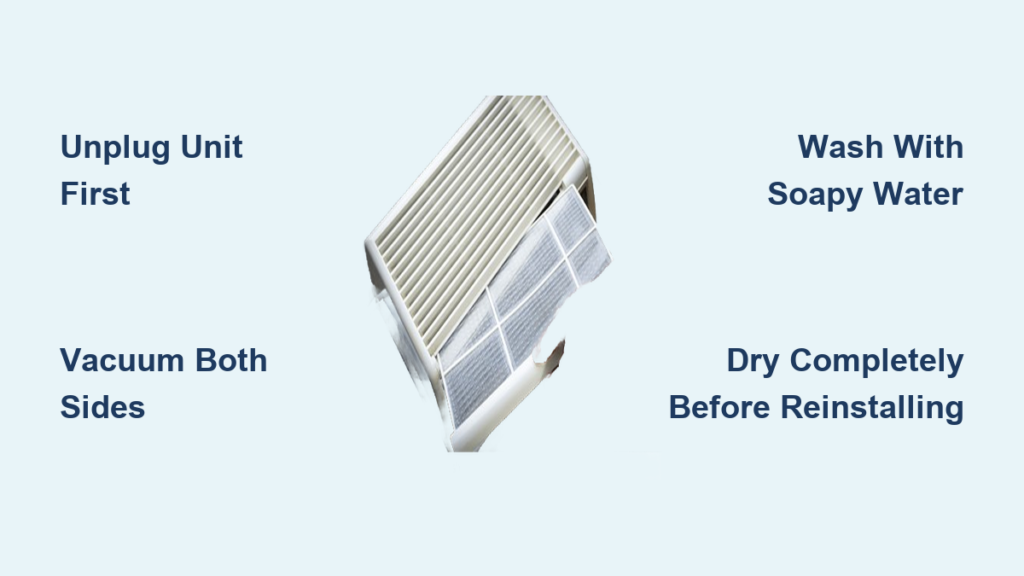
Use a shop vacuum or a regular vacuum hose, ideally without a brush attachment, which pulls out embedded lint better. Start with the room-facing side, which is usually the dirtiest. Vacuum both sides to remove loose dust and debris before wet cleaning.
Vacuum the Interior While You’re There
With the filter out, vacuum the inside of the unit, especially where the filter sits and the slats of the front cover. Never use a stiff brush on the interior, since it can bend the delicate aluminum fins or push dust deeper into the evaporator coil.
Deep Clean the Filter with Soap and Water

Now that loose dirt is gone, give the filter a proper wash to remove embedded grime.
Wash with Warm Soapy Water
Fill a bucket with warm water and a few drops of mild dish soap. Submerge the filter and gently scrub both sides using an old toothbrush or soft brush. Focus on dense areas where gunk tends to build up. Rinse under a gentle stream of water until the runoff runs clear.
Treat Mold and Musty Odors
If you notice dark spots or a musty smell, soak the filter in a solution of one part white vinegar to three parts water for 15 minutes. For severe mold, use a diluted bleach solution (half a cup of bleach per gallon of water). Scrub lightly afterward and rinse thoroughly.
Dry the Filter Completely
Shake off excess water and place the filter in a shaded, well-ventilated area to dry. Avoid direct intense sunlight, which can degrade some filter materials. Never reinstall a damp filter, since moisture breeds mold and can damage internal components. Allow one to two hours for full drying.
Clean Internal Components While the Filter Dries
Use the drying time to tackle other parts that affect cooling performance.
Clean the Evaporator Coils
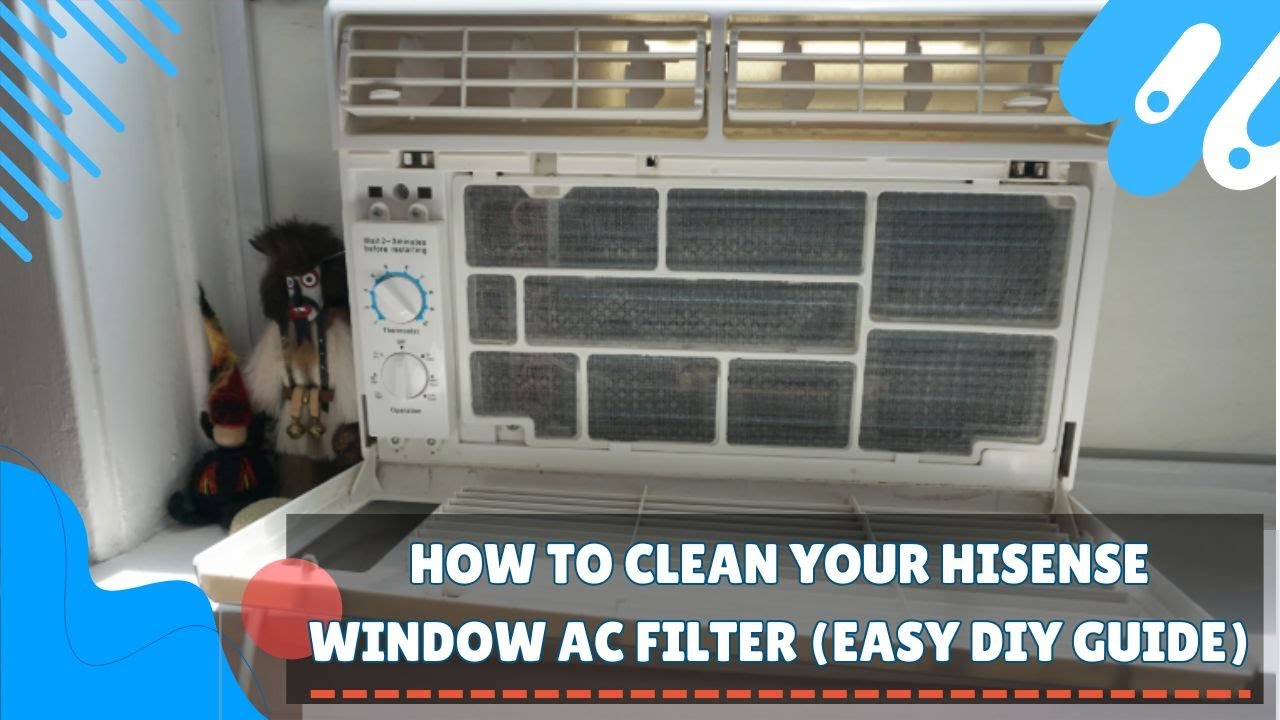
These coils sit behind the filter and are responsible for cooling the air. Use a soft brush or fin comb to remove surface dust. For stuck grime, spray a non-foaming coil cleaner or mild detergent, let it sit for 3 to 5 minutes, then wipe or rinse lightly with a spray bottle. Avoid soaking the coils.
Straighten Bent Fins
If you notice bent fins, gently realign them with a fin comb or the flat edge of a kitchen knife. Straight fins improve airflow and cooling efficiency.
Rinse the Condenser Coils
The condenser coils sit on the back of the unit and release heat outside. Remove leaves and debris by hand first. Then rinse with a garden hose on low pressure, working from the outside in. Never spray electrical components directly.
Clear the Drain Hose
Find the drain hose at the base of the unit and detach it. Flush with hot water to clear clogs. For stubborn blockages, use full water pressure or a vinegar and water mixture. Reattach securely to prevent leaks.
Wipe the Filter Slot and Cover
Dust left in the filter slot will dirty your clean filter immediately. Wipe the area with a damp cloth. Clean the front cover with soapy water and dry it with a towel before reassembly.
Reinstall the Filter and Test the Unit
Everything should be clean and dry by now, so it is time to put it all back together.
Reinsert the Filter
Slide the dry filter back into its housing notches. Make sure it fits snugly with no gaps around the edges. A loose fit lets unfiltered air bypass the filter, reducing efficiency and dirtying internal parts.
Replace the Front Cover
Snap or screw the front panel back in place. Confirm it is secure and properly aligned.
Power On and Verify Cooling
Plug the unit back in or restore power at the breaker. Turn on the air conditioner and set it to cooling mode. Check for strong, cool airflow and listen for unusual noises. If everything runs smoothly, your cleaning was a success.
Prevent Future Filter Buildup
A few simple habits keep your AC running efficiently all summer long.
Stick to a Monthly Cleaning Schedule
Clean the filter every month during heavy use. At minimum, clean it once per season. Homes with pets or dusty environments may need more frequent cleanings.
Use the Filter Reminder If Available
Some modern units, like those with FreshIN technology, include a filter life reminder. Reset it after each cleaning so you stay on track.
Store the Unit Clean During Winter
If you remove the unit for storage, clean it thoroughly first. Store it in a dry place to prevent mold and pest problems during the off-season.
When to Replace the Filter Instead of Cleaning
Cleaning extends filter life, but not forever. Know when replacement is the better option.
Replace Damaged Filters Immediately
If the filter is torn, has holes, or the mesh is falling apart, replace it. A damaged filter cannot trap debris, which lets dust clog the evaporator coil and reduce airflow.
Check Your Manufacturer’s Guidelines
Some filters are reusable, while others are disposable. Check your owner’s manual to confirm. Replacement filters typically cost between $10 and $20 and are available at hardware stores or online.
Common Mistakes to Avoid During Cleaning
Even simple tasks can go wrong if you are not careful. Steer clear of these errors.
Never Reinstall a Wet Filter
Moisture leads to mold, odors, and potential electrical problems. Always confirm the filter is 100% dry before putting it back.
Avoid High-Pressure Water
Too much pressure can damage filter fibers or bend delicate coil fins. Use a gentle stream instead.
Do Not Skip the Filter Slot
Failing to wipe the filter housing undoes your hard work. Dust there will dirty the clean filter right away.
Skip Harsh Scrubbing
Aggressive brushing tears the filter membrane. Stick with soft tools and gentle motions.
Always Respect Electrical Safety
Never work on a plugged-in unit. Electricity and water do not mix.
Frequently Asked Questions About Cleaning Window AC Filters
How often should I clean my window air conditioner filter?
Clean the filter at least once a month during peak summer use. If monthly cleaning is not realistic, aim for every three to six months. At a minimum, clean it once a year before the cooling season starts.
Can I use the dishwasher to clean my AC filter?
It is not recommended. Dishwasher water is often too hot and the spray pressure too intense, which can damage the filter membrane. Hand washing with warm soapy water is safer and just as effective.
What is the white stuff on my filter, and how do I remove it?
White or gray buildup is usually a mix of dust, lint, and mineral deposits. Soak the filter in a vinegar and water solution (1:3 ratio) for 15 minutes, then scrub gently with a soft brush and rinse clean.
Is it okay to run my window AC without a filter?
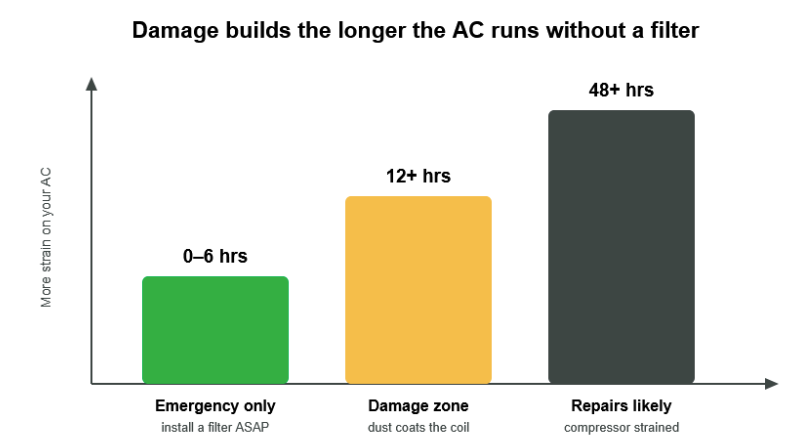
No. Running the unit without a filter allows dust and debris to coat the evaporator coils, reducing efficiency and potentially damaging internal components. Always operate your AC with a clean, properly installed filter.
How do I know if my filter needs replacing instead of cleaning?
Replace the filter if it is torn, has holes, or the mesh is falling apart. Also check your owner’s manual, since some filters are designed for one-time use only.
Can a dirty filter cause my AC to stop cooling?
Yes. A clogged filter restricts airflow, which reduces cooling performance and makes the unit work harder. In severe cases, the evaporator coil can freeze, stopping cooling altogether.
Final Thoughts on Keeping Your Window AC Filter Clean
Cleaning your window air conditioner filter is one of the easiest ways to boost cooling performance, lower energy bills, and improve indoor air quality. The key takeaways are simple: unplug the unit before starting, vacuum before washing, dry the filter completely before reinstalling, and clean monthly during heavy use. Pair filter cleaning with annual coil and drain maintenance for the best results.
Ready to get started? Set a reminder on your phone to clean the filter at the start of each month during summer. Your AC will run cooler, your air will feel fresher, and your energy bills will thank you.