
Framing a window opening correctly sets the stage for every finish that follows. A poorly framed opening causes sagging walls, drafty gaps, and windows that refuse to close properly. Get it right, and your window seats cleanly, your wall stays plumb, and your energy bill stays low.
This guide walks you through the entire process of how to frame a window opening, from marking the rough opening to insulating the header. You’ll learn the exact measurements, stud layouts, and code requirements used by professional framers, plus how to avoid the costly mistakes that derail most DIY projects.
Mark the Rough Opening on Your Plates
Find the Center Line on Both Plates
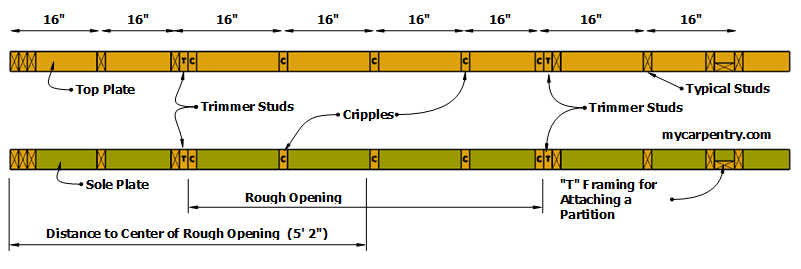
Begin by locating the window’s center point on both the top and bottom wall plates. Use your building plans or field measurements to set the position. In some additions, the center sits 3 feet 7½ inches from the house’s outer edge to align with exterior trim. This center mark becomes your reference for every measurement that follows.
Add the Standard ½-Inch Allowance
The rough opening must be larger than the window unit to allow shimming, squaring, and insulation. A typical allowance adds ½ inch to both width and height. For a 36×36 window, the rough opening becomes 36½ x 36½ inches. Always confirm this number with the window manufacturer’s specifications before cutting any lumber.
Transfer and Label Stud Positions
From the center mark, measure half the rough opening width in both directions. For a 30-inch opening, mark 15 inches left and right. Label these inner edges with a “J” for jack stud locations. Then measure 1.5 inches outward to mark the king stud positions. Use a framing square to strike perpendicular lines across each plate. Transfer every mark from the bottom plate to the top plate so alignment holds when the wall is raised.
Install King and Jack Studs
Cut Jack Studs to 81 Inches
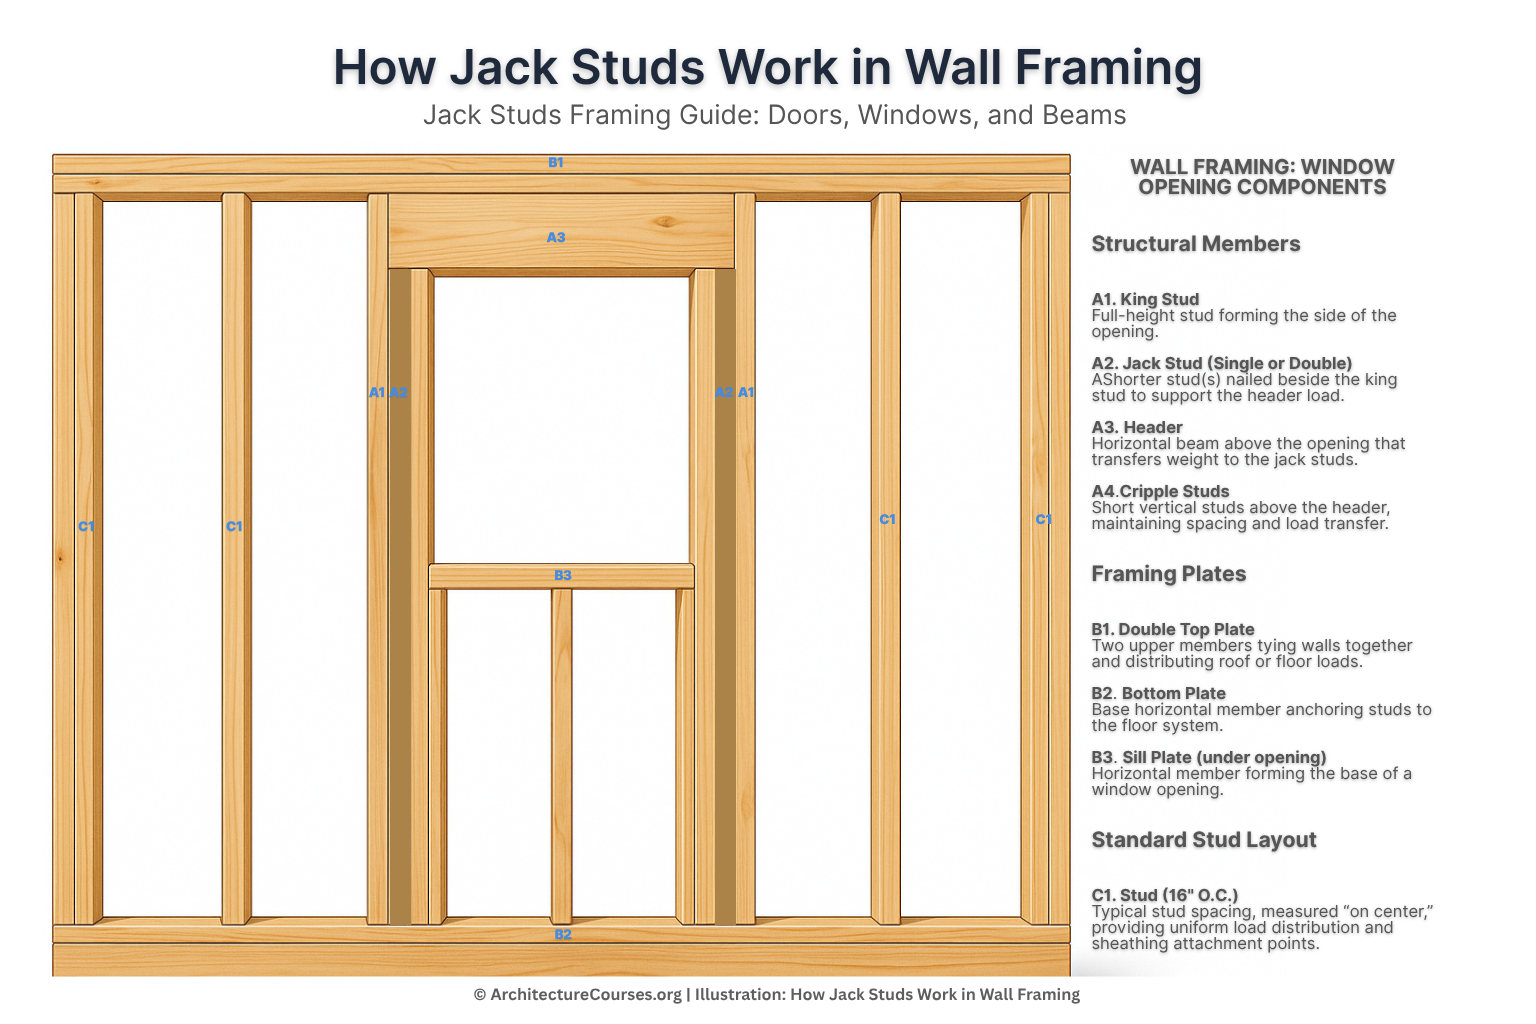
Jack studs (also called trimmers) carry the header ends and are typically 81 inches long. This height aligns the top of the window header with standard door headers, keeping the structural plane consistent across interior walls. Cut two jack studs per side from straight, high-quality lumber to prevent warping.
Set the Crown Facing Up
Always install studs with the crown (bow) facing up. When the load compresses the wall, the crown flattens downward instead of buckling outward. This small detail keeps your wall surface flat and your drywall free of bulges.
Nail Jack Studs to King Studs Correctly
Install the king studs first, running full height from bottom to top plate. Then position the jack studs inside, resting on the bottom plate. Nail from the bottom up and the top down, working toward the center. This technique keeps the jack stud flush against the king stud along its full length and prevents gaps that compromise header support.
Build and Set the Header

Add 3 Inches for Header Overhang
The header must extend past the rough opening to rest fully on the jack studs. Add 1.5 inches per side (3 inches total) to the rough opening width. For a 36.5-inch opening, cut the header to 39.5 inches. This overhang distributes the structural load across a wider bearing surface.
Assemble a Boxed 2×10 Header
For a standard load-bearing wall, build a header from dimensional lumber. For a 36.5-inch rough opening:
– Cut a 2×10 to 39.5 inches.
– Cut two 2×6 end blocks to 9¼ inches (matching wall depth).
– Sandwich the 2×10 between the 2x6s, flush with the ends, and nail securely. This creates a boxed header that matches the wall thickness and provides full nailing surfaces.
Fill the Cavity with Foam Insulation
If your header is hollow or boxed, drill access holes into the cavity and fill it completely with expanding foam. This eliminates thermal bridging, where cold air travels through the wood, and improves the energy efficiency of the wall. Seal the holes after the foam cures.
Install Cripple and Sill Studs
Support the Sill with Interior Cripples
Cut two cripple studs to support the window sill between the jack studs. These short studs rise from the bottom plate and carry the weight of the sill and window unit. In one configuration, cripples measured 31.5 inches long, calculated from a 49.5-inch sill height target minus an 18-inch base reference.
Maintain 16-Inch On-Center Spacing
Cripple studs above the header and below the sill must align with the wall’s 16-inch on-center layout. This spacing ensures sheathing and drywall seams land on solid framing. Use the bottom plate markings as your guide and transfer the layout to the top of the jack studs or header.
Set the Sill at the Correct Height
The top of the sill plate should measure window height + 1.5 inches to account for the bottom plate thickness. For a 48-inch window, mark 49.5 inches up the jack studs. Install the sill between the jack studs, resting on the interior cripples, and secure with nails or screws to prevent sag.
Handle Wide Openings Correctly

Use Double Jack Studs for Openings 60 Inches or Wider
When the rough opening reaches 60 inches or more, install two jack studs per side. This doubles the bearing surface for the heavier header and prevents crushing or deflection under load. Most building codes require double jack studs for wide spans.
Consider Double King Studs for Extra Stability
While not always required, adding two king studs per side strengthens lateral stability, especially in shear walls or high-wind regions. This reinforcement resists racking and improves overall wall rigidity.
Square and Secure the Frame
Check Diagonals for a Perfect Square
Before nailing anything permanently, verify the opening is square. Measure corner to corner diagonally, and both measurements must match. A difference means the frame is out of square, which causes window fit issues. Push the high corner inward until both diagonals align.
Confirm Plumb and Level
Use a 4-foot level to check that king and jack studs are perfectly vertical (plumb). Check the header and sill for level. Even a slight tilt prevents the window from operating smoothly. Shim as needed during this check phase.
Nail Through the Header into the Studs
Once the frame is square and plumb, drive 16d nails through the header into the king studs, jack studs, and cripples. This locks the header in place and ties the entire assembly together. Repeat for the sill and cripples to create a rigid frame.
Prepare for Sheathing and Weatherproofing
Apply House Wrap Before Raising the Wall
If you’re building a wall for an addition or any area exposed to water, install house wrap before sheathing. Wrap the entire frame, extending the material fully over the window opening edges. This creates a continuous weather barrier and prevents water intrusion at seams.
Sheathe Only After Final Verification
Do not install sheathing until you re-verify these critical points:
– Rough opening width and height match the plan.
– Diagonal measurements confirm a square frame.
– All vertical members are plumb.
Correcting errors after sheathing is time-consuming and costly. Once confirmed, apply plywood or OSB sheathing, ensuring it spans fully over the headers and king studs for structural continuity.
Avoid Common Framing Mistakes
Don’t Use the Window Size for the Rough Opening
One of the most frequent errors is framing to the actual window size instead of the rough opening. Always use the manufacturer’s rough opening specs. A 36-inch window needs a 36.5-inch rough opening, and framing it tight makes installation impossible.
Avoid Warped or Twisted Lumber
King and jack studs must be straight. Warped lumber causes the header to sit unevenly and produces a non-square opening. Reject any studs with significant bow, twist, or cup before installation.
Never Skip Header Insulation
An uninsulated header cavity creates a thermal bridge, allowing heat to escape in winter and enter in summer. Always fill hollow headers with foam, even in mild climates, to improve comfort and efficiency.
Check Squareness Before Sheathing
Waiting until after sheathing to check squareness is a costly mistake. Once panels are nailed down, correcting a twisted frame requires demolition. Verify squareness immediately after assembly, before sheathing.
Frequently Asked Questions About How to Frame a Window Opening
What is the standard rough opening for a window?
The rough opening is typically ½ inch larger than the actual window in both width and height. For a 36×36 window, the rough opening measures 36½ x 36½ inches. Always confirm exact dimensions with the window manufacturer before framing.
How long should jack studs be for a window?
Jack studs are typically cut to 81 inches. This length aligns the top of the window header with standard door header heights, creating a consistent structural plane across the wall.
Do I need a header for a non-load-bearing wall?
Non-load-bearing walls may use two 2×4 cripples stacked vertically instead of a solid header, but only if local building codes approve this method. Load-bearing walls always require a solid header, usually a 2×10 or 2×12.
How do you frame a window opening in an existing wall?
Cut the drywall or sheathing, remove the existing studs within the rough opening area, and install king studs, jack studs, a header, and cripples. Add temporary bracing to support the wall above during construction, then verify squareness before closing up the wall.
What size header do I need for a window?
For a standard load-bearing wall, use a 2×10 or 2×12 header. The exact size depends on the span and the load above. Check local building codes or span tables to confirm the right header for your specific situation.
Why is my framed window opening not square?
Common causes include warped studs, incorrect measurements, or shifting during nailing. Check diagonal measurements corner to corner and adjust the frame until both diagonals match. Always verify squareness before installing sheathing.
Key Takeaways for Framing a Window Opening Successfully

Learning how to frame a window opening comes down to three core principles: measure accurately, build square, and verify before committing. Start with the manufacturer’s rough opening specs, add the standard ½-inch allowance, and transfer every mark precisely from the bottom plate to the top plate.
Use straight lumber for king and jack studs, cut jack studs to 81 inches, and build a header with proper overhang and foam insulation. Maintain 16-inch on-center spacing for cripples, and check diagonals, plumb, and level before nailing anything permanently.
Your next step is to gather your tools, review your window manufacturer’s rough opening sheet, and lay out your plates. With careful planning and the techniques in this guide, you’ll frame a window opening that supports the structure, fits the window perfectly, and stands the test of time.



