
Installing a door can transform your space, improve energy efficiency, and boost your home’s security and curb appeal. Whether you’re replacing an old interior door or installing a new exterior entryway, knowing how to install a door correctly ensures smooth operation, weather resistance, and long-term durability. This guide walks you through every critical step, from removing the old unit to final sealing and adjustment.
Why Prehung Doors Are the Smart Choice
Most homeowners should install a prehung door instead of replacing just the slab. Experts agree that slab replacement is not beginner-friendly. Prehung doors come fully assembled with hinges, jamb, and weatherstripping already mounted. They’re easier to align, level, and seal properly, saving you from the precision chiseling and routing required for slab installation.
Only consider a slab if your existing jamb is perfectly square, plumb, and undamaged, or if you’re preserving historic or custom millwork. Even then, use a butt marker or trace the old door onto the new slab to transfer hinge locations accurately.
Tools and Materials You Need
Gather these essential tools before starting your door installation project. You’ll need a tape measure, 2-foot and 4-foot level, framing square, pry bar, hammer, utility knife, screw gun or drill with bits, and a caulking gun. Stock up on wood or composite shims, and have an oscillating tool ready for cutting old nails.
For fasteners and sealants, use #8 or #10 exterior-grade screws that are 2.5 to 3 inches long, galvanized finish nails, and elastomeric or polyurethane sealant. You’ll also need low-expansion foam insulation and silicone caulk for exterior use. For exterior doors specifically, add a sill pan kit, weather-resistant barrier, flashing material, and brickmould or exterior trim to your materials list.
Removing the Old Door and Frame

Start by taking off the door slab. Open the door and support it with your knee or ask a helper to hold it. Unscrew the hinge pins from the jamb using a screwdriver and hammer, then lift the door off and set it aside.
Next, dismantle the old jamb by removing interior and exterior trim with a pry bar. Cut through nails securing the jamb to the framing using an oscillating tool or reciprocating saw, then pull out the entire frame carefully. Watch for hidden wiring like doorbells or security sensors in exterior walls.
Finally, inspect the rough opening for rot, insect damage, or moisture in the framing. Check the structural integrity of the header and studs, and verify that the subfloor is level and the side studs are plumb. Clean out debris and repair any damage before proceeding.
Preparing the Rough Opening
Use a level and tape measure to verify your rough opening is ready. Check that the subfloor is level, both vertical jambs are plumb, and diagonal measurements from corner to corner match exactly. If diagonals differ, the opening is out of square and needs adjustment with shims or framing repairs.
Measure the height at the left, right, and center, then measure the width at the top, middle, and bottom. Allow half an inch extra height and half to three-quarters inch extra width for shimming. The prehung unit should fit loosely in the opening, giving you room for proper alignment.
Installing the Sill Pan
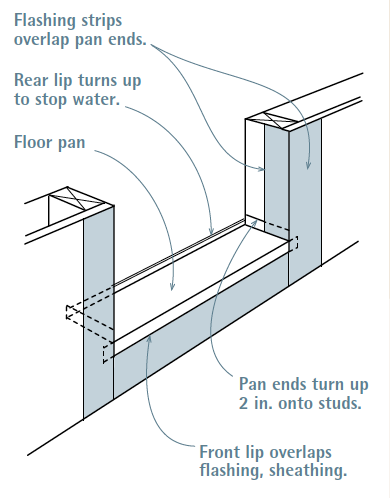
A sill pan is critical for preventing water from entering under the door, which is a leading cause of rot and structural damage. Dry-fit the sill pan to confirm the size, then apply three beads of sealant along the subfloor. Press the pan into place, overlap joints, and seal with PVC cement. Trim excess material with tin snips and seal all seams with additional caulk.
Never caulk the bottom of the sill pan because this allows water to drain out properly. If you skip the sill pan, apply a full bead of sealant under the threshold and behind the brickmould as an alternative.
Setting the Door Unit in Place
Place the bottom of the door first into the opening, then tilt the unit upright. Ensure the hinge side is plumb using a 4-foot level, then temporarily secure with screws through the center hinge hole into the stud. This is a two-person job since prehung doors are heavy.
Mark the hinge locations on the jamb now to guide your shimming process.
Shimming at Hinge Locations

With the door closed, insert shims behind each hinge to hold the jamb in perfect alignment while screws anchor it to the wall. Use a level to confirm the jamb is plumb on both faces, then pre-drill one-eighth-inch holes to prevent wood splitting. Drive screws through the jamb and shims into studs, tightening in order from middle to top to bottom.
Use longer screws at the top and bottom hinges for better grip. Never rely on brickmould screws since they’re for trim, not structural support.
Securing the Lockset Side Jamb
Check the space between the door and weatherstrip. It should be three-eighths to one-half inch. Insert shims behind the lockset-side jamb to maintain this gap, then install screws partially to allow fine-tuning. Recheck plumb and square, then fully tighten once alignment is perfect.
For double doors, install the inactive door first, then align the active door using an astragal and slidebolt.
Installing Door Hardware
Remove the shipping clamp that protects the frame during transport. Replace any short or weak hinge screws with #10 2.5-inch exterior-grade screws for durability. Use a hole saw kit or manufacturer’s jig to drill for the knob and latch, then insert hardware and secure it.
For adjustable strike plates, close the door and mark the bolt location, drill pilot holes, partially install, test alignment, then fully tighten. Using a door hardware jig ensures precise, centered holes.
Testing the Seal
Perform the dollar bill test to verify proper seal. Close the door on a dollar bill or piece of paper at the threshold, then pull the paper slowly. If it tears or resists, the seal is good. If it slides out easily, raise the threshold using the adjustable mechanism.
Trim excess weatherstripping material if the door drags, and ensure full contact along the entire length for maximum energy efficiency.
Adding Corner Seal Pads
For in-swing doors, apply a bead of sealant where the jamb meets the sill. Peel the backing from the corner pad and position it so the tab faces up and the narrow edge touches the sill. Press firmly into place to prevent moisture from sneaking into this common failure point.
Reinforcing, Flashing, and Insulating
Add shims at the top of the jamb, drill pilot holes, and install additional screws. Remove excess shim material with a utility knife. Some areas require hurricane-rated anchors, so follow your local building codes.
Install head flashing behind the weather-resistant barrier, overlapping layers like shingles from bottom to top. Seal all exterior joints including jamb-to-trim, around hardware, and at corners using silicone caulk for lasting durability.
Fill gaps between jamb and stud with low-expansion foam insulation. Avoid overfilling since foam expands and can warp the frame. Let it cure, then trim any excess.
Finishing with Trim and Caulk
Nail brickmould or casing in place with finish nails using a nail gun or hammer. Don’t overdrive the nails, then fill holes with wood putty. Apply silicone caulk around trim-to-wall joints, jamb-to-sill connections, and threshold edges. Smooth with a wet finger for a clean finish.
Re-caulk every three to five years to maintain weather resistance.
Final Checks and Adjustments
Test door operation by opening and closing the door five to ten times. It should swing freely and latch without force, with no rubbing or binding. Use a 4-foot level on jamb faces to verify level and plumb, and check that both diagonals of the opening match.
Inspect the gap around the door when closed. It should be one-eighth inch. If the door binds, check for out-of-plumb jamb and adjust shims. If gaps appear at the top, add shims at hinge points. If the latch won’t catch, loosen the strike plate, reposition it, and retighten. For drafts, re-caulk, check weatherstripping, and verify the sill pan is properly installed.
Maintaining Your Door Long-Term
Inspect seals and replace cracked weatherstripping annually. Lubricate hinges and locks with silicone spray twice a year. Clear debris from threshold and drainage channels, and check for wood swelling. If edges swell, plane them as needed.
Remember warranty requirements. Steves Doors requires finishing within 60 days, while Therma-Tru requires finishing within six months. Skipping this step voids your warranty.
When to Call a Professional
Even with this guide, some situations require professional help. Call a pro if the rough opening is damaged, rotting, or severely out of square. Also seek expert help when installing a historic or custom door with unique dimensions, or if you lack the tools, strength, or confidence to handle heavy units safely.
Key Takeaways for Installing Your Door
Installing a door is a moderate DIY project, but patience and precision matter most. Always choose prehung doors over slabs for easier installation, and work slowly through each step rather than rushing. A well-installed door lasts 20 or more years, so take your time getting the alignment perfect.
Watch installation videos before starting, practice chiseling on scrap wood, and work with a helper for safety. The effort you invest now pays off in decades of reliable performance.
Frequently Asked Questions About Installing a Door
How long does it take to install a door?
Most DIYers need four to eight hours to install a prehung door, depending on experience level and whether repairs to the rough opening are needed.
Can I install a door myself, or do I need a professional?
You can install a prehung door yourself if you have basic carpentry skills and tools. However, hire a pro if the rough opening is damaged, out of square, or for historic doors requiring custom fitting.
What’s the difference between a prehung door and a slab?
A prehung door comes already mounted in its frame with hinges and weatherstripping attached. A slab is just the door panel itself and requires fitting into an existing frame, which is much more difficult for beginners.
How do I know if my door is properly sealed?
Use the dollar bill test. Place a dollar bill or paper at the threshold, close the door, and try to pull it out. If it holds snugly or tears, the seal is good. If it slides out easily, adjust the threshold or weatherstripping.
Do I need a sill pan for exterior doors?
Yes, a sill pan is strongly recommended and required by many building codes. It prevents water from seeping under the door and causing rot or structural damage.
When should I finish my exterior door?
Finish your exterior door within 60 days for Steves Doors products or six months for Therma-Tru doors to maintain warranty coverage. Use exterior-grade paint or stain as specified by the manufacturer.


