
Installing a slider window becomes far less intimidating once you understand each phase of the process. Whether you’re replacing a drafty old unit or adding one to new construction, the difference between a window that sticks and one that glides smoothly comes down to careful preparation and precise execution. A poorly fitted slider invites air leaks, water damage, and operational headaches that cost time and money to fix.
This guide walks you through every critical step of how to install a slider window, from verifying the rough opening to applying the final weather seal. You’ll learn the 180-degree level check, why low-expanding foam matters, and which mistakes cause the most common failures. By the end, you’ll have the knowledge to complete a professional-quality installation that lasts for decades.
Verify the Rough Opening Before Installation

The rough opening is where most slider window problems begin. An opening that is the wrong size, out of square, or uneven will sabotage every step that follows. Taking time here saves hours of frustration later.
Confirm Proper Clearance and Squareness
Your rough opening should be ½ inch larger than the window unit in both width and height. Some manufacturers accept as little as ¼ inch, but the half-inch standard gives you flexibility for shimming and adjustment. Measure horizontally and vertically, then compare against the specifications on your window’s documentation.
Next, check that the opening is square. Measure from corner to corner diagonally in both directions. If the two measurements differ, the opening is out of square and needs correction. Even a quarter-inch discrepancy can cause the sash to bind or create gaps in the weather seal.
Level the Sill with Precision
A level sill is non-negotiable for smooth sash operation and proper drainage. Place a spirit level across the sill and adjust the bubble until it centers between the indicator lines. Insert 5mm packers or wood shims under the low end to bring the sill into true level.
For a professional accuracy check, rotate the level 180 degrees and place it in the same position. If the bubble stays centered, your sill is genuinely level. If it moves, either your level is faulty or the sill still needs adjustment. Support the entire sill length with packers to prevent any movement during installation.
Clean and Prep the Opening Thoroughly
Remove every piece of debris, old caulk, and remnants from previous installations. In renovation projects, strip away damaged sheetrock, the old 2×4 sill, and any rotted window ledge. Replace compromised substrates with autoclaved aerated concrete (AAC) for superior moisture and mold resistance, especially valuable in humid climates.
Install a water membrane along the full sill, extending 6 inches up both sides. This drainage plane prevents water from penetrating the wall cavity, even if the primary seal ever fails.
Prepare the Frame and Substrate for a Lasting Install
Substrate preparation determines whether your slider window lasts five years or fifty. Skipping this step is one of the costliest mistakes in window installation.
Plumb the Vertical Reveals
Use a 1200mm spirit level to check each vertical side of the opening. Adjust with packers until the bubble sits precisely between the indicator lines. Repeat on the opposite jamb to confirm both sides are plumb and parallel.
If the reveals are out of plumb, the window will bind during operation. Consistent vertical alignment also prevents the frame from twisting when you anchor it.
Apply Flashing and Moisture Barriers
For aluminum slider windows, apply black flashing tape to the exterior side of the structure before placing the unit. This creates a waterproof barrier behind the frame that catches any water that gets past the primary seal.
In clad or lightweight construction, install hardened head flashing over the top of the window. This directs rainwater away from the header and meets building code requirements in high-exposure areas.
Shim the Window Frame for Perfect Alignment
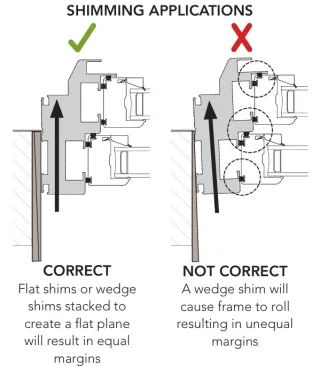
Shimming is the single most important step in learning how to install a slider window correctly. Well-placed shims keep the frame level, plumb, and square, which translates directly to smooth sash operation and airtight seals.
Choose Quality Shim Materials
Select wood shims or 5mm or 10mm plastic packers. Avoid soft or compressible materials that settle over time. Your shims must make full contact with both the frame and the rough opening to prevent any shifting.
Place Shims at Strategic Points
Install shims at each corner, directly under the vertical jambs. Space additional shims no more than 16 inches apart along the sill and side jambs. For extra precision, place shims 5 inches from each corner in addition to the standard spacing.
Always position a shim at the interlock point where the two sashes meet. This maintains alignment and reduces air infiltration at the meeting rails. For windows with center mullions, place a plastic packer beneath the mullion to prevent sagging in the middle.
Never Shim the Header
Do not use solid shims at the header. Doing so can bow the wood lintel and distort the entire frame. The top horizontal rarely needs shimming unless specified for load adjustment, and solid blocking is never acceptable.
Align and Position the Window Unit
With shims in place, you’re ready to position the window and verify alignment before making anything permanent.
Center the Frame in the Opening
Slide the window into the rough opening and check that the gap between the window jambs and the rough opening is uniform on all sides. Centering the unit ensures consistent sealing around the entire perimeter.
Use a 10mm packer to verify that the frame sits flush with the interior timber reveal. This guarantees your drywall or trim will sit properly without gaps or protrusions.
Confirm Level, Plumb, and Square
Check the sill with your level, then recheck the vertical jambs with the 1200mm level. Place a carpenter’s square at the corners to verify 90-degree angles. If the frame shifted during handling, adjust the shims and recheck before proceeding.
Anchor the Window Securely
Once alignment is confirmed, secure the window using the fastening method suited to your installation type. Nail flanges work best for new construction, while screw-through frames are ideal for renovations.
Select the Right Fasteners
Use #8 x 2.5-inch screws for most frame anchoring. For exposed surfaces or heavy-duty applications, pre-drill a 3/8-inch hole and use a 3-inch steel Addai screw.
If you’re working with a nail flange, drive 3-inch finishing nails through the flange into the framing. Always place a shim under the nail point (except at the header) to prevent frame compression.
Pre-Drill Every Screw Hole
Pre-drilling prevents cracking in vinyl and aluminum frames. Drill pilot holes slightly smaller than your screw diameter for a snug fit without over-tightening.
Tack and Anchor in Proper Sequence
- Tack the frame using screws through the flange or temporary shims.
- Slide the sash to the center and remove snap-in jam covers with a sharp chisel, prying gently.
- Remove pocket covers from the head and sill to access the screw holes.
- Drive screws through the frame pockets at each shim location without over-tightening.
Avoid Screwing Through the Sill
Do not place screws through the sill unless absolutely necessary. If you must, pre-drill the hole, fill it with top-grade PVC caulking or silicone, insert the screw, and seal the head with high-quality silicone to prevent leaks.
Keep the Pivot Shoe Clear
Ensure no screws or shims interfere with the pivot shoe, the mechanism that allows the sash to tilt for cleaning. Blocking this path renders the window inoperable.
Reassemble and Seal the Frame
After anchoring, reassemble the covers and apply seals that lock out air and water for years to come.
Reinstall Covers and Plugs
Snap the jamb covers back into place on both sides. Reattach pocket covers to the head and sill using #8 x 2.5-inch screws. For custom units with flush-fit plugs, use the included hardware to hide screws while keeping them accessible for future maintenance.
Seal the Interior Track
Before reinstalling the sash, apply quality silicone sealant to the center of the head and sill tracks on the interior side. This prevents dust and moisture from entering the interlock area where the sashes meet.
Insulate and Waterproof the Window Cavity

Proper insulation and waterproofing protect your home from drafts, condensation, and structural damage for the life of the window.
Use Only Low-Expanding Foam
Fill gaps between the frame and rough opening with low-expanding foam. Standard expanding foam generates enough pressure to warp vinyl and aluminum frames. Apply conservatively; a complete air barrier at the dew point or glass line is sufficient.
Lock the Window During Cure
After foaming, keep the window locked for 30 minutes to let the foam cure without restricting the frame. Unlock and test operation afterward. If the sash binds, the foam expanded too much and needs adjustment.
Seal Remaining Gaps Before Trim
Apply OSI silicone or equivalent to fill any remaining gaps between the frame and rough opening. This creates an airtight seal that works alongside your exterior flashing.
Apply the Final Perimeter Seal
Once the foam dries and shims are trimmed flush, run a continuous bead of silicone sealant around the entire interior and exterior perimeter. This final weather barrier protects against air and water infiltration for years.
Test Operation and Finish the Installation
The final steps confirm that your window works smoothly and looks professionally finished.
Check Sash Movement
Slide the sash fully left and right. Movement should feel smooth and resistance-free. If the sash binds, loosen the anchor screws slightly, adjust the shims, re-tighten, and retest.
Verify Gap Consistency and Locking
Check that the gap between the sash and frame stays consistent all around. Test the lock; engagement should feel firm and secure.
Install Trim and Final Seals
Install 3.5-inch colonial casing and a new window ledge. Seal all trim joints and nail holes with silicone. Fill holes and finish for a smooth, polished appearance. Keep screw plugs accessible for future adjustments if your house settles over time.
Prevent Common Installation Mistakes

Knowing what goes wrong helps you avoid problems before they start. These are the errors that compromise the most installations.
Header Distortion from Solid Shims
Solid shims in the header bow the wood lintel and stress the frame. Never shim the top unless specified, and never use solid blocking.
Pivot Shoe Interference
Screws or shims in the pivot shoe path prevent the sash from tilting or sliding. Always verify clearance before anchoring.
Overfilled Foam Cavities
Standard expanding foam exerts over 100 psi of pressure, more than enough to warp vinyl or aluminum frames. Always use low-expanding foam and apply it conservatively.
Operating Before Foam Cures
Opening the window too soon shifts the frame and breaks the seal. Wait 30 minutes with the unit locked before testing operation.
Inaccurate Leveling
Failing to rotate the level 180 degrees produces false readings. Always double-check to confirm true level.
Frequently Asked Questions About Slider Window Installation
What size rough opening do I need for a slider window?
The rough opening should be ½ inch larger than the window unit in both width and height. Some single slider models accept as little as ¼ inch, but the half-inch clearance is preferred for easier shimming and alignment.
Can I install a slider window without professional help?
Yes, with the right tools, preparation, and attention to detail, most homeowners can successfully install a slider window. The key is verifying the rough opening, shimming properly, and using low-expanding foam instead of standard foam.
What type of foam should I use around a slider window?
Always use low-expanding foam designed for windows and doors. Standard expanding foam generates enough pressure to warp vinyl and aluminum frames, leading to binding sashes and failed seals.
How long should I wait before opening the window after foaming?
Keep the window locked for 30 minutes after foam application. This allows the foam to cure without putting pressure on the frame. Opening too soon can shift the frame and compromise the seal.
Why should I rotate the level 180 degrees when checking the sill?
Rotating the level 180 degrees verifies that your level is accurate and the sill is truly level. If the bubble shifts when you flip the level, either the tool is faulty or the sill still needs adjustment.
What happens if I shim the header of a slider window?
Shimming the header with solid materials can bow the wood lintel and distort the entire frame. The top horizontal rarely needs shimming, and solid blocking should never be used there.
Key Takeaways for a Successful Slider Window Installation
Learning how to install a slider window comes down to three core principles: precision over power, proper materials over shortcuts, and patience over speed. Verify your rough opening with the 180-degree level check, shim at every critical point without touching the header, and use low-expanding foam to protect your frame from distortion.
Your next step is to gather your tools, measure your rough opening carefully, and follow this guide phase by phase. With proper installation, your slider window will operate smoothly and resist weather damage for decades. Inspect your silicone seals annually and keep the tracks clean to maintain peak performance year after year.



