

If you’re researching how to install retrofit windows, you probably want a faster, cleaner alternative to full-frame replacement. Retrofit installation lets you upgrade old, inefficient windows without tearing into the surrounding wall or disturbing interior trim. By fitting a new sash and frame inside the existing opening, you gain better energy efficiency, improved soundproofing, and a refreshed appearance, usually within one to two days. This guide walks you through every critical phase, from measuring and prep to sealing, fastening, and finishing. Whether you’re a skilled DIYer or supervising a professional crew, these steps ensure a watertight, level, and long-lasting result.
Measure and Assess the Opening for a Retrofit Window
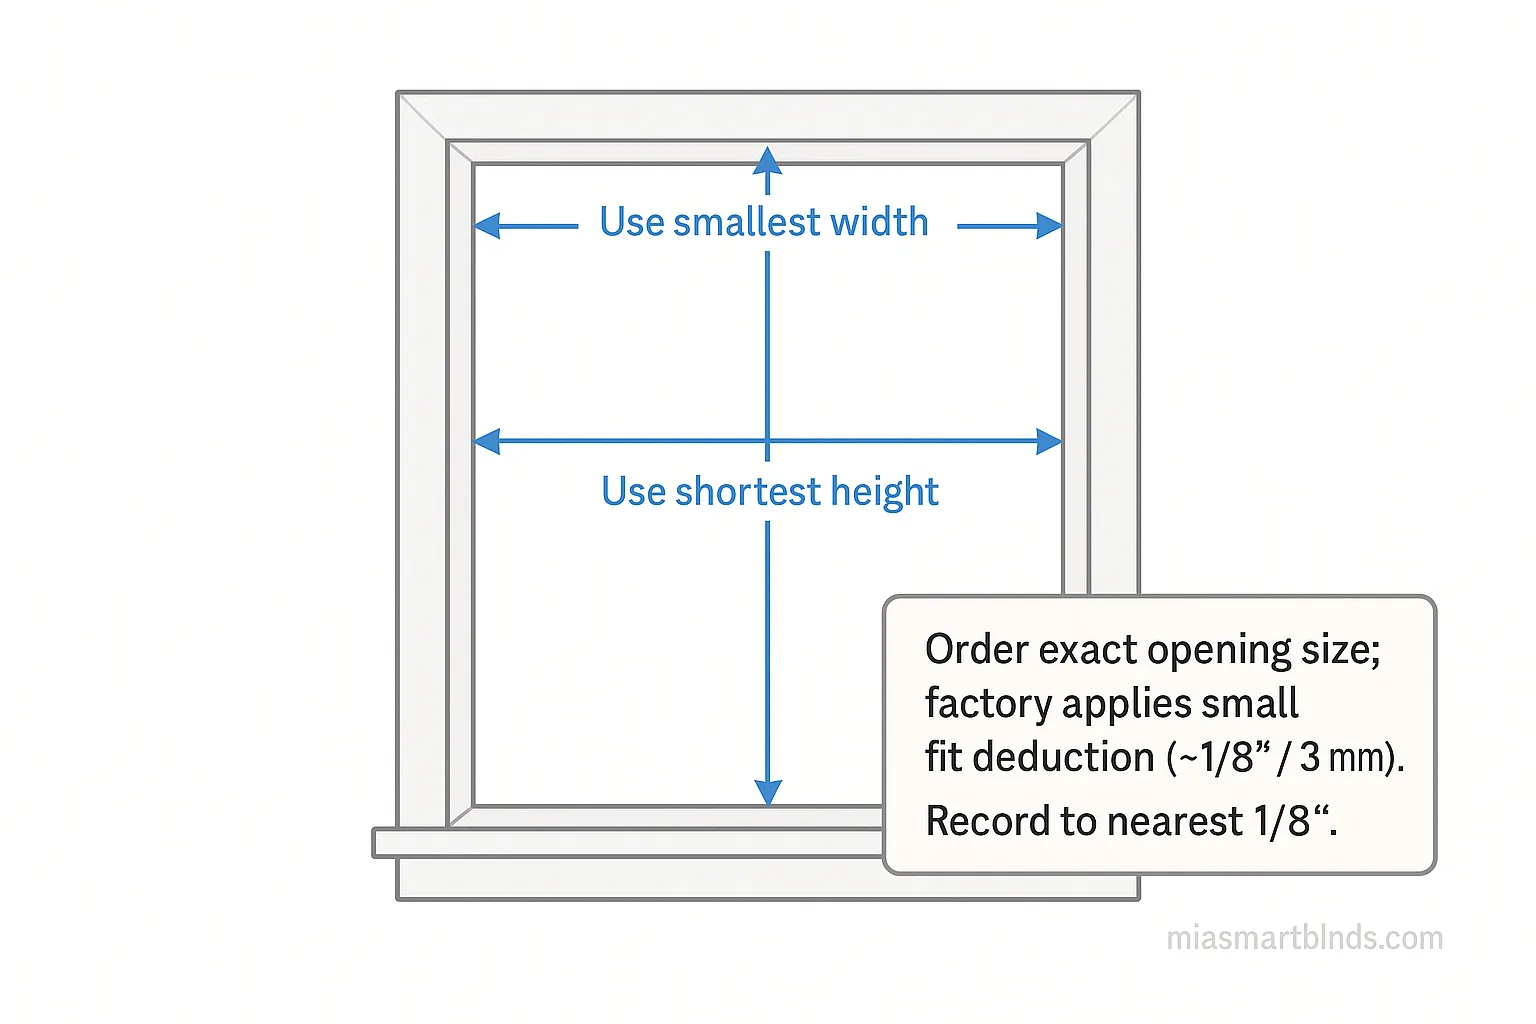
Accurate measurement is the foundation of any successful retrofit window project. Before ordering materials or picking up tools, you need to understand exactly what you’re working with. This phase prevents costly mistakes and ensures your new unit sits flush and square.
Cut Back Stucco for a Flush Fit
When dealing with stucco exteriors, never install a retrofit window directly over the stucco surface. The original stucco wraps around the existing frame, creating a recessed cavity that prevents proper sealing. Use a grinder to carefully cut back the stucco on all four sides of the window opening. This exposes the underlying frame and creates a flat surface for the new window’s flush fin to seat against. Skipping this step leads to improper sealing and water intrusion.
Take Precise Three-Point Measurements
Measure the height at the left, center, and right sides of the opening. Then measure the width at the top, middle, and bottom. Transfer these dimensions to the new window’s fin to plan your trimming strategy. Even minor inconsistencies in the opening can cause fit problems. Accurate three-point measurements ensure the retrofit unit sits flush and square once installed.
Dry-Fit and Trim the Flush Fin
Before applying any sealant, dry-fit the window to check alignment. Use a carpenter’s pencil to mark high spots where the fin contacts the opening. Remove the unit and trim the fin with a small carpenter’s plane until it fits snugly. Repeat this process until the window slides in evenly with consistent gaps. This iterative trimming is essential for recessed installations to achieve a uniform seal.
Remove Interior Trim and the Old Sash
With measurements confirmed, you’re ready to remove the old components. The goal here is preservation. You want to keep the original frame intact while clearing out everything that doesn’t belong.
Carefully Pry Off Interior Casing
Start inside by removing the interior trim using a pry bar and a scrap piece of wood to protect the wall. Work slowly to avoid damaging drywall or paint. In a true retrofit, only the sash and trim come out. Label and store trim pieces if you plan to reuse them.
Extract the Old Window Unit
Remove the old sash by detaching it from its tracks or hinges. Clean out debris, old caulk, and any broken glass from the frame. Inspect the rough opening for rot or water damage. If the frame is compromised, repairs must happen before you proceed. Retrofitting relies on a structurally sound base.
Handle Integral Mullion Bars Correctly
Only cut mullion bars if they belong to a single-frame unit. Use a reciprocating saw or skill saw to cut through the mullion. Immediately after cutting, fill the cavity with a half-inch bead of sealant to block water entry. Never cut mullions on dual or multi-unit windows, as this weakens structural support.
Apply the Primary Sealant Bead
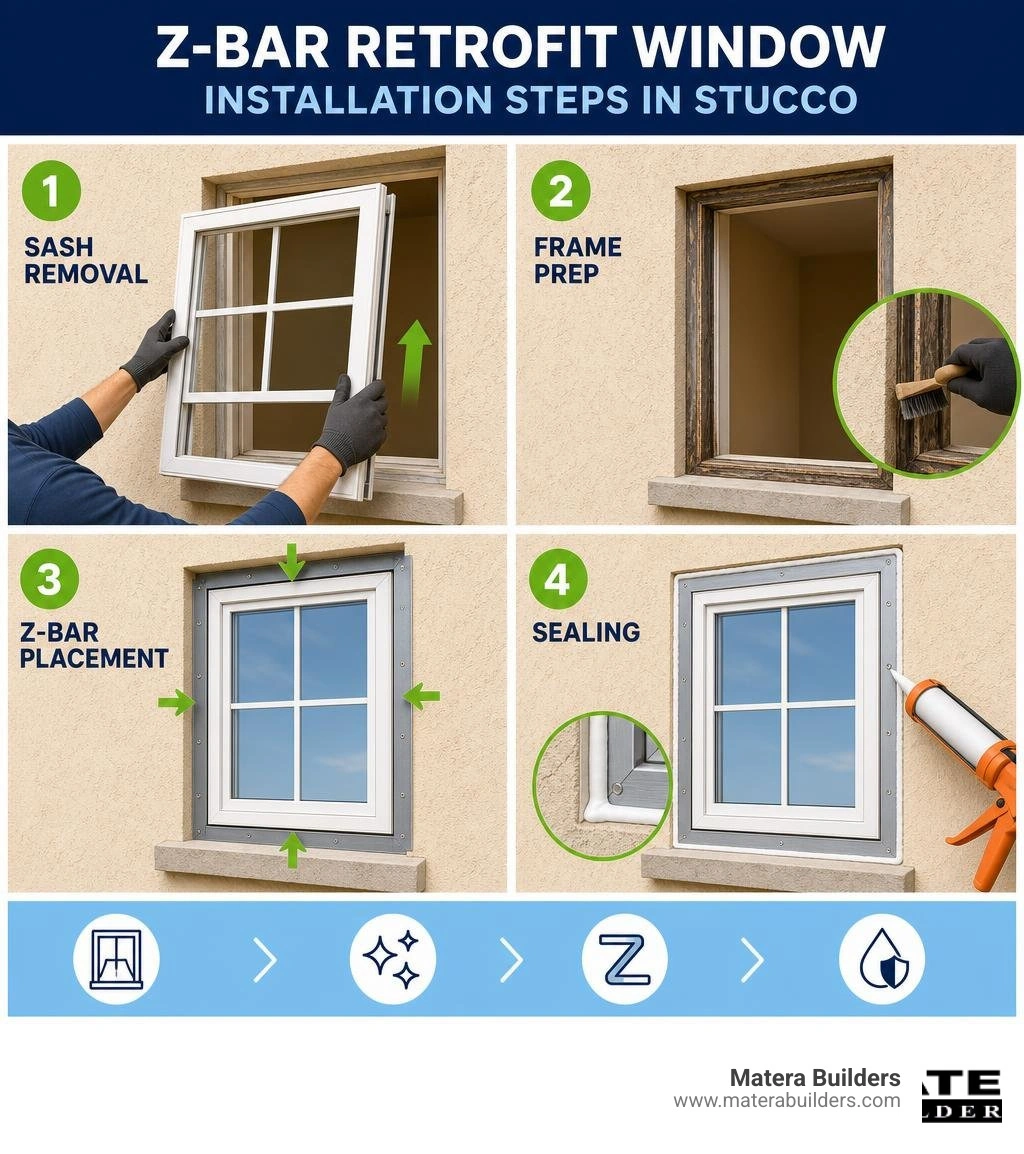
Sealant is your primary defense against weather infiltration. A continuous, generous application creates the weather barrier that protects your home for decades.
Seal the Frame or Fin Perimeter
Apply a continuous, plump bead of exterior-grade sealant around the back of the new window’s fin or directly onto the existing frame. Aim for about half an inch wide. For recessed units, also seal the area where the mullion was cut. Excess sealant is far better than gaps.
Use High-Performance Exterior Caulk
Choose a high-performance, UV-resistant sealant rated for outdoor use. Silicone or hybrid polymer sealants offer the best durability and flexibility. Avoid standard latex caulk, which cracks over time. The sealant must remain elastic to accommodate slight building movement.
Position and Align the New Window
Proper positioning ensures smooth operation and a clean appearance. Take your time here. Small adjustments now prevent big headaches later.
Shim for Level and Square Fit
Place the window into the opening, centering it left-to-right for an even trim reveal. Use non-tapered shims at the top center and sides to adjust height and alignment. Check for level and square repeatedly with a precision level. Over-shimming distorts the frame, so use only enough to correct minor misalignments.
Check for Consistent Gaps
Maintain even gaps of about 1/8 inch around the perimeter. These spaces get filled with expanding foam later. Uneven gaps indicate misalignment and can lead to stress points, air leaks, or difficulty operating the window.
Fasten the Window Securely
Once aligned, fastening locks everything in place. The right screws and proper technique keep your window stable for years.
Pre-Drill Holes to Prevent Splitting
Use a quarter-inch drill bit to pre-drill pilot holes every 12 to 18 inches along the frame. This prevents the wood or vinyl from cracking when screws go in. For professional results, use a countersink bit so screw heads sit flush.
Drive 3-Inch Corrosion-Resistant Screws
Secure the window with 3-inch framing screws or manufacturer-provided exterior-grade screws. If originals are missing, gold deck screws offer superior corrosion resistance. Drive screws into wall studs for maximum hold. Avoid screws that are too long, since they can penetrate interior walls.
Verify Frame Stability and Seal Compression
As you fasten, constantly recheck that the frame remains level and square. A proper seal is confirmed by squeeze-out, meaning excess sealant oozes evenly around the edges. This visual cue tells you the fin is fully compressed and the weather barrier is intact.
Seal Externally and Maintain Drainage

The exterior seal is your second line of defense against moisture. Done correctly, it keeps wind-driven rain out while allowing trapped water to escape.
Apply Secondary Sealant to the Flange
Once the window is secured, apply a second continuous bead of sealant around the exterior flange where it meets the wall. This secondary seal locks out moisture. Pay special attention to the top and sides.
Leave Gaps for Weep Holes
At the bottom edge of the flange, do not seal completely. Leave two small openings of about half an inch at each end to maintain weep holes. These allow trapped moisture to escape, preventing rot and mold. Sealing over weep holes is a common mistake that leads to long-term damage.
Tool Sealant for a Clean Finish
For a professional look, apply painter’s blue tape along the window frame and wall before sealing. Smooth the caulk with a sealant tool or wet finger, then remove the tape immediately. Wipe away excess with a damp sponge. Proper tooling ensures adhesion and prevents cracking.
Insulate and Finish Internally

Now you shift to the interior, where insulation and trim complete the job. This phase boosts energy efficiency and gives the room a polished look.
Install Foam Backer Rod First
Before applying expanding foam, insert a foam backer rod into the gap between the old frame and new window. Mill Guard recommends this step to control foam depth, improve insulation, and prevent overfilling. The rod acts as a backing to create a proper seal.
Fill Gaps with Expanding Foam
Apply low-expansion spray foam into the cavity. Standard foam exerts too much pressure and can distort the frame. Use a foam rated specifically for windows and doors. Fill in stages if needed, allowing partial curing between applications.
Trim Foam and Let Cure Fully
After 24 hours of curing, trim excess foam flush with a utility knife. This prepares the surface for interior trim and enhances thermal performance. Uncured foam continues expanding and can push the window out of alignment.
Reinstall Interior Trim and Finish
The final trim work transforms a functional installation into a finished project. Attention to detail here makes the difference between a DIY look and a professional result.
Add Jamb Extensions if Needed
If the new window is shallower than the original, install jamb extensions to match the depth of the existing trim. This ensures a seamless transition and allows the casing to sit flat against the wall.
Encapsulate Frame with Vinyl Trim
Use flat vinyl trim to fully encapsulate the old frame. This provides a clean, modern finish and protects the retrofit seam. Secure with vinyl adhesive or small nails, then cover fasteners with vinyl plug caps.
Reattach or Replace Interior Casing
Reinstall the original casing or fit new trim. Nail or glue it in place, then apply a final interior bead of sealant along the trim edge for air tightness. This step minimizes drafts and improves comfort.
Test, Clean, and Finalize Your Retrofit Window Installation
Before declaring the job done, run through a final quality check. This catches any issues while you still have tools on hand.
Check Operation and Alignment
Open and close the window multiple times. Verify smooth operation, proper locking, and consistent gaps. Use a level to confirm the frame hasn’t shifted during fastening. Address any binding or resistance immediately.
Perform an Air Leak Inspection
Feel for drafts around the perimeter. A smoke pencil or incense stick helps detect air movement. Any leaks indicate incomplete sealing or gaps in foam. Address them before finalizing.
Clean Glass and Restore the Work Area
Wipe down the glass and frame with a streak-free cleaner. Remove all debris, tools, and protective coverings. Haul away old windows and materials. A clean finish reflects professionalism and care.
Frequently Asked Questions About Retrofit Window Installation
How long does it take to install a retrofit window?
A standard retrofit window installation typically takes one to two days for a residential project. Professional crews can handle high volumes while maintaining quality and speed.
Can I install a retrofit window over stucco?
No. You must cut back the stucco on all four sides to expose the underlying frame. Installing directly over stucco prevents proper sealing and leads to water intrusion.
What tools do I need to install retrofit windows?
Essential tools include a pry bar, grinder, reciprocating saw, drill with a quarter-inch bit, level, tape measure, caulking gun, utility knife, and a small carpenter’s plane. You’ll also need shims, sealant, screws, foam backer rod, and expanding foam.
Should I use shims when installing a retrofit window?
Yes. Use non-tapered shims at the top center and sides to adjust height and alignment. Avoid over-shimming, which can distort the frame and cause operational issues.
Why are weep holes important in retrofit window installation?
Weep holes allow trapped moisture to escape from the frame. Sealing over them traps water inside, leading to rot and mold. Always leave small gaps at the bottom edge of the flange.
What type of sealant works best for retrofit windows?
Use a high-performance, UV-resistant exterior-grade sealant such as silicone or hybrid polymer. Avoid standard latex caulk, which cracks over time and loses elasticity.
Key Takeaways for a Successful Retrofit Window Installation

Installing retrofit windows correctly saves time, money, and disruption while delivering performance close to full-frame replacement. The most critical steps include measuring accurately with three-point checks, cutting back stucco for a flush fit, applying generous beads of high-performance sealant, and maintaining weep holes for drainage. Fasten with corrosion-resistant screws into wall studs, and insulate with foam backer rod and low-expansion foam for maximum energy efficiency. Your next step is gathering your tools, taking precise measurements, and ordering the right retrofit unit for your opening.



