
Buying a window air conditioner without accurate measurements often leads to frustration, poor cooling, and even safety hazards. Knowing how to measure window for AC unit properly is the single most important step before making a purchase. A unit that fits snugly seals out hot air, runs efficiently, and stays securely in place all season long.
Window sizes vary dramatically between homes, apartments, and even rooms within the same house. Standard double-hung windows typically range from 23 to 36 inches wide, but actual openings rarely match the label on the window. This guide covers every measurement you need, common pitfalls to avoid, and how to match your window to the right cooling capacity.
Measure Window Width First
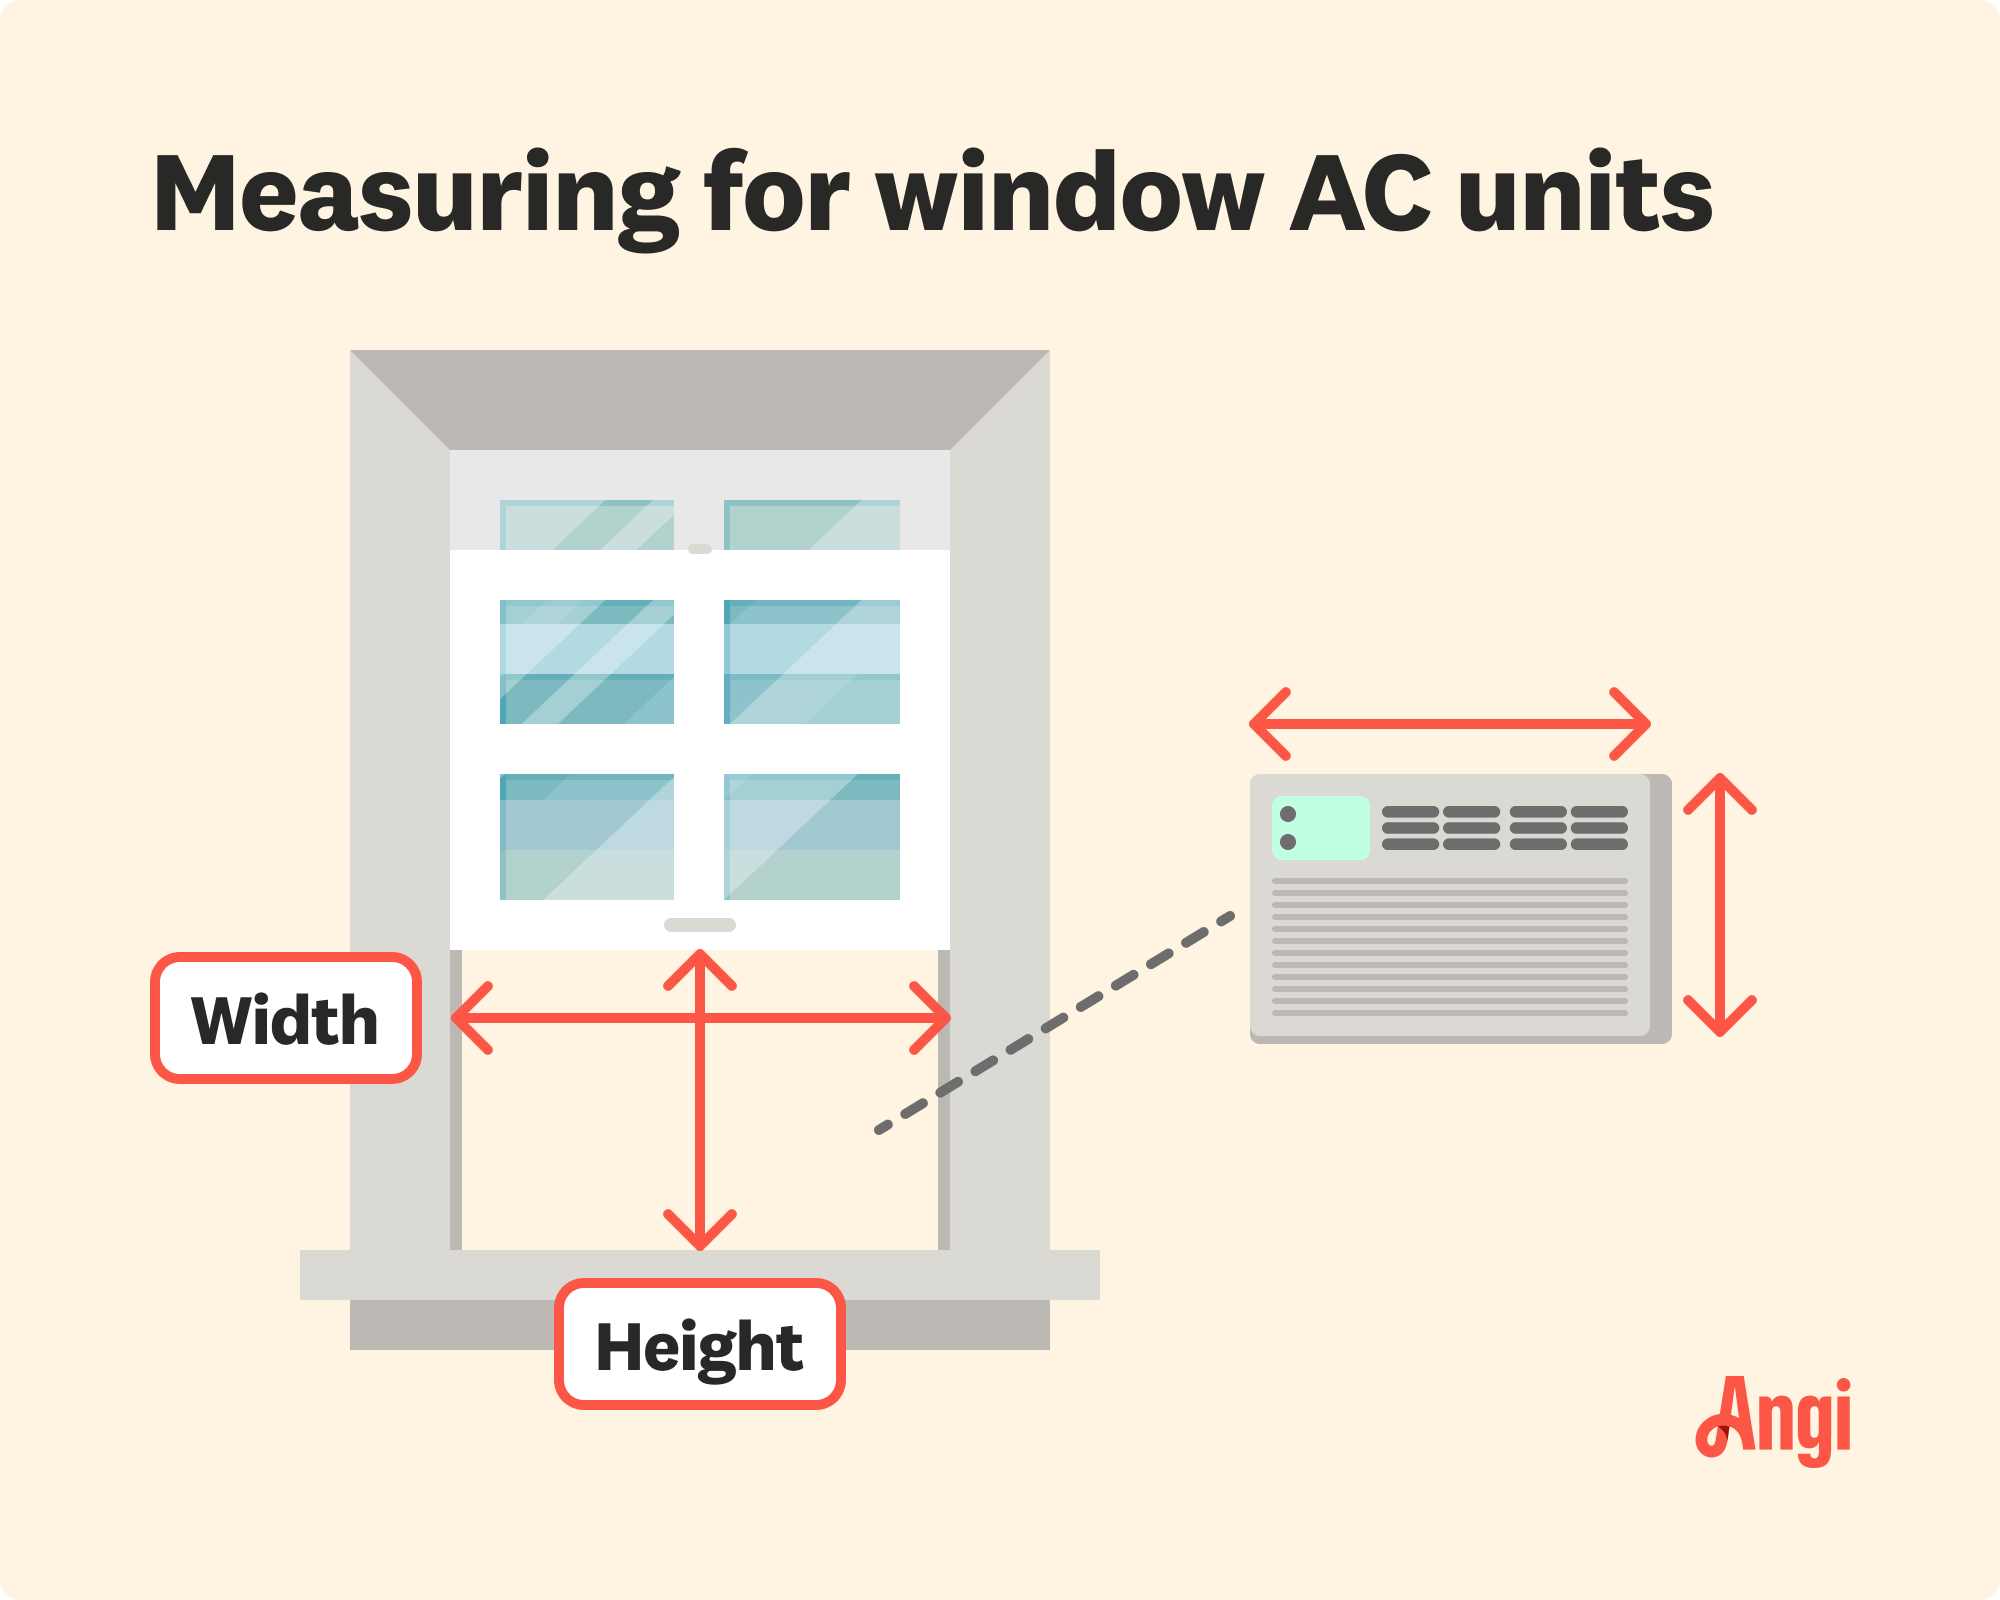
Window width is the most critical dimension when fitting a window AC. Most units are designed for openings between 23 and 36 inches, so even a half-inch error can make installation impossible.
Capture the Full Opening Width
Start by opening your window fully to expose the entire opening. Use a metal tape measure for the most accurate results.
- Measure from the left inner frame to the right inner frame at the bottom of the opening.
- Take additional measurements at the top and middle of the opening.
- Record the smallest of the three measurements as your true window width.
If the top reads 28 inches, the middle 27.5 inches, and the bottom 28 inches, your window width is 27.5 inches. Windows are rarely perfectly square, so checking multiple spots prevents costly surprises.
Confirm Side Clearance Around the Unit
Beyond the opening itself, you need room for the AC to extend outward and for side panels to seal the gaps.
- Allow 6 to 12 inches of space outside the window for the AC housing.
- Make sure the unit does not block doors, walkways, or fire escape routes.
- Verify that adjustable side panels can compress without hitting the frame.
Most AC units include accordion-style side panels that adjust between 2 and 10 inches. The total assembled width of the unit plus panels must match your window opening exactly.
Determine Required Height Clearance
Height matters because the AC must sit fully supported on the sill while the window sash closes over the top. Skipping this measurement often leads to unstable installations.
Measure from Sill to Lowered Sash
Close your window and measure from the top of the inside sill up to the bottom of the lowered window sash. Most window ACs require between 12 and 18 inches of vertical clearance. The unit should rest entirely on the sill rather than hanging from the window frame.
If your measurement falls below 12 inches, the AC likely will not fit safely. Consider a through-wall unit or a portable air conditioner as alternatives.
Check Exterior Clearance and Ventilation
The outdoor portion of the AC also needs room to operate correctly.
- Confirm the unit does not rest on a window screen, awning, or decorative ledge.
- Make sure the outdoor coil has at least a few inches of clearance on all sides.
- Verify that rainwater can drain freely away from the unit.
A tight exterior fit traps heat and causes the compressor to overheat, dramatically shortening the lifespan of the AC.
Measure Depth of Installation Space
Depth determines how far the AC projects into your room and how securely it sits in the window frame. Ignoring this measurement can leave the unit sticking awkwardly into your living space.
Measure from Interior Wall to Outer Frame
Place your tape measure at the inside wall where the AC will rest, then extend it to the outer edge of the window frame. Most window ACs require 16 to 24 inches of depth. Units that are too shallow wobble during operation, while overly deep units eat into your floor space.
Account for Tilt and Drainage
Window ACs must tilt slightly downward toward the outside, roughly one quarter inch per foot, so condensation can drain properly. Use a small level to confirm the angle during installation. Excessive tilt causes oil to pool in the compressor, leading to mechanical failure over time.
If your window sill slopes the wrong direction, add shims under the AC to achieve the correct drainage angle.
Match Room Size to BTU Rating
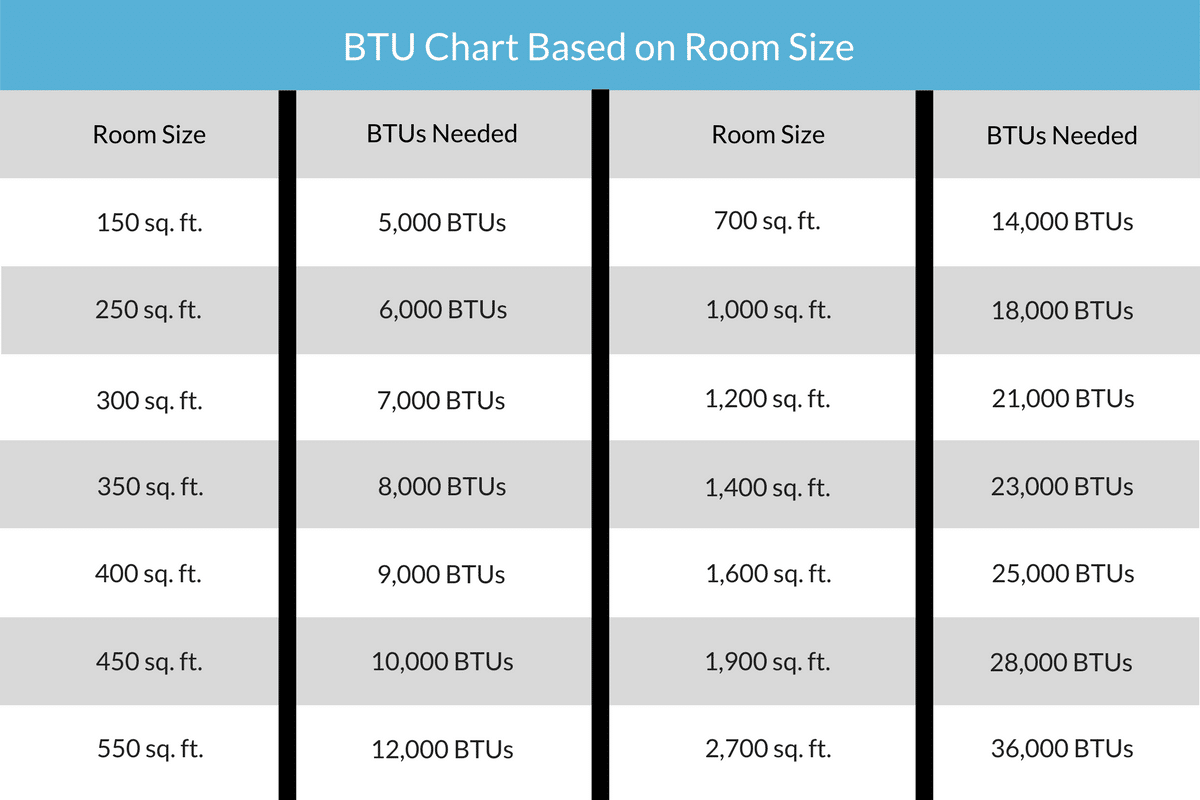
Once you have your window measurements, you need enough cooling power for the room. Cooling capacity is measured in BTUs, or British Thermal Units, and matching it to your room size prevents short cycling and wasted energy.
| Room Size (sq ft) | Recommended BTU |
|---|---|
| 100 to 150 | 5,000 |
| 150 to 250 | 6,000 |
| 250 to 300 | 7,000 |
| 300 to 350 | 8,000 |
| 350 to 400 | 9,000 |
| 400 to 450 | 10,000 |
A 12 by 12 room (144 square feet) typically needs around 5,000 BTUs to stay comfortable.
Adjust for Heat-Producing Factors
Increase the BTU rating when your room faces extra heat sources. Add 10 percent for rooms with strong direct sunlight. Add 1,000 BTUs for kitchens, since cooking generates significant heat. Add 600 BTUs for each person beyond the second occupant in the room regularly.
These adjustments ensure your AC keeps up with real-world cooling demands rather than struggling against hidden heat gains.
Avoid Common Measuring Mistakes
Small errors during measurement create big problems during installation. Knowing what to watch for saves you from returns, damage, and unsafe setups.
Ignore Window Labels and Stickers
Manufacturers often label windows by rough opening size, but actual dimensions shift over time. Older windows settle, warp, or swell with humidity. Always measure the actual opening rather than trusting the label.
Check for Screen and Lock Conflicts
Before committing to a unit, confirm that nothing interferes with installation.
- Remove the window screen and store it elsewhere during AC season.
- Test whether the window lock still engages once the sash closes over the AC.
- Verify that the sash seals properly against the top of the unit.
If the window cannot lock over the AC, install a security bracket to prevent the unit from being pushed out from inside.
Never Force a Tight Fit
If the AC does not slide smoothly into the opening, stop and recheck your measurements. Forcing the unit damages the window frame, cracks the AC housing, and creates gaps that leak cold air. When in doubt, consult a professional installer or choose a different cooling option.
Confirm Fit Before You Buy

With your measurements in hand, you can now filter AC options confidently and avoid wasting time on incompatible models.
Compare Manufacturer Specifications Carefully
Every AC model lists minimum and maximum window widths, required height clearance, and depth dimensions in the product manual. Check the spec sheet online before purchasing, since marketing descriptions often omit critical details.
Use Online Retailer Filters
Major retailers like Home Depot, Lowe’s, and Amazon let you filter window ACs by width range. Enter your exact window width to see only compatible models. Read customer reviews that mention “tight fit” or “needed extender” to learn from real installation experiences.
Some homeowners successfully fill small gaps (under 2 inches) with DIY foam insulation or plexiglass panels when factory extenders fall short.
Install and Test Your New AC
Proper installation is the final test of your measurements. Even a perfectly sized unit fails if installed incorrectly.
Follow the Included Instructions
Each AC model has specific setup steps that differ slightly from competitors.
- Insert the unit from outside at a slight upward angle.
- Lower it gently onto the sill and extend the side panels.
- Secure the unit with the included mounting brackets or screws.
- Close the window sash firmly onto the top of the AC.
Seal any remaining gaps with weatherproof foam or vinyl strips to prevent air leaks and maximize efficiency.
Run the Unit and Check Performance
Turn the AC on and monitor it closely during the first hour of operation. Cold air should begin flowing within 15 minutes. Listen for vibrations, rattling, or grinding noises that signal poor support or misalignment. If the unit shuts off quickly, it may be overheating from restricted airflow or improper positioning.
Frequently Asked Questions About Measuring Windows for AC Units
What is the standard window size for a window AC unit?
Most window ACs fit openings between 23 and 36 inches wide. Smaller units designed for narrow windows start around 21 inches, while larger commercial-style units can exceed 40 inches. Always measure your specific window rather than assuming it matches a standard size.
How do I measure a window for an AC unit if my window slides horizontally?
For sliding windows, measure the width of the opening when the slider is fully open. Then measure the height from the sill to the top of the opening. Sliding window ACs are less common, so confirm your window type is compatible before purchasing.
Can I install a window AC in a window that is too wide?
Yes, if the AC includes adjustable side panels. These panels extend to fill gaps between the unit and the window frame. For gaps larger than 10 inches, you may need custom-built filler panels or plywood extensions to seal the space properly.
How much clearance do I need above a window AC unit?
Most units require 12 to 18 inches of vertical clearance between the sill and the lowered sash. This space allows the window to close over the top of the AC while providing enough room for proper airflow and structural support.
Do I need to measure window depth for a window AC?
Yes, depth is essential for safety and fit. Most window ACs need 16 to 24 inches of depth from the interior wall to the outer window frame. Insufficient depth causes instability, while excessive depth wastes interior floor space.
What happens if my window measurements are slightly off?
Small gaps (under 2 inches) can be sealed with foam insulation or weatherstripping. Larger discrepancies require adjustable side panels, custom filler pieces, or a different unit entirely. Never force a unit into an opening that does not match its specifications.
Key Takeaways for Measuring Your Window Before Buying an AC
Accurate measurements are the foundation of every successful window AC installation. Measure width at three points and use the smallest reading. Confirm height clearance from sill to sash and check exterior ventilation space. Verify depth allows for proper tilt and drainage. Match your room size to the right BTU rating, then adjust for sunlight, kitchens, and occupancy.
Your next step is simple: grab a metal tape measure and record all three dimensions today. With those numbers in hand, you can shop with confidence, install safely, and enjoy reliable cooling all summer long.



