
Rain, snow, and road grime hit your windshield daily, and worn wiper blades turn every drive into a guessing game. Cracked rubber, streaking glass, and chattering sounds are clear warnings that your wipers need attention. Learning how to replace window wipers takes just minutes and dramatically improves driving safety. This guide covers everything from inspection and sizing to removal, installation, and testing, so you can handle the job like a pro.
You’ll learn how to spot worn blades, choose the correct size and type, remove old wipers safely, install new ones securely, and verify proper performance. Grab your blades and let’s get started.
Spot the Warning Signs of Worn Wiper Blades

Before buying replacements, inspect your current blades. Not every visibility issue means you need new wipers, but most do.
Physical Signs of Deterioration
Lift each wiper arm and run your finger along the rubber edge. Watch for these red flags:
- Cracks or splits in the rubber surface
- Missing chunks or uneven edges
- Hardened, stiff rubber that lost its flexibility
- Squeaking, screeching, or chattering during operation
- Streaking, smearing, or skipping across the glass
Any of these signs mean replacement time.
Contact and Alignment Check
With wipers at rest, confirm the entire rubber length sits flat against the windshield. Gaps indicate warped arms or worn blades. Even if blades look fine, replace them every 6 to 12 months, especially before spring and winter weather arrives.
Find the Correct Wiper Blade Size
Wrong sizes create blind spots, overlap problems, or even windshield scratches. Getting the right fit matters.
How to Determine Your Blade Size
- Check the owner’s manual for exact front and rear specifications
- Measure existing blades with a tape measure, end to end, in inches
- Use online lookup tools from retailers like AutoZone, O’Reilly, or Amazon by entering your vehicle’s year, make, and model
Pro Tip: Driver and passenger blades often differ in length. Always measure or verify both sides separately. If your vehicle has a rear wiper, measure that one too.
Choose the Right Wiper Blade Type
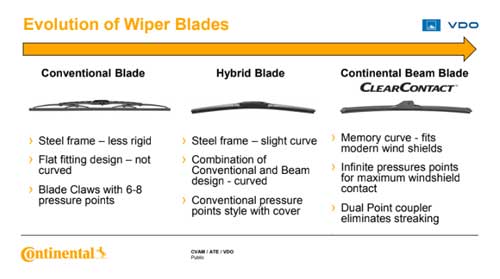
Three main blade types exist, each suited to different conditions and budgets.
| Feature | Conventional | Beam | Hybrid |
|---|---|---|---|
| Frame Design | Metal skeleton with multiple pressure points | Frameless, single molded arc | Metal frame with aerodynamic cover |
| Performance | Good in mild weather | Excellent in snow and ice | Balanced and quiet |
| Durability | 6 to 12 months | 12 to 24 months | 12 to 18 months |
| Cost | Budget-friendly | Higher investment | Mid-range |
| Best For | Dry, mild climates | Snowy regions and curved glass | Highway driving and varied conditions |
Winter Tip: Beam blades resist ice buildup and conform better to curved windshields, making them ideal for harsh climates.
Gather Your Tools and Prepare the Vehicle
You don’t need much, but proper preparation prevents costly mistakes.
What You’ll Need
- New wiper blades in the correct size and type
- Clean microfiber cloth or rag
- Windshield washer fluid
- Safety glasses and gloves
- Flashlight (for low-light conditions)
Park and Position the Wipers
- Park on flat, stable ground away from traffic
- Shift to Park and engage the parking brake
- Turn the ignition to accessory mode, run the wipers until they reach mid-swipe, then shut off the engine
This trick holds the arms upright for easy access. If your vehicle doesn’t support it, lift the arms manually after turning off the car.
Protect the Windshield
Critical Warning: Place a thick towel on the glass where the bare metal arm rests. If the arm slips and snaps back without protection, it can crack your windshield or damage the arm mechanism.
Remove the Old Wiper Blades
Removal depends on your connector type. Compare the old blade to the new one before discarding anything.
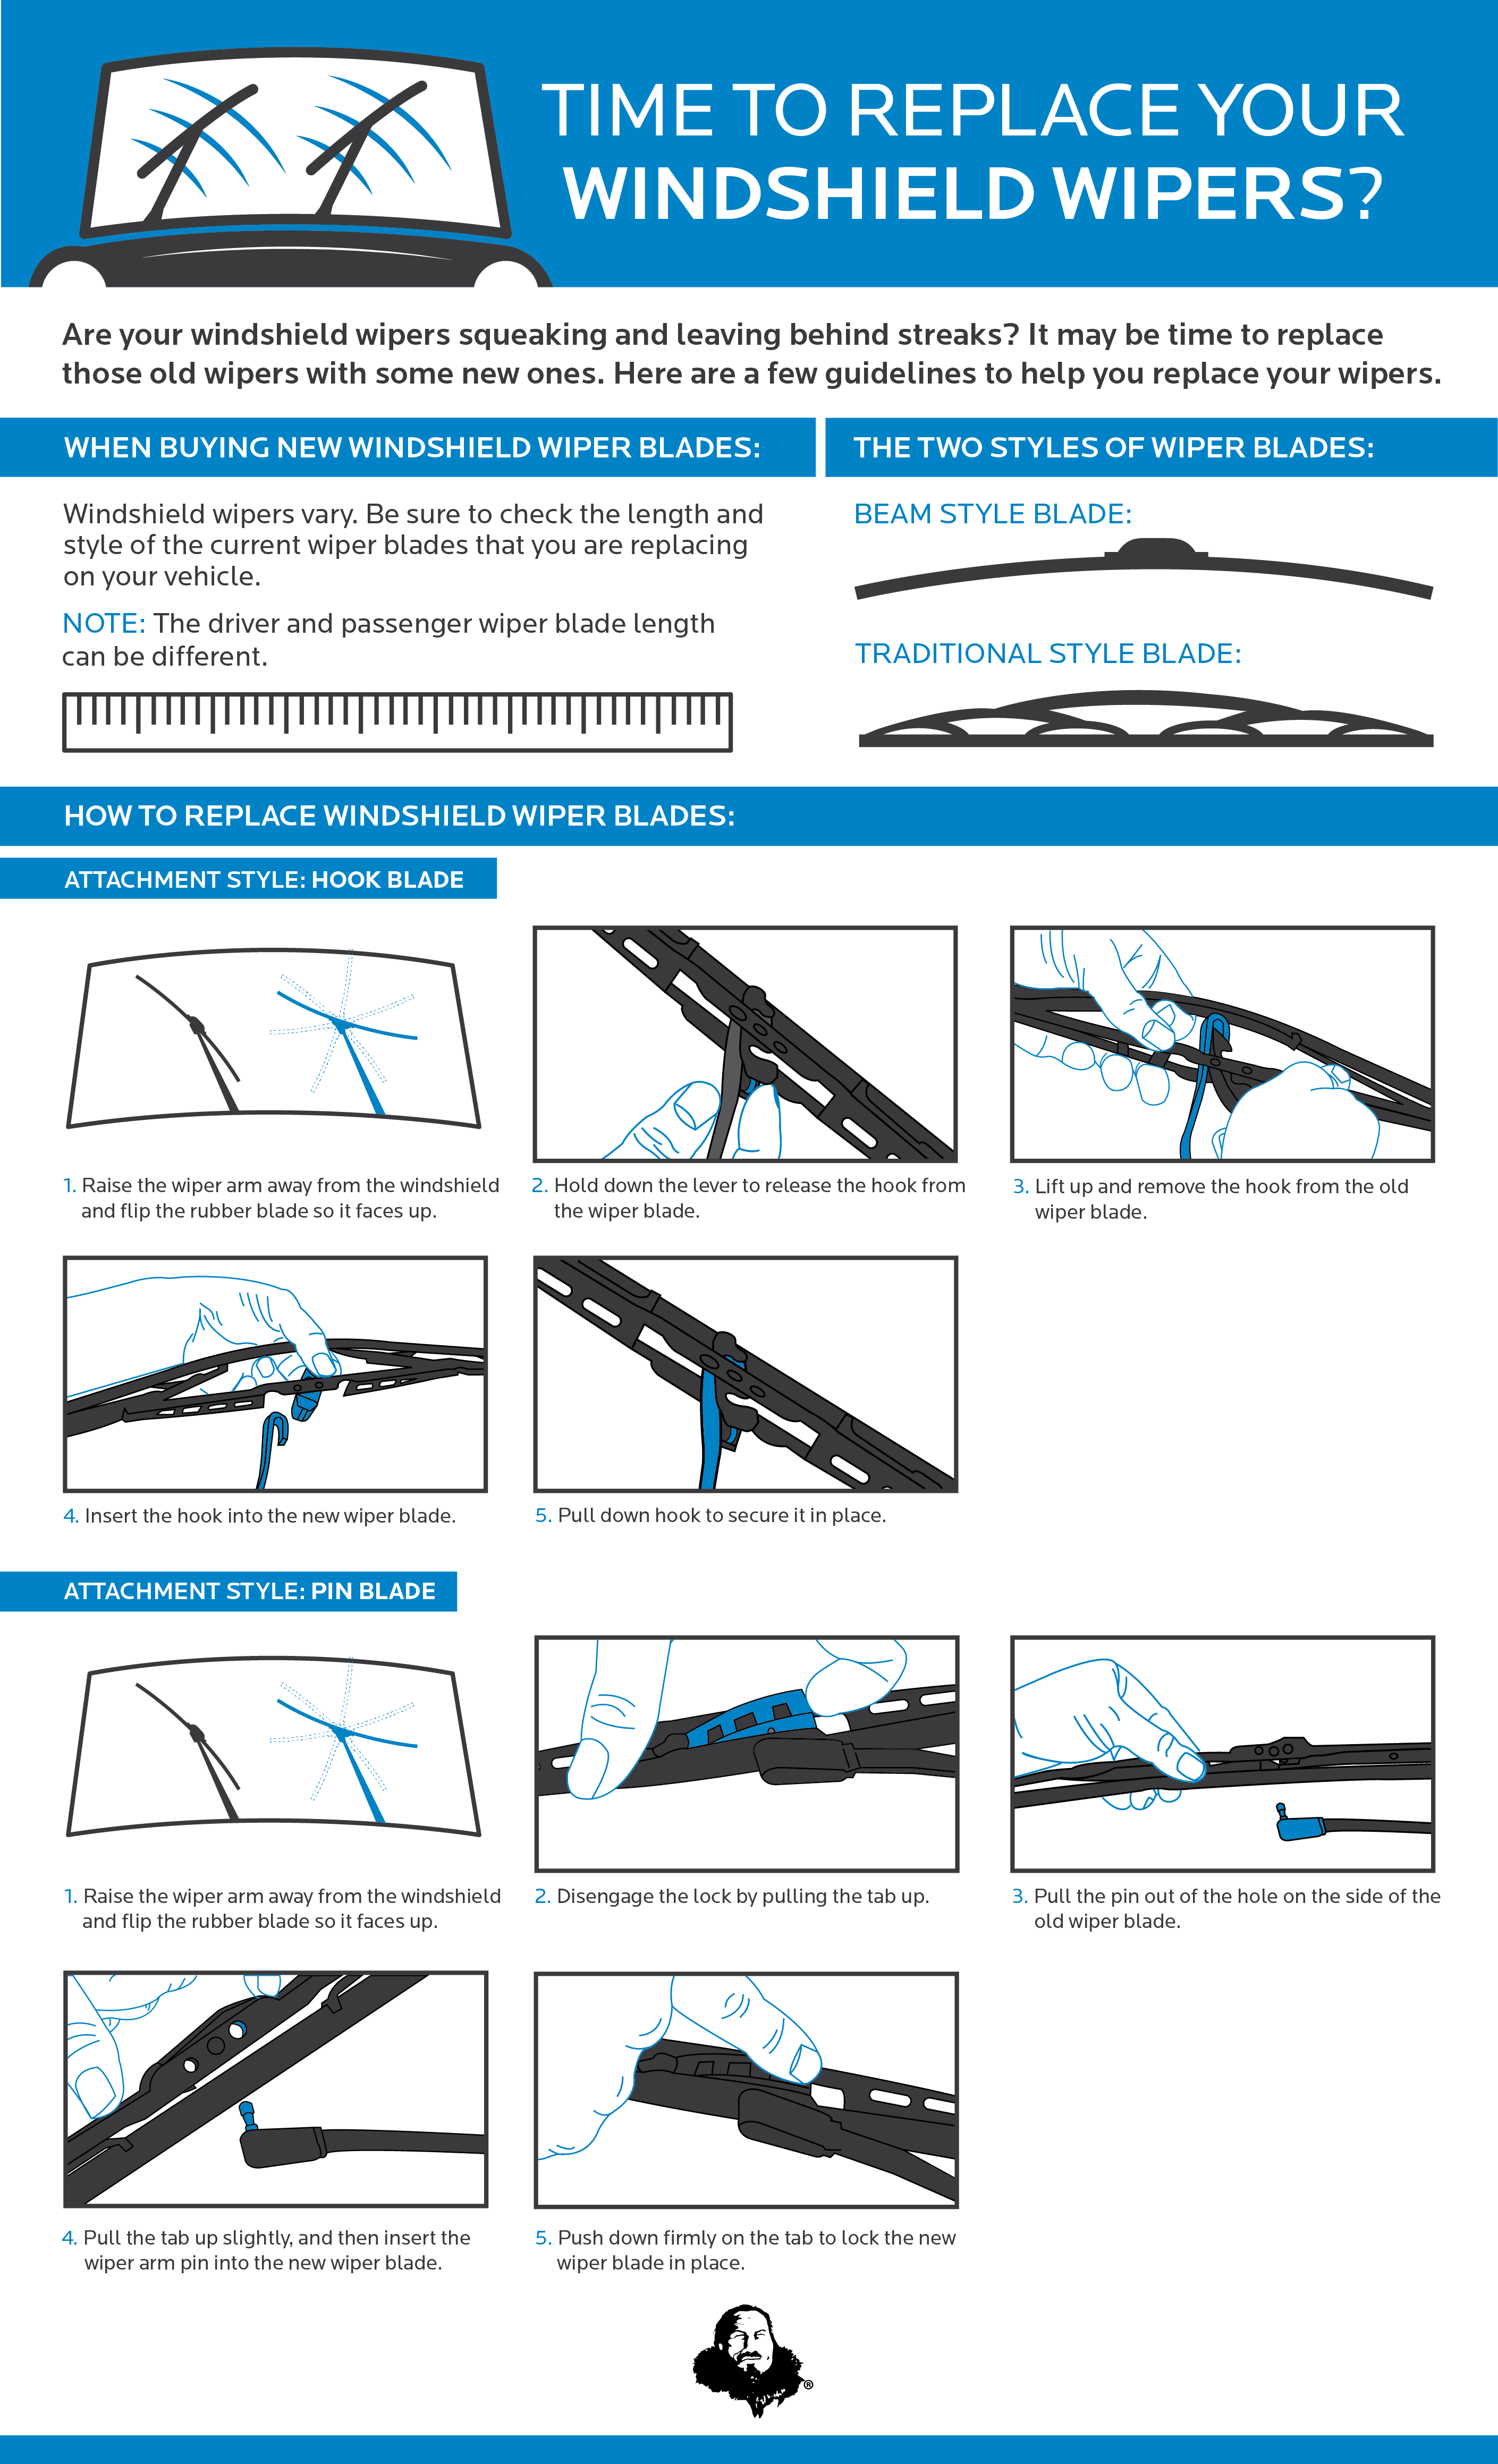
J-Hook Connection (Most Common)
Found on most domestic and Asian vehicles.
- Lift the wiper arm to a 90-degree angle
- Locate the release tab where the blade meets the hook
- Press the tab toward the arm
- Slide the blade downward off the hook
- Remove completely
Visual Cue: The blade should slide off smoothly without forcing.
Clip or Pinch-Tab Connection
Common on European and luxury models like BMW, Mercedes, and Audi.
- Lift the arm away from the windshield
- Pinch the side tabs together or press the top button
- While holding the release, slide the blade off the arm
- Confirm full disengagement
Troubleshooting: If the blade feels stuck, recheck the mechanism. Excessive force can break plastic clips.
Immediate Step: After removal, gently lower the bare arm onto the protective towel.
Install the New Wiper Blades

Correct installation ensures secure fit and full windshield contact.
Prepare the New Blade
- Remove the plastic protector strip covering the rubber edge. Leaving it on causes streaks and scratches.
- Select the correct adapter from multi-fit packages. Match it to your arm type (J-hook, pin, or bayonet).
- Check orientation. The curved end of the blade connector should align with the curved hook of the arm.
Install on J-Hook Arms
- Hold the new blade with the rubber facing up
- Align the J-hook with the plastic clip opening
- Slide the hook into the clip and pull upward until you hear a click
- Tug gently to confirm it’s locked
Install on Clip or Pinch-Tab Arms
- Align the blade’s connector with the wiper arm
- Slide the arm into the blade until it seats
- Press or snap the locking mechanism until it clicks
- Ensure tabs are fully engaged
Double Check: Both blades should sit securely and align straight across the windshield.
Lower the Arms and Test the Wipers
Rushing this final step risks damage. Always test before driving.
Lower the Wiper Arms
- Gently lower each arm by hand
- Let it land softly. Never let it snap down
- Repeat for both sides and the rear wiper if equipped
Clean and Lubricate the Windshield
- Spray washer fluid generously across the glass
- Or rinse with a garden hose to simulate rain
- Never test on a dry windshield. This wears the rubber and strains the motor.
Run a Full Test Cycle
- Turn on the wipers
- Cycle through low, high, and intermittent speeds
- Watch for these issues:
- Streaking may indicate dirty glass or a defective blade
- Chattering suggests improper installation
- Skipping means the blade isn’t conforming to the windshield curve
- Uneven coverage points to wrong size or misalignment
Fix Common Issues
- Streaks? Clean the windshield and rubber edge with glass cleaner
- Chatter? Recheck blade alignment and the locking mechanism
- Noise? Apply a drop of silicone spray to the rubber (optional)
- Still not working? The blade may be defective. Replace under warranty.
Avoid These Common Mistakes
Even experienced DIYers slip up. Steer clear of these pitfalls.
Wrong Blade Size
Too short creates blind spots. Too long causes overlap, scratching, or motor strain. Always verify both sides.
Forgetting the Plastic Protector
Leaving the protective cover on is the number one rookie mistake. It blocks contact and ruins wiping action.
Letting the Arm Snap Back
This can crack the windshield or bend the arm. Always lower by hand.
Skipping the Click Test
If it doesn’t click, it’s not secure. A loose blade can fly off at highway speeds.
Replacing Only One Blade
Wipers wear together. Replacing just one leads to uneven cleaning. Always replace in pairs.
Ignoring the Owner’s Manual
Some vehicles have proprietary connectors. The manual shows the correct release method and adapter.
Extend the Life of Your Wiper Blades
Proper care keeps blades performing longer.
Monthly Maintenance Tips
- Clean blades every time you refuel by wiping the rubber with a damp cloth
- Wash the windshield regularly to remove sap, bugs, and road grime
- Avoid dry wiping. Always use washer fluid first
- Lift wipers during snowstorms to prevent freezing to the glass
Storage Tips for Spares
Keep unused blades in a cool, dark place. UV light and heat degrade rubber quickly.
When to Call a Professional
Most replacements are simple, but some situations need expert help:
- Broken wiper arm or motor
- Stuck connector that won’t release
- Proprietary systems (like Tesla or some Audis) with hidden latches
- Rear wiper with tight access in SUVs or hatchbacks
Many auto parts stores offer free installation with purchase. Take advantage if you’re unsure.
Frequently Asked Questions About Replacing Window Wipers
How often should I replace my windshield wipers?
Replace wiper blades at least once a year, or every six months for optimal performance. A common strategy is swapping them before spring and winter. Vehicles in sandy or dusty environments may need even more frequent replacement.
What size wiper blades do I need?
Check your owner’s manual for exact specifications, measure existing blades with a tape measure, or use an online lookup tool by entering your vehicle’s year, make, and model. Driver and passenger sides often require different lengths.
Can I replace wiper blades myself?
Yes, replacing wiper blades is a simple DIY task that takes about 10 to 15 minutes. Most blades use a J-hook connection that requires no tools. Just lift the arm, release the tab, and slide the old blade off.
Why are my new wiper blades streaking?
Streaking usually means you forgot to remove the plastic protector strip, the windshield is dirty, or the blade is defective. Clean the glass thoroughly and inspect the rubber edge. If streaking persists, the blade may need replacement under warranty.
Do I need to replace both wipers at the same time?
Yes, always replace wiper blades in pairs. They wear at similar rates, and replacing only one leads to uneven cleaning performance and inconsistent visibility.
What’s the difference between beam and conventional wiper blades?
Conventional blades have a metal skeleton frame and work well in mild climates. Beam blades are frameless with a single molded arc, offering superior performance in snow and ice plus better conformity to curved windshields. Hybrid blades combine both designs for balanced performance.
Key Takeaways for Successfully Replacing Window Wipers
Replacing your window wipers is one of the easiest and most affordable ways to boost driving safety. Start by inspecting your current blades for cracks, stiffness, or streaking. Measure carefully or check your owner’s manual to get the right size, and choose a blade type that matches your climate and budget.
During installation, always protect the windshield with a towel, remove the plastic protector strip, and listen for the click that confirms a secure fit. Test with washer fluid, never on dry glass, and cycle through all speed settings to verify smooth, streak-free performance.
Set a reminder to check your blades every six months, especially before winter storms arrive. For best results, pair new wipers with fresh washer fluid and a clean windshield. Clear vision keeps you safe in every condition.



