

Water intrusion around windows is one of the most common causes of structural damage in homes. Left unchecked, it leads to rotting wood, mold growth, peeling paint, and compromised indoor air quality. Knowing how to waterproof a window correctly can extend its life by decades and protect your home’s integrity.
The key to success lies in a layered defense that starts before the window is even installed. True waterproofing happens in two phases: preparing the rough opening and sealing the installed unit, with an emphasis on shingle-style layering. This means every layer overlaps the one below it so water flows outward, not inward. The bottom of the window must also allow trapped moisture to escape rather than sealing it in, which could lead to hidden rot.
In this guide, you’ll learn professional-grade techniques for both new installations and repairs, including how to use self-adhering membranes, flashing tape, backer rods, and caulk for maximum protection. You’ll also discover special considerations for high-moisture areas like showers and how to maintain your seals over time.
Prepare the Rough Opening for Waterproof Window Installation
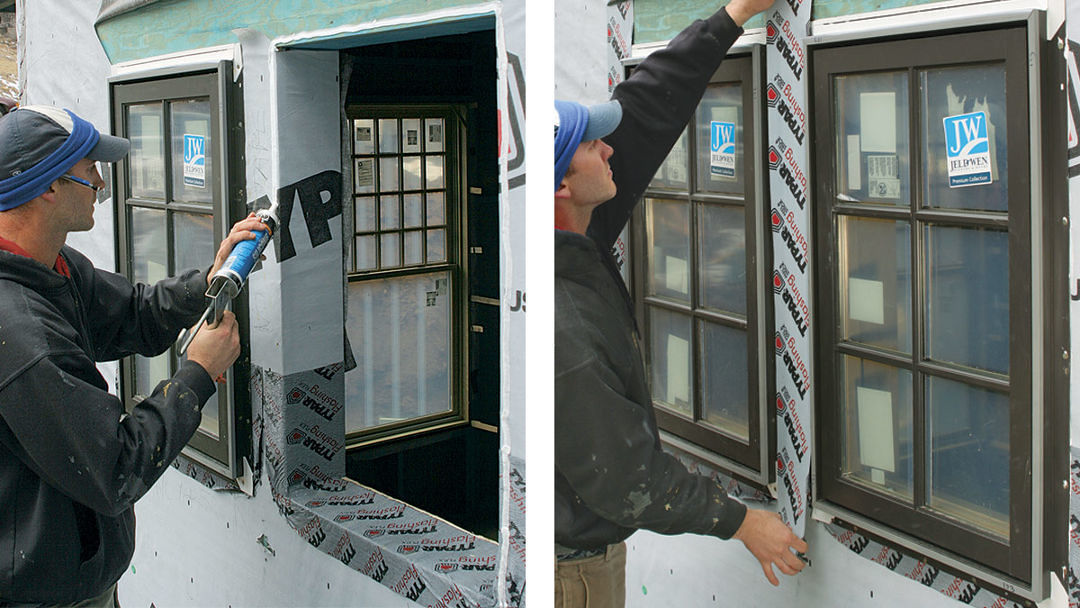
Before any sealant touches the frame, the foundation for waterproofing must be built: the rough opening. A poorly prepared or misaligned opening undermines even the best materials. Proper prep ensures the window fits snugly, drains correctly, and bonds securely to weather-resistant barriers.
Inspect for Structural Damage Before Sealing
Begin by checking the framing and sheathing around the opening. Look for soft spots, discoloration, or crumbling wood, which are signs of rot or past water intrusion. Any compromised material must be replaced before proceeding. Water will always find the weakest point, so reinforcing damaged areas stops future leaks at the source.
Next, clean out dust, debris, and old caulk. A smooth, dry surface allows membranes and tapes to adhere properly. Moisture trapped under flashing can degrade adhesion over time, so ensure the area is completely dry before moving forward.
Verify Square, Level, and Plumb Measurements
Use a tape measure to check the width at the top, middle, and bottom of the opening. Do the same for height on both sides and the center. If any measurement differs by more than 1 inch, the opening is out of tolerance and needs correction.
To fix misalignment, cut tapered filler strips from scrap stud stock and nail them into the uneven areas. This creates a uniform surface for the window to sit on. An out-of-plumb frame won’t seal properly, leading to gaps and stress on the glass.
Ensure the window unit is at least ¾-inch narrower and ½-inch shorter than the smallest dimension of the opening. This gap allows room for shims, insulation, and thermal expansion. If the fit is too tight, the frame may warp; if too loose, sealing becomes unreliable.
Install a Weather-Resistant Barrier (WRB)
Apply a weather-resistant barrier over the sheathing. Choose between sheet membranes like Tyvek or liquid-applied flashing. For sheet WRBs, staple the material to the wall, wrapping it around the rough opening. Cut it back carefully with a utility knife to expose the opening while leaving enough overlap for flashing.
If using liquid flashing, brush or roll it directly onto the sheathing, extending it into the opening. Liquid products conform tightly to irregular surfaces and eliminate seams where water might penetrate. Seal any cuts in sheet WRBs with flashing tape to maintain continuity.
Apply Bottom Flashing First for Proper Water Shedding
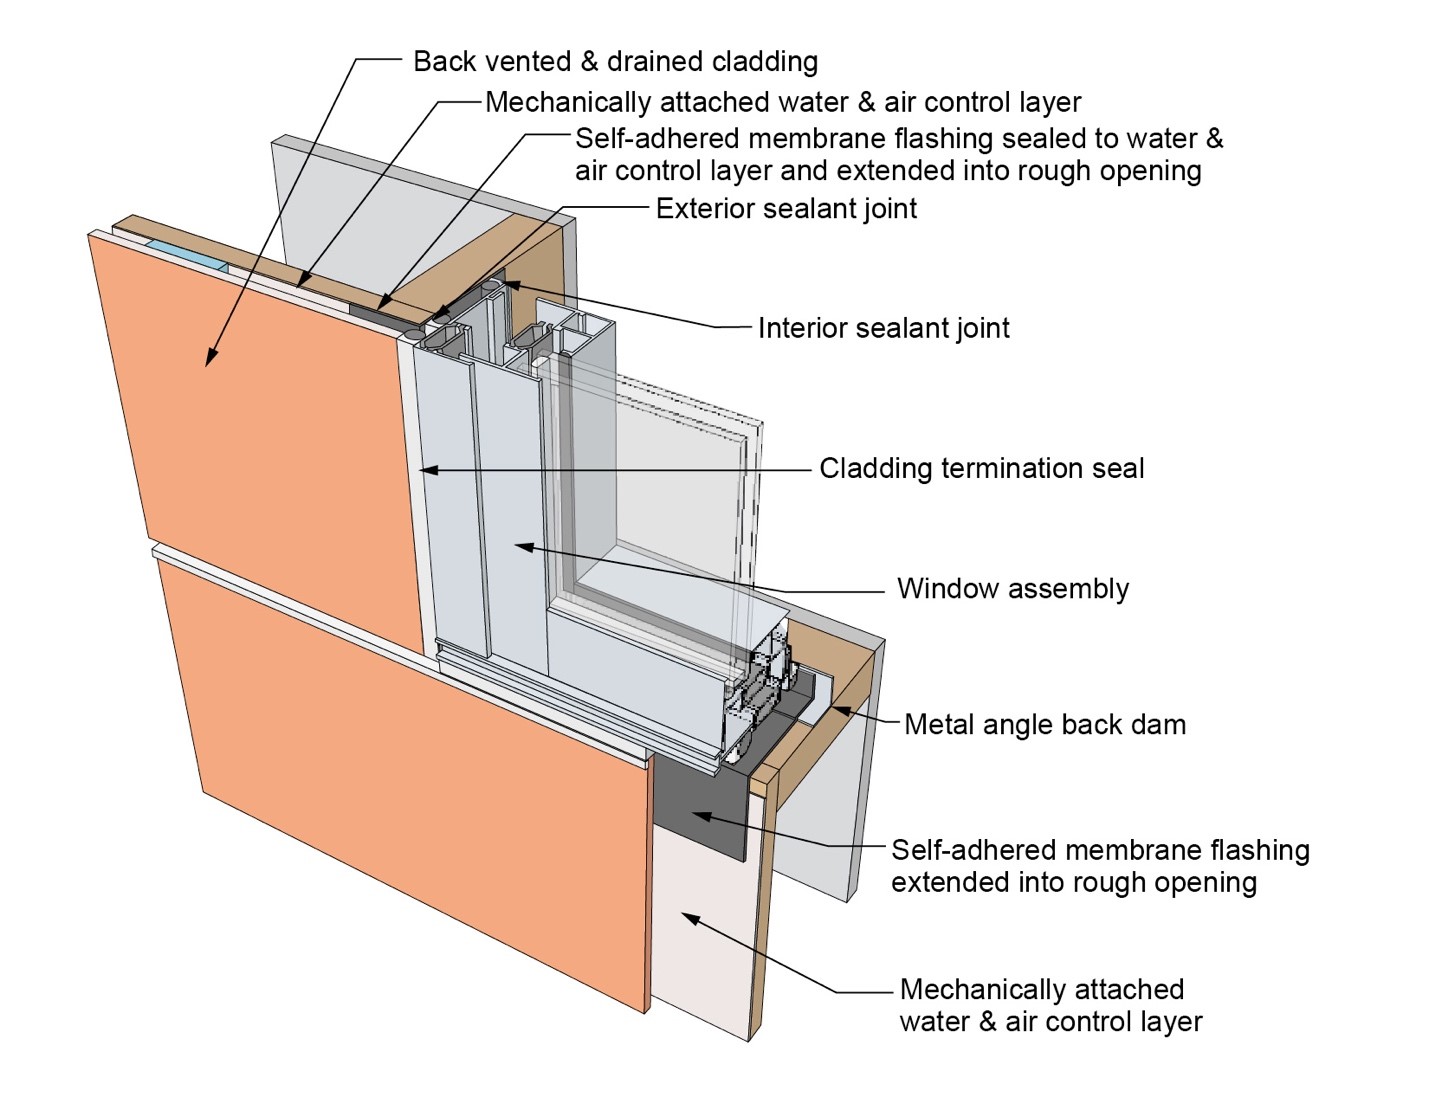
Water follows gravity, so the lowest part of the window (the sill) must be waterproofed first. Applying bottom flashing before side or top layers ensures upper materials can overlap it, creating a continuous downward path for moisture.
Install Builder’s Felt and Membrane at the Sill
Staple 15-pound builder’s felt across the bottom of the opening, extending it past the sides. This acts as a temporary moisture shield and helps bond the primary membrane.
Over the felt, apply a strip of self-adhering waterproof membrane. Press it firmly into place, ensuring full contact with the sheathing. The membrane should extend several inches up the sides of the opening to create a base for side flashing to overlap.
Reinforce Corners Against Capillary Leaks
Cut diagonal corners on the membrane where it meets the side edges. Fold the excess material inward to form tight L-shaped seals in each corner. Then, cut small triangular patches of membrane and apply them over the folded corners to seal any gaps.
This double-layer corner reinforcement prevents water from sneaking through one of the most vulnerable parts of the assembly. Without it, capillary action can wick moisture into the frame over time.
Install Side Flashing with Proper Overlap
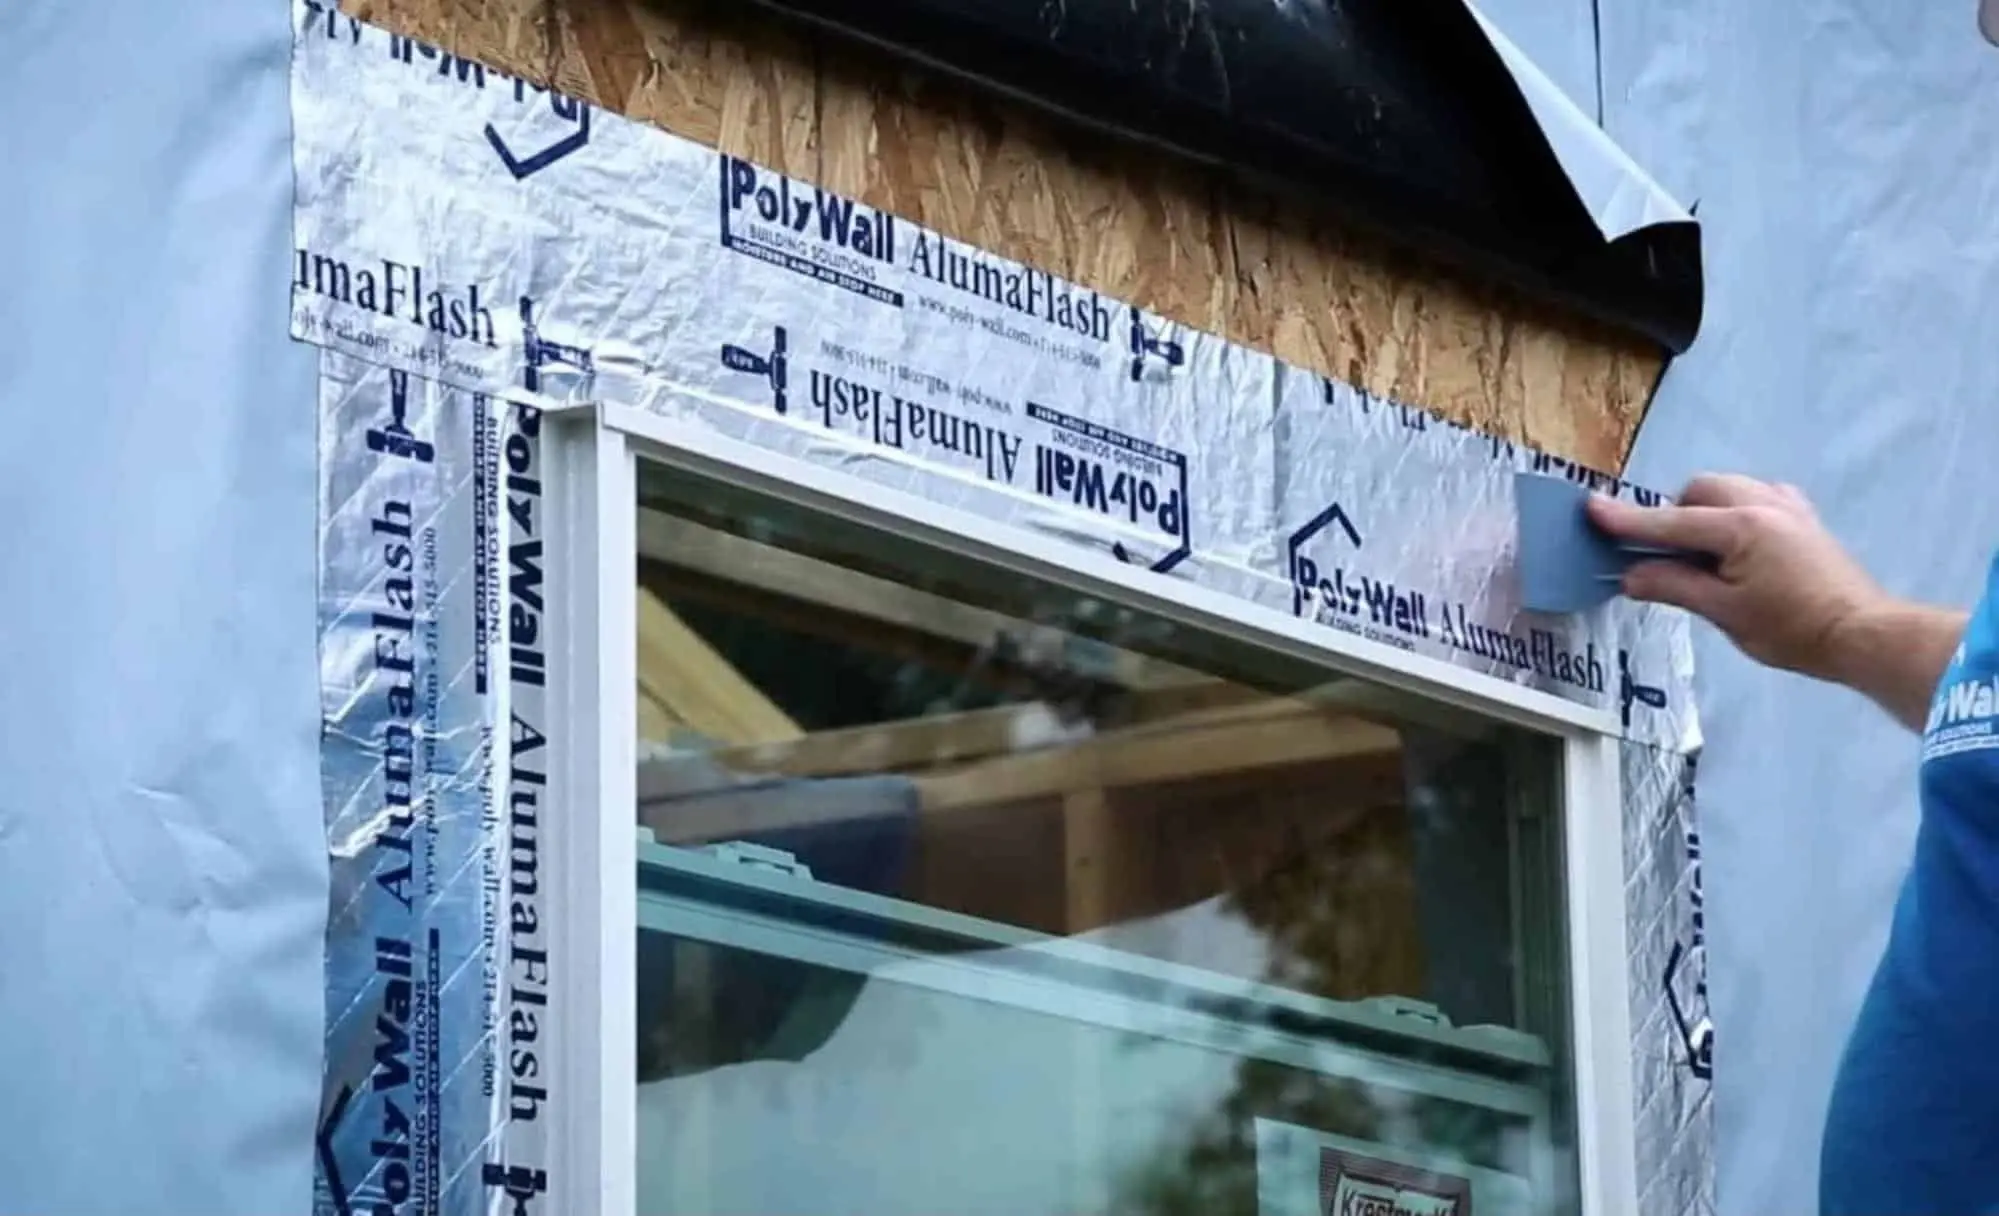
With the bottom sealed, move to the vertical sides. Side flashing must overlap the bottom layer to maintain the shingle effect, where each higher layer sheds water over the one below.
Cut and Position Flashing Strips Correctly
Measure and cut two strips of self-adhering membrane long enough to reach from the bottom of the opening past the header (top) by at least 6 inches. These extensions will later be covered by top flashing.
Starting at the bottom, press the side flashing onto the opening, ensuring it overlaps the bottom membrane by at least 2 inches. Smooth it upward with your hand or a roller to eliminate air bubbles and ensure strong adhesion.
Check Flashing Continuity Along the Sides
Once both sides are applied, inspect the overlap zones. There should be no gaps, wrinkles, or lifted edges. Any discontinuity breaks the water-shedding chain and creates a potential entry point.
Use a utility knife to trim excess material neatly at the top. Avoid pulling or stretching the membrane, as this can reduce its elasticity and lead to cracking later.
Set and Shim the Window for a Plumb Fit
Now that the rough opening is fully flashed, it is time to install the window. Precision here determines how well the final seals perform.
Place the Window from Outside
Carefully lower the window into the opening from the exterior. Have a helper guide it while you monitor alignment from inside. Avoid dropping or forcing the unit, which can damage the nailing flange or glass.
Insert Shims for Alignment on All Four Sides
From the interior, insert wood shims between the window frame and the rough opening on all four sides. Follow the manufacturer’s recommendation, typically 3 to 4 shims per side.
Shims serve three purposes: they level the window, keep it plumb, and prevent bowing when nails are driven through the flange. They also create a consistent gap for insulation and help direct any infiltrating water toward the flashing.
Confirm Square Measurements and Secure the Frame
Use a level to verify the sides are plumb and the sill is level. Then measure diagonally from corner to corner. Both measurements must be equal. If not, adjust the shims until the frame is perfectly square.
Once aligned, nail through the flange into the framing. Do not overtighten, as this can distort the frame. After securing, remove any temporary shims that were used only for positioning.
Finish with Top Flashing and Exterior Sealants
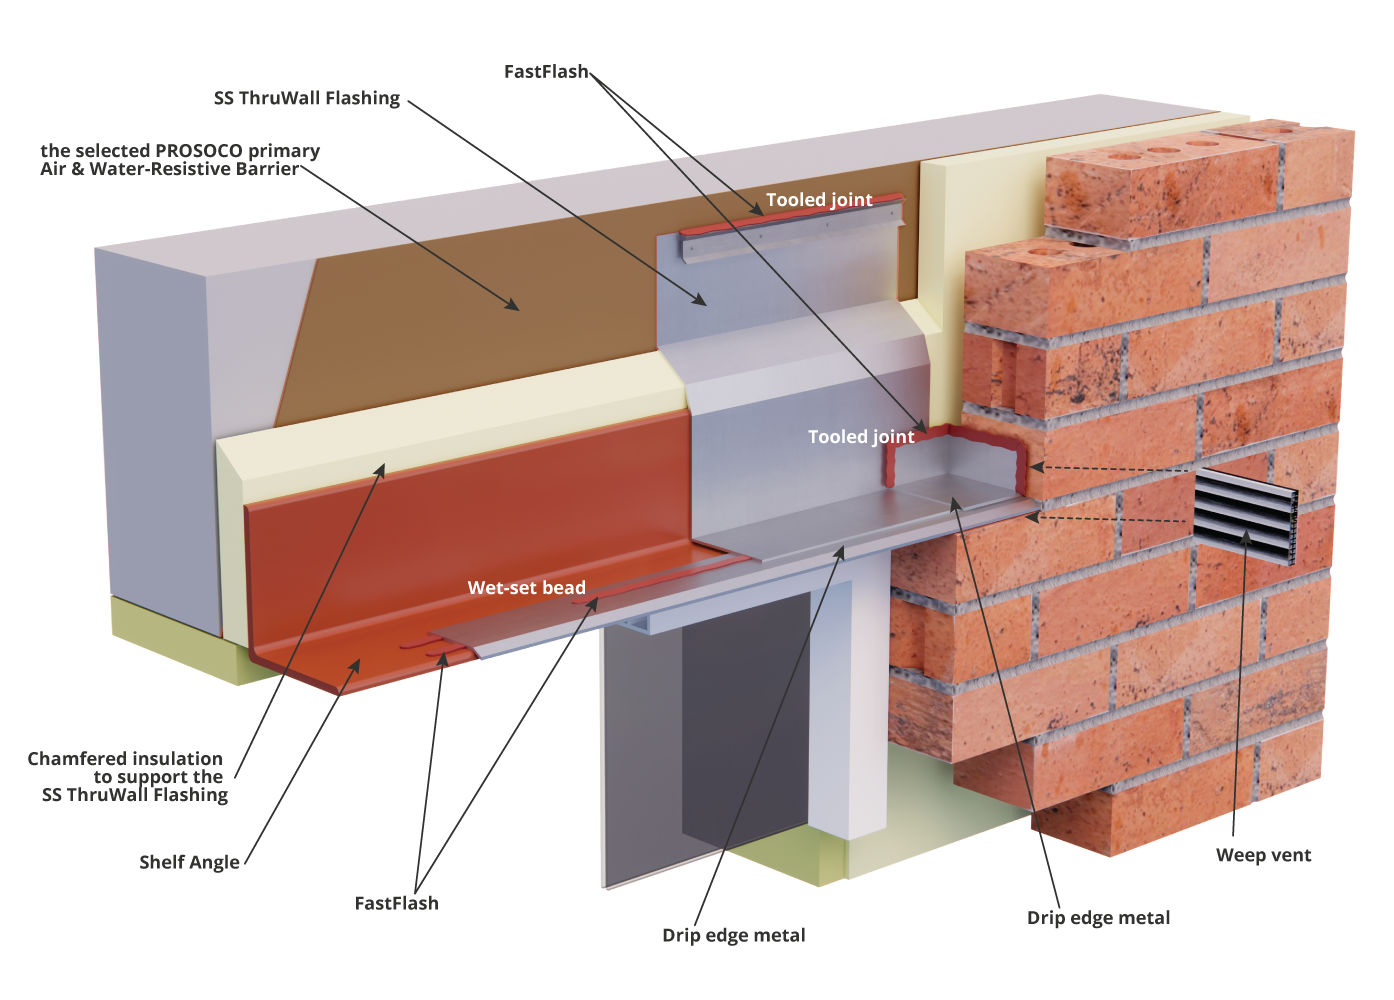
With the window locked in place, complete the waterproofing system with top flashing and exterior sealing. This final layer protects the most exposed part of the assembly: the header.
Apply Top Flashing to Shed Water Outward
Cut a strip of self-adhering membrane wide enough to cover the top of the window and extend at least 3 inches beyond each side. Press it over the header so it overlaps both side flashing strips.
This creates a T junction that sheds water away from the opening. Never let top flashing end flush with the sides, since water can sneak behind if there is no overlap.
Seal Flanges While Leaving the Bottom Open
Use flashing tape to cover the side and top nailing flanges. Extend the tape about 3 inches onto the surrounding wall to bond it to the WRB. This seals nail holes and prevents water from getting behind the flange.
Critical rule: Do not tape the bottom flange. Sealing the bottom traps any water that gets past the glass or frame. Instead, rely on weep holes in the window’s sill to allow drainage. Trapped moisture leads to rot and mold inside the wall cavity.
Create a Drip Edge for Flush Window Installations
If the window is flush with the wall surface (common with foam board installations), extend the waterproofing material slightly beyond the frame at the bottom. This forms a drip edge that directs water away instead of letting it pool at the seam.
For tile showers, use HydroBlok foam board and extend it ¼ to ½ inch past the frame. This synthetic sill mimics traditional overhangs and prevents water from tracking back into the wall.
Seal Gaps with Backer Rod and Caulk

Even with perfect flashing, small gaps remain between the window frame and wall. These must be sealed with the right technique to last.
Insert Backer Rod Before Applying Caulk
Remove temporary shims or cut permanent ones flush. Then press a foam backer rod into the gap between the frame and wall. Use a wood shim or tool to push it down about ¼ inch below the surface.
The backer rod acts as a backing for the caulk, creating an hourglass joint profile. This improves flexibility and adhesion, preventing the caulk from bonding to three surfaces, which causes premature failure.
Apply and Finish Exterior Caulk on All Four Sides
Load a caulking gun with high-performance acrylic or silicone sealant rated for exterior use. Apply a continuous bead over the backer rod on all four sides.
Pay special attention to the bottom corner joints, where gravity pulls water. These are the most common leak points. Run the caulk smoothly and avoid gaps or thin spots.
Use a caulk finisher tool or damp finger to smooth the bead. This ensures full contact with both surfaces and removes excess. A clean, concave bead dries evenly and resists cracking.
Waterproof Windows in Tile Showers with HydroBlok
Standard flashing is not enough for shower environments. Constant direct water exposure demands a fully integrated wet-area system.
Use HydroBlok Foam Board as the Primary Barrier
Replace traditional backer board with HydroBlok, a rigid waterproof foam board. Install it around the window frame, ensuring full contact with the wall.
This board serves as both a vapor barrier and a stable substrate for tile. Unlike cement board alone, it will not absorb moisture if water penetrates behind the tile.
Seal All Seams and Edges in the Shower Assembly
Apply a flexible joint sealant to every seam, corner, and edge where the foam board meets the wall or window frame. Pay close attention to the transition between vertical and horizontal surfaces.
Once sealed, install cement backer board over the foam for added rigidity. Tape all seams with fiberglass mesh and thinset, then apply a liquid waterproofing membrane like RedGard or Kerdi over the entire surface.
Tile and Seal Grout for a Watertight Finish
Tile the area, including the window frame if designed for it, using waterproof mortar. After grouting, let it cure fully, then apply a penetrating grout sealer.
Finally, inspect all transitions. Apply a final bead of mildew-resistant sealant where the tile meets the window to close any micro-gaps.
Weatherproof Existing Windows to Stop Drafts
For older windows showing drafts or condensation, full waterproofing may not be needed, but weatherproofing improves energy efficiency and comfort.
Install V-Strips or Foam Tape on Sashes
If you feel a draft, apply V-strips (tension seals) to the top and bottom of movable sashes. Nail-on versions last longer; adhesive-backed ones are easier to install.
Alternatively, use closed-cell foam tape. Cut it to length and stick it along gaps in the sash. It compresses when the window closes, forming an airtight seal.
Apply Window Film for Added Insulation
Interior or exterior window film reduces air leakage and adds insulation. It also minimizes UV fading and increases privacy. Choose low-VOC, removable films for rental properties.
Avoid felt weatherstripping in wet areas, as it deteriorates quickly. Use silicone gaskets or tubular seals for exterior protection against water and pests.
Maintain Seals and Inspect Annually for Longevity
Waterproofing is not a one-time fix. Regular maintenance keeps the system intact for decades.
Check for Cracks and Gaps Each Year
Inspect exterior caulk and flashing every year. Look for cracks, shrinking, or separation, especially after extreme weather. Reapply sealant at the first sign of wear.
Clean window tracks and clear weep holes in the sill. Clogged drains trap water, leading to frame damage even with perfect flashing.
Touch Up Paint and Reseal as Needed
Repaint exterior trim as needed. Peeling paint exposes wood to moisture. Always seal nail holes and joints with acrylic caulk after painting.
If you spot water stains inside, investigate immediately. The source is likely failed flashing or caulk, not the glass itself.
Frequently Asked Questions About Waterproofing Windows
What is the best material to waterproof a window?
Self-adhering waterproof membranes combined with high-quality exterior caulk provide the most reliable seal. For structural layers, sheet WRBs like Tyvek or liquid-applied flashing create the primary barrier against water intrusion.
Can you waterproof a window from the inside?
Interior sealing alone cannot stop water intrusion. Effective waterproofing requires exterior flashing, membranes, and caulk to shed water outward. Interior caulk or foam insulation only addresses drafts and air leaks, not structural water damage.
Why should you not seal the bottom of a window?
Sealing the bottom flange traps any water that bypasses the glass or frame. Without an exit path, moisture accumulates inside the wall cavity, causing rot and mold. Weep holes in the sill allow drainage, so the bottom flange must remain open.
How often should window waterproofing be inspected?
Inspect exterior caulk, flashing, and seals at least once per year, ideally after extreme weather. Annual checks catch small cracks before they become major leaks and extend the life of the waterproofing system.
What is the difference between weatherstripping and waterproofing?
Weatherproofing stops air leaks and drafts using V-strips, foam tape, or gaskets. Waterproofing prevents liquid water intrusion through flashing, membranes, and caulk. Both work together, but waterproofing is essential for structural protection.
How do you waterproof a window in a shower?
Use HydroBlok foam board around the frame, seal all seams with flexible joint sealant, apply a liquid membrane like RedGard or Kerdi, then tile with waterproof mortar and sealed grout. This creates a continuous wet-area system that handles constant water exposure.
Final Thoughts on Waterproofing a Window
Properly waterproofing a window combines precision, the right materials, and correct layering. Start with a sound rough opening, apply flashing from the bottom up, avoid taping the bottom flange, and use backer rod with quality caulk to create a system that sheds water and lasts. In high-moisture areas like showers, integrate rigid foam boards and liquid membranes for total protection. Regular inspection and resealing ensure long-term performance, protecting your home from rot, mold, and energy loss.
Begin by assessing your current windows for drafts, water stains, or damaged caulk. Even small repairs today prevent thousands of dollars in structural damage tomorrow.



