

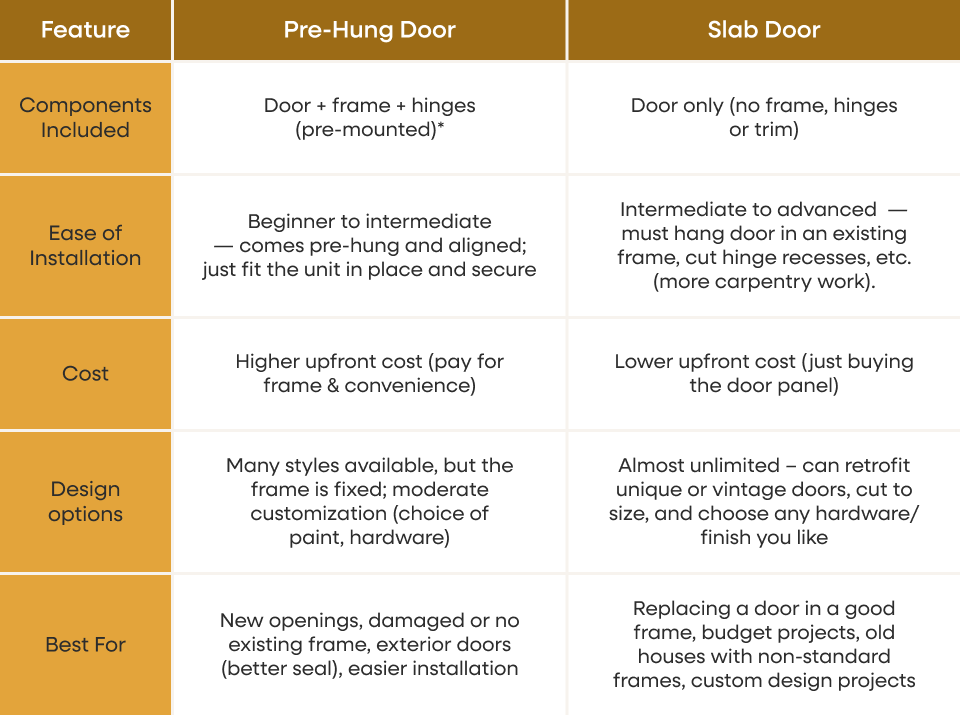
Installing a door frame might seem straightforward, but getting it right affects everything—how the door opens, seals, and lasts for years. Whether you’re replacing an old frame in a Victorian home or fitting a new pre-hung unit in a modern build, precision matters. A poorly installed frame leads to gaps, sticking doors, drafts, and even water damage over time. This guide covers how to install a door frame correctly, with step-by-step instructions for different types, tools you will need, UK-specific tips, and expert-backed best practices.
You will learn how to measure accurately, level and plumb the frame, prevent warping, and weatherproof exterior units so your installation lasts for decades.
Measure the Rough Opening Correctly
Before buying any door frame, you must measure the opening precisely. Walls are rarely perfect, especially in older homes.
Check Width, Height, and Depth
Measure the rough opening at three points: top, middle, and bottom for width. Measure both sides and the center for height. Use the smallest measurement to ensure the frame fits.
The opening should be:
• ½ inch (12.7mm) taller than the door unit
• ½ to ¾ inch (12.7–19mm) wider
• Depth must match wall thickness, typically 150mm in UK homes
This extra space allows room for shimming and leveling.
Verify Squareness and Alignment
Use a 1800mm level to check if the subfloor is level and the jambs will sit plumb. Check diagonals across the opening. If they are unequal, the wall is not square. Run a string from corner to corner. If the strings cross without touching, the walls are out of plane.
In Victorian brick homes, expect irregular openings. Off-the-shelf frames rarely fit, so custom fabrication is often needed.
Choose the Right Frame Type
Not all door frames work in every situation. Pick based on your wall type and project scope.
Fixed-Width Frames for Standard Walls
These frames come in set sizes and suit standard wall thicknesses like 150mm. They are ideal for new builds where openings are uniform. You must match the rough opening exactly because there is no wiggle room.
Adjustable Frames for Renovations
Telescoping side jambs let you adapt to varying wall thicknesses, typically 120–220mm. These are perfect for retrofitting doors in older properties where plaster and brick vary.
Pre-Hung Door Units: Door and Frame Together
Factory-assembled units come with hinges already attached. They arrive square and aligned, which is ideal for accuracy. However, they require a precise rough opening.
Custom-Built Frames for Historic Homes
In Victorian or listed buildings, stock frames will not fit. Buy oversized timber and mill it on-site to match irregular openings. This is essential when walls are not plumb or square.
Be prepared to make it yourself. Buy oversize lumber and plane it down to fit.
Gather Essential Tools and Materials
Having the right tools ensures a professional result and saves time.
Tools You Will Need
• Tape measure for accurate dimensions
• 1800mm level for full-height plumb checks
• 600mm level for fine-tuning alignment
• Framing square to confirm 90-degree corners
• String or twine to check wall planes
• Hammer and nail gun to fasten trim
• Screw gun to drive screws without stripping
• Utility knife and tin snips to trim foam and sill pans
• Caulking gun to apply sealant
• Inflatable door wedges to hold the unit in place when working alone
Use HTCELLE Air Wedge Bags to stabilize heavy units solo.
Key Materials Required
• Wood shims to align and secure the frame
• Polyurethane mounting foam to insulate and hold the frame
• Elastomeric sealant to waterproof joints
• #10 2.5-inch exterior screws for rust-resistant, strong hold
• Galvanized nails for architrave or brickmould
• Sill pan for exterior doors to prevent water intrusion
• Flexible flashing to shed water away from the frame
• Architrave to cover gaps and improve the finish
Always use exterior-grade screws. Never use drywall screws.
Prepare the Opening
A clean, stable opening sets the stage for success.
Clear and Inspect the Area
Remove old trim, debris, or crumbling plaster. In older UK homes, removing a frame can crack surrounding brick. Be ready to repoint or patch masonry after installation.
Level the Subfloor
Uneven floors cause misaligned doors. Sand high spots or fill low areas. Ensure the threshold area is solid and not rotted or soft.
Install Weather-Resistant Barrier for Exterior Doors
For entry doors, apply a breathable membrane over sheathing. Then install flexible flashing starting from the bottom up, overlapping layers like shingles to direct water outward.
Install a Pre-Hung Door Unit
Most exterior and many interior doors today come pre-hung. Follow these steps for a secure, weathertight fit.
Set the Sill Pan
Skip this and risk rot. Dry-fit the pan first. Apply three beads of polyurethane caulk on the subfloor. Press the pan into place, seal overlaps with PVC cement, and trim excess with tin snips.
Do not caulk the bottom of the sill pan because it needs to drain.
If you have no pan, seal the entire subfloor with heavy-duty sealant before setting the unit.
Insert the Unit Sill-First
Tilt the door unit and slide the sill into the opening. Make sure the hinge swing direction matches your layout. Do not remove the shipping clamp yet.
Temporarily Secure the Frame
Pre-drill 1/8-inch holes through the hinge-side jamb into the stud. Use countersunk screws in center holes only. Avoid fastening through brickmould because this can distort the frame.
Plumb the Hinge-Side Jamb
Use the 1800mm level vertically on the hinge-side jamb. Adjust with wood shims behind the jamb until perfectly plumb. Insert shims at each hinge location to prevent sagging.
Hinges carry weight, so shimming here keeps the door aligned.
Tighten screws in this order: middle, then top, then bottom. This prevents twisting.
Align the Lock-Side Jamb
With the door closed, check the gap between door and weatherstrip. It should be 3/8-inch to 1/2-inch. Adjust the lock-side jamb with shims behind screw points. Fasten loosely at first, then recheck plumb and even gaps before final tightening.
For double doors, align the passive side first, then the active side.
Remove Shipping Clamp and Hang Door
Only now remove the factory clamp. Check that hinges are tight and screws are in place. If not, use #10 2.5-inch exterior screws because they resist rust and pull-out.
Install an adjustable strike plate by aligning the center hole with the lock. Drill pilot holes, partially secure, test the latch, fine-tune the position, then tighten fully.
Adjust the Sill Height
If the threshold is adjustable, use a screwdriver to raise or lower it. Perform the dollar bill test. Close the door on a bill. The resistance should be strong but not tear it.
Too tight? Trim weatherstrip slightly. Too loose? Raise the sill.
Seal Joints and Install Flashing
Apply head flashing beneath the weather-resistant barrier. Seal all exterior joints around jambs, at head and sill, and behind brickmould.
Use elastomeric sealant because it stays flexible. Secure brickmould with galvanized nails or screws if adding a storm door.
Fill screw holes with exterior-grade putty to prevent rust and improve appearance.
Paint or stain within 6 months for Therma-Tru and similar brands to keep the warranty valid.
Install a Fixed-Width Interior Frame
For interior doors where you are not replacing the whole unit, follow this process.
Assemble the Frame on a Flat Surface
Lay jambs and head jamb on a level floor. Connect with screws. Use a framing square to ensure 90-degree angles.
Insert and Align the Frame
Place the frame in the opening. Use mounting wedges to hold it steady. Check plumb on both sides and level across the head.
Secure and Shim the Frame
Drive screws through the jamb into studs at top, middle, and bottom. Do not overtighten because wood can warp.
Apply Mounting Foam
Run a zigzag bead of low-expansion foam around the frame. Avoid large globs because expanding foam can bow the jamb.
Wait 4–6 hours to cure before trimming.
Trim and Finish
Use an upholstery knife to slice off cured foam flush with the frame. Install architrave with nails or glue to hide gaps and create a clean look.
In the UK, always replace architrave because it ensures a professional finish.
Fit an Adjustable Door Frame
Adjustable frames are great for non-standard walls in older homes.
Assemble and Position the Frame
Connect jambs and head. Insert into the opening. Use wedges to stabilize.
Adjust to Wall Thickness
Slide the telescoping panel until it fits snugly against both sides of the wall. Lock in place per manufacturer instructions.
Fasten and Insulate
Secure with screws at designated points. Apply foam sparingly. Let cure fully.
Cover Gaps with Fascia Ties
Use plastic or wood strips to hide any residual space between jamb and wall. Attach with glue or small pins.
Hang and Test the Door
Mount hinges, hang the door, and check for smooth operation. Adjust hinges or shims if rubbing occurs.
Hang the Door and Finalize the Fit
Even a perfectly installed frame fails if the door does not operate right.
Set Hinge Positions
Standard spacing is 20cm from the top for the top hinge and 20cm from the bottom for the bottom hinge. Place the third hinge centered for tall or heavy doors.
Chisel or rout mortises so hinges sit flush.
Check Clearance
The door should be 2–3mm smaller than the frame on all sides. Test with a business card or feeler gauge.
Adjust for Alignment
Use adjustable hinges or shims behind hinge plates to correct doors that sit too high or low, rub at top or side, or have gaps at the latch side.
Tighten screws only after alignment is perfect.
Seal and Finish for Performance
A good seal keeps out drafts, noise, and moisture.
Add Gaskets and Sweeps
Install perimeter gaskets for better thermal and acoustic insulation. Fit a door sweep or threshold to block drafts at the floor.
Install Hardware
Fit handles, locks, and latches. Test all functions. The lock should engage smoothly, and the handle should turn easily.
Final Quality Checks
Walk through this checklist:
• Door swings freely with no rubbing
• Gaps are even, 3–5mm all around
• Latch engages without force
• No light leaks around edges
• Architrave is straight and secure
• Screws are countersunk and filled
• Paint or stain applied if required
UK-Specific Tips for Older Homes
Work with Brick, Not Timber
Victorian homes use double-skin brick walls, not wood framing. The door frame is embedded in masonry, so removal risks cracking. Plan for minor rebuilding or repointing.
Match 150mm Wall Thickness
Standard UK wall is 110mm brick plus 20mm plaster each side, totaling 150mm. Buy 150mm jamb stock or wider timber to plane down.
Replace Architrave Every Time
Old trim will not align with new frames. Install fresh architrave for a seamless finish.
Avoid Common Mistakes
Overfilling with Expanding Foam
Foam expands 2–3 times its size. Too much causes a warped frame. Apply in thin zigzags, not solid lines.
Skipping the Sill Pan
Exterior doors without a sill pan rot within years. Sill pan plus flashing plus sealant is the gold standard.
Ignoring Plumb and Level
Even 3mm off can cause binding. Use the 1800mm level for full-length accuracy.
Working Alone Without Support
Use inflatable door wedges to hold the unit while you adjust. This prevents dropped doors and crooked frames.
Key Takeaways for Installing Door Frames
Installing a door frame is not just about fitting wood into a hole. It requires precision, weatherproofing, and long-term performance planning.
The most critical steps are measuring accurately, using a full-length level to ensure plumb, shimming at hinge points to prevent sagging, and installing a sill pan with flashing for exterior doors. Take your time with each measurement, check twice, and do not skip the small details because they make all the difference.
Whether you are working in a new build or a 100-year-old brick house, following these steps ensures a door that opens smoothly, seals tightly, and lasts for decades.
Frequently Asked Questions About Installing Door Frames
How do I know if my door frame is square?
Measure diagonally across the opening from corner to corner. If both measurements are equal, the opening is square. If they differ, the walls are out of square, and you will need to adjust during installation.
Can I install a door frame by myself?
Yes, but using inflatable door wedges helps hold the unit in place while you adjust. This makes solo installation much easier and safer.
What happens if I do not use a sill pan on an exterior door?
Without a sill pan, water can seep underneath the door and cause rot in the subfloor. This leads to structural damage and costly repairs within a few years.
How long does door frame installation take?
A pre-hung exterior door takes 3–4 hours for experienced DIYers. Interior frame installation takes 2–3 hours. Add extra time for older homes with non-standard openings.
Should I use expanding foam around the door frame?
Use low-expansion foam in thin zigzag beads. Standard expanding foam can warp the frame. Apply sparingly and allow 4–6 hours to cure before trimming excess.


