
You’re trying to install a trusted legacy application or run a system test, but Windows Defender keeps blocking it. This built-in antivirus is designed to protect your PC, yet there are valid scenarios where you need to disable Windows Defender temporarily or permanently.
This guide covers every reliable method to disable Windows Defender, from quick UI toggles to advanced Registry and PowerShell techniques. You will learn how to stop real-time protection, prevent automatic re-enabling, and safely restore security afterward. Before proceeding, remember that disabling Defender exposes your system to malware and ransomware. Only proceed when necessary, and always re-enable protection once your task is complete.
Disable Tamper Protection First
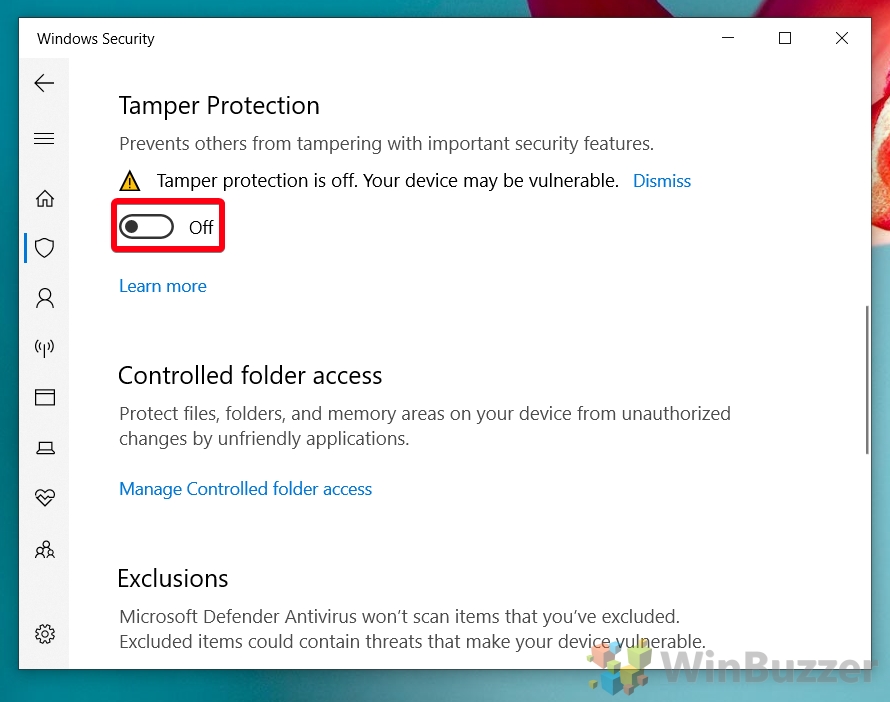
Before any disable method works on Windows 10 (22H2 or later) or Windows 11, you must turn off Tamper Protection. This security feature blocks unauthorized changes and will automatically re-enable Defender even after Registry or Group Policy edits.
Turn Off Tamper Protection via Windows Security
- Press Win + S, type Windows Security, and open the app.
- Go to Virus & threat protection.
- Under “Virus & threat protection settings,” click Manage settings.
- Find Tamper Protection.
- Toggle it to Off.
- Confirm the User Account Control (UAC) prompt.
Note: If Tamper Protection is grayed out, your organization or third-party antivirus may be managing it. You need admin rights or must remove other security tools first.
Without this step, most disable methods will fail or revert at reboot.
Temporarily Disable Real-Time Protection
Use this method for quick, short-term disablement, such as installing a flagged but trusted file.
Toggle Off Real-Time Protection in Settings
- Open Settings (Win + I).
- Go to Privacy & security > Windows Security > Virus & threat protection.
- Click Manage settings under “Virus & threat protection settings.”
- Toggle Real-time protection to Off.
- Effect: Stops live scanning immediately.
- Persistence: Usually resets after 15 to 20 minutes or on reboot.
- Best for: One-time installations or troubleshooting false positives.
Warning: Windows may auto-enable it again. Do not rely on this for long-term disable.
Use Group Policy Editor (Pro and Enterprise Only)
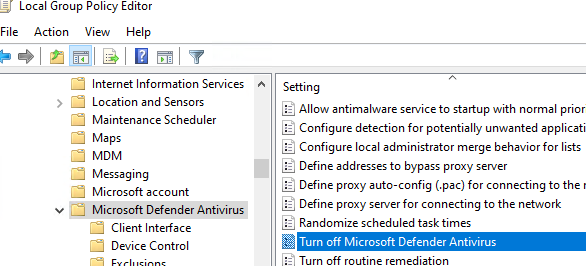
This is the cleanest, most persistent method, but it only works on Windows 10 or 11 Pro, Enterprise, or Education editions.
Apply via Local Group Policy Editor
- Press Win + R, type
gpedit.msc, and hit Enter. - Navigate to:
Computer Configuration > Administrative Templates > Windows Components > Microsoft Defender Antivirus - Double-click Turn off Microsoft Defender Antivirus.
- Select Enabled, then click Apply and OK.
- (Optional) Go to the Real-time Protection subfolder and enable Turn off real-time protection.
- Restart your PC.
- Persistence: High. Survives reboots if Tamper Protection is off.
- Limitation: Not available in Windows Home.
Pro Tip: If Group Policy changes do not stick, reboot into Safe Mode and reapply the changes.
Edit Registry for Full Disable (All Windows Versions)

The Registry method works on every edition, including Windows Home. It is more technical but highly effective when done correctly.
Manual Registry Steps
- Press Win + R, type
regedit, and press Enter. - Navigate to:
HKEY_LOCAL_MACHINE\SOFTWARE\Policies\Microsoft\Windows Defender
– If theWindows Defenderkey is missing, right-clickMicrosoft, select New > Key, and name itWindows Defender. - Right-click in the right pane, select New > DWORD (32-bit) Value.
- Name it
DisableAntiSpyware, double-click it, and set Value data to1. - Navigate to or create:
HKEY_LOCAL_MACHINE\SOFTWARE\Policies\Microsoft\Windows Defender\Real-Time Protection - Create a new DWORD named
DisableRealtimeMonitoringand set the value to1. - Restart your computer.
Use a .reg File for Faster Application
Create a text file, rename it to disable-defender.reg, and paste this content:
“`reg
Windows Registry Editor Version 5.00
[HKEY_LOCAL_MACHINE\SOFTWARE\Policies\Microsoft\Windows Defender]
“DisableAntiSpyware”=dword:00000001
[HKEY_LOCAL_MACHINE\SOFTWARE\Policies\Microsoft\Windows Defender\Real-Time Protection]
“DisableRealtimeMonitoring”=dword:00000001
“`
Double-click to run and confirm the prompt.
Caution: Incorrect registry edits can break Windows. Always back up the registry before editing.
Disable Windows Defender via PowerShell Commands
PowerShell offers granular control. Run commands in an Administrator PowerShell window (search PowerShell, right-click, and select Run as administrator).
Turn Off Core Scanning Features
powershell

Set-MpPreference -DisableRealtimeMonitoring $true
This stops live scanning. Add more flags for deeper disable:
powershell

Set-MpPreference -DisableRealtimeMonitoring $true -DisableIOAVProtection $true -DisableScriptScanning $true -DisableIntrusionPreventionSystem $true -EnableControlledFolderAccess Disabled -MAPSReporting Disabled -SubmitSamplesConsent NeverSend -Force
Stop Defender Services from Starting
To prevent Defender from auto-starting, disable its services:
powershell

Set-ItemProperty -Path "HKLM:\SYSTEM\CurrentControlSet\Services\WinDefend" -Name Start -Value 4

Set-ItemProperty -Path "HKLM:\SYSTEM\CurrentControlSet\Services\WdNisSvc" -Name Start -Value 4

Set-ItemProperty -Path "HKLM:\SYSTEM\CurrentControlSet\Services\Sense" -Name Start -Value 4
Disable Core Drivers
These drivers load early in boot. Disabling them prevents deep-level protection:
powershell

Set-ItemProperty -Path "HKLM:\SYSTEM\CurrentControlSet\Services\WdnisDrv" -Name Start -Value 4

Set-ItemProperty -Path "HKLM:\SYSTEM\CurrentControlSet\Services\wdfilter" -Name Start -Value 4

Set-ItemProperty -Path "HKLM:\SYSTEM\CurrentControlSet\Services\wdboot" -Name Start -Value 4
Note: You may need to re-run
Set-MpPreferenceafter each boot unless services and drivers are also disabled.
Fix Defender Turning Back On Automatically
Even after disabling, Windows may re-enable Defender, especially after updates or reboots.
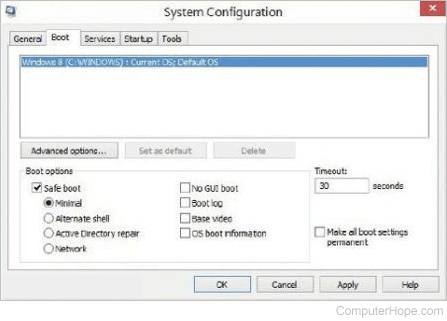
Boot into Safe Mode to Apply Changes
- Press Win + R, type
msconfig, and hit Enter. - Go to the Boot tab, check Safe boot, and select Minimal.
- Click OK and restart.
- Once in Safe Mode, apply Registry or Group Policy changes.
- Reboot normally and disable Safe Mode in
msconfig.
Why it works: In Safe Mode, Defender services do not run, so changes are not blocked or reverted.
Offline Registry Editing (Last Resort)
If the OS actively blocks edits, edit the registry from another system or a Linux live USB.
- Boot from a Linux Live USB (such as Ubuntu).
- Mount the Windows drive (usually
sda2orsda3). - Navigate to
/mnt/[drive]/Windows/System32/config/. - Use
chntpwor a similar tool to load theSYSTEMhive. - Navigate to
\SYSTEM\CurrentControlSet\Services\WinDefend. - Set the
Startvalue to4. - Repeat for
WdNisSvc,Sense, and driver services. - Reboot into Windows.
Warning: This is advanced. Incorrect edits can make Windows unbootable.
Auto-Restart Script at Login
Create a shortcut to re-disable Defender on every boot:
- Right-click the desktop, select New > Shortcut.
- Location:
C:\Windows\System32\WindowsPowerShell\v1.0\powershell.exe -Command "Set-MpPreference -DisableRealtimeMonitoring $true" - Click Next, name it (for example, “Disable Defender”).
- Right-click the shortcut, select Properties > Advanced, and check Run as administrator.
- Place the shortcut in the Startup folder:
C:\Users\[YourName]\AppData\Roaming\Microsoft\Windows\Start Menu\Programs\Startup
Risk: Microsoft may flag this script as malicious. Antivirus warnings are common.
When to Use Each Method
Running Legacy Software
Do not disable Defender. Instead, use Exclusions. Go to Settings > Privacy & security > Windows Security > Virus & threat protection > Manage settings > Add or remove exclusions. Add the folder or .exe path. This lets the app run safely while keeping your system protected.
Malware Analysis or Reverse Engineering
Use Safe Mode or Offline Registry Editing to fully disable Defender. Ensure the machine is air-gapped (no network). Re-enable protection immediately after analysis.
Performance Testing
Use Group Policy or PowerShell to disable real-time scanning. Re-enable as soon as testing ends.
Windows Home Users
Use Registry Editor or PowerShell, since Group Policy is not included. Disable Tamper Protection first.
Re-enable Windows Defender After Use
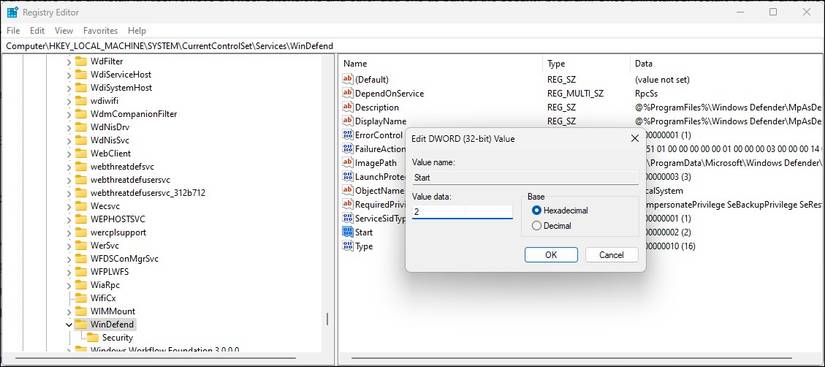
After completing your task, restore protection immediately.
Reverse Registry Changes
- Open
regedit. - Go to
HKEY_LOCAL_MACHINE\SOFTWARE\Policies\Microsoft\Windows Defender. - Delete the
DisableAntiSpywareandDisableRealtimeMonitoringvalues. - Navigate to
HKEY_LOCAL_MACHINE\SYSTEM\CurrentControlSet\Services\. - Set
Startvalues back to2(Automatic) for:
–WinDefend
–WdNisSvc
–Sense
–WdnisDrv,wdfilter,wdboot
Re-enable via Group Policy
- Open
gpedit.msc. - Go to
Computer Configuration > Administrative Templates > Windows Components > Microsoft Defender Antivirus. - Set Turn off Microsoft Defender Antivirus to Not Configured.
- Restart.
Turn On Tamper Protection Again
- Open Windows Security.
- Go to Virus & threat protection > Manage settings.
- Toggle Tamper Protection back to On.
Verify: Check that real-time protection is active and no warnings appear.
Frequently Asked Questions About Disabling Windows Defender
How do I disable Windows Defender in Windows 11?
Open Windows Security, go to Virus & threat protection, click Manage settings, and toggle Tamper Protection off first. Then toggle Real-time protection to Off. For permanent disable, use the Registry or Group Policy method.
Can I disable Windows Defender without admin rights?
No. All disable methods require administrator privileges. Without admin access, you can only add Exclusions for specific files or folders.
Why does Windows Defender keep turning back on?
Modern Windows versions include Tamper Protection and self-healing mechanisms that automatically re-enable Defender after reboots or updates. Disable Tamper Protection first, or apply changes in Safe Mode.
Is it safe to disable Windows Defender permanently?
No. Permanently disabling Defender leaves your system vulnerable to malware, ransomware, and network attacks. Use exclusions for trusted apps instead, and only disable Defender temporarily for specific tasks.
What is the difference between disabling real-time protection and full disable?
Disabling real-time protection stops immediate scanning but Defender remains active. Full disable (via Registry or Group Policy) stops all services and drivers, effectively shutting down Defender completely.
Will installing a third-party antivirus disable Windows Defender automatically?
Yes. When you install a recognized third-party antivirus, Windows automatically disables Defender real-time protection to avoid conflicts. This is often the safest alternative to manual disable.
Key Takeaways for Safely Disabling Windows Defender
- Tamper Protection must be off for any disable method to persist on modern Windows.
- Exclusions are safer than full disable for trusted apps.
- Group Policy is the best option for Pro and Enterprise users.
- Registry edits work on all versions but require caution and backups.
- PowerShell gives fine-grained control, ideal for scripting and automation.
- Safe Mode or offline editing bypasses stubborn reactivation mechanisms.
- Always re-enable protection after completing your task.
Microsoft continuously strengthens Defender’s resilience. Future updates may block or override these methods. If you install a third-party antivirus, Windows Defender disables itself automatically, which is often the safest alternative. Use this knowledge responsibly. Your system’s security depends on it.



