

You’ve finally decided to deep clean your windows, but the screen won’t budge. Frustrating, right? Learning how to remove window screen from inside is a surprisingly useful skill that saves you time, money, and unnecessary stress. Most modern windows are built with user-friendly release mechanisms, yet the exact method depends on your window style and hardware setup.
In this guide, you’ll discover the most common interior screen removal techniques used in today’s homes. We’ll walk through identification, removal, and reinstallation for double-hung, sliding, casement, and specialty windows. By the end, you’ll be able to remove any screen confidently without calling a handyman.
Identify Your Window Screen Type Before You Start
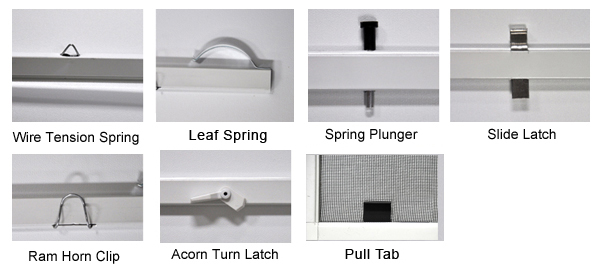
The first step is figuring out which retention system your window uses. Removing the screen incorrectly can bend the frame or damage the track.
Look for Spring-Loaded Clips at the Top Corners
Many double-hung and sliding windows feature small metal or plastic tabs that compress under pressure. Inspect the top inside edge of the screen frame closely. If you spot a tiny protrusion that moves when pressed, you’ve found your release point. These clips allow the top of the screen to pivot inward toward you.
Check the Bottom Rail for Lifting Tabs or Slots
Some screens stay secured at the top but release easily from the bottom. Slide your fingers under the lower rail and pull gently outward. Once the bottom edge clears the track, tilt the top toward you and lift the screen free. This design is common in single-hung and many vinyl windows.
Spot Twist Locks or Rotating Cams
Newer or premium windows sometimes use small cylindrical locks that require a quarter-turn before removal. If you see a knob or cam that rotates, turn it 90 degrees with your fingers or a flathead screwdriver. This disengages the lock and frees the screen for tilting.
Remove a Double-Hung Window Screen from Inside

Double-hung windows are the most common style in North American homes. Their screens typically tilt inward for easy access.
Locate the Spring Clips on Both Sides
Check the top inside edge of the screen frame for two spring clips. Press both inward simultaneously using your thumbs. Apply firm, even pressure until you feel them compress. The top of the screen will then pivot toward you.
Tilt and Lower the Screen Out
With the clips released, tilt the top of the screen inward at roughly a 45-degree angle. Once tilted, lower the bottom edge down and out of the track. Always grip the screen with both hands to prevent bending the frame. Place it flat on a soft surface to protect against warping.
Reinstall the Screen Correctly
To put the screen back, reverse the process. Angle it into the top track first, then push the bottom rail upward into position. Finally, swing the top back until you hear the clips snap into place. A soft click confirms proper seating.
Remove a Sliding Window or Patio Screen from Inside
Sliding screens lift out or slide sideways depending on the model.
Use the Lift and Angle Method
Stand inside and locate the bottom track of the screen. Grip both sides of the frame with your hands and lift the screen straight up about an inch. This disengages the bottom rollers from the track. Tilt the bottom outward, then pull the screen down and inward toward you.
Try the Side-Release Method for Horizontal Sliders
Some screens slide sideways within their own track. Look for a small lever or tab on the side or top edge. Push or pull this to unlock the screen, then slide it fully to one side. Once it clears the removal point, pull it straight out.
Inspect for Retaining Clips at the Ends
Even sliding models may have small plastic or metal retainers at the top or bottom. Squeeze or lift these before attempting removal. Skipping this step can damage the clips or bend the frame.
Remove Casement and Awning Window Screens from Inside
Hinged windows sometimes allow interior screen access, though not all models do.
Confirm Interior Accessibility First
Open the window fully and inspect the screen frame. If the screen mounts on the outside, you’ll need outdoor access. However, some newer casement windows include quick-release brackets on the interior for tool-free removal.
Use the Pivot Release if Available
Look for pivot bars or hinge pins at the top and bottom of the frame. Press or lift the release tab and pull the screen gently toward you. These frames tend to be narrower and more fragile, so handle them with extra care.
Handle Vinyl and Aluminum Frames Safely

Once removed, proper handling prevents costly damage.
Support the Frame on Both Sides
Vinyl and aluminum frames bend easily under uneven pressure. Always carry the screen with two hands, one on each side. Never lift it by a single corner, as this can permanently warp the structure.
Clean Without Causing Warping
Use a soft brush and mild soapy water to clean the mesh. Avoid high-pressure sprayers or aggressive scrubbing. Lay the screen flat to dry, and never lean it vertically against a wall.
Common Mistakes to Avoid During Screen Removal
Simple errors can turn an easy task into a costly repair.
Forcing a Stuck Screen
If the screen resists movement, stop pulling immediately. Hidden clips, debris, or swollen frames are usually the cause. Clean the track first or apply a light silicone lubricant.
Skipping Track Cleaning Before Reinstallation
Wipe down the screen track with a damp cloth before putting the screen back. Sand, pet hair, and dead insects can block proper seating and cause rattling or misalignment.
Failing to Test Stability After Reattachment
After reinstalling, push gently on the screen to confirm it sits flush. If it wobbles, one side may not be fully engaged. Remove it and try again to ensure a secure fit.
Helpful Tools for Stubborn Screens
Most removals require no tools, but a few items make tricky jobs easier.
Plastic Putty Knife
A flexible putty knife gently pries up a stuck bottom rail without scratching the frame.
Flathead Screwdriver
Useful for rotating twist locks or pressing tight clips. Wrap the tip in painter’s tape to prevent scratches.
Work Gloves
Protect your hands from sharp mesh edges and gritty buildup, especially on older screens.
When to Call a Professional for Help
Some situations call for expert assistance.
Custom or Older Windows with Proprietary Systems
If your screen is fused in place, severely bent, or lacks visible release points, professional service may be necessary. Custom and historic windows often use unique hardware that requires specialized knowledge.
Rental Property Restrictions
Before attempting removal in a rental unit, check your lease agreement. Some landlords prohibit tenants from handling window components. Contact your property manager to avoid lease violations.
Frequently Asked Questions About Removing Window Screens from Inside
Can I remove a window screen without any tools?
Yes, most modern window screens are designed for tool-free removal. Spring clips, lifting tabs, and twist locks all release by hand. Tools are only needed for stubborn or older screens.
What if my window screen won’t come out?
Stop pulling and inspect for hidden clips, debris, or swollen frames. Clean the track, apply silicone lubricant, and try again. Forcing the screen can bend the frame or damage the window.
How do I know which type of window screen I have?
Look at the top corners and bottom rail for clips, tabs, or rotating locks. Check whether the screen tilts, lifts, or slides out. The hardware style usually reveals the removal method.
Is it safe to remove window screens myself?
Yes, removing screens is generally safe and simple. Just use gentle pressure, support the frame with both hands, and avoid sharp mesh edges. Wear gloves if the screen is old or dirty.
Should I clean the screen track before reinstalling?
Always clean the track before reinstalling. Wipe it down with a damp cloth to remove dirt, sand, and insects. A clean track ensures the screen seats properly and stays stable.
How often should I remove and clean my window screens?
Most experts recommend cleaning screens twice per year, ideally in spring and fall. Regular cleaning extends screen life and improves airflow throughout your home.
Key Takeaways for Removing Window Screens from Inside

Learning how to remove window screen from inside is a quick, tool-free process once you identify your window type. Spring clips, lifting tabs, and twist locks are the three most common release mechanisms. Always support the frame with both hands and clean the track before reinstalling.
Your next step is simple. Pick a window in your home, identify its hardware, and try the matching removal method from this guide. Within minutes, you’ll have a clean, properly seated screen and the confidence to handle any window in your house.



