
Is your garage door refusing to respond, or did you just move into a new home and need to secure your property? Knowing how to reset garage door opener systems is essential for maintaining both security and convenience. A complete reset wipes all stored remote codes, keypads, and vehicle connections, ensuring only you can access your garage. Whether you’ve lost a remote, added new devices, or your opener stopped working after a power outage, this guide covers every step you need.
This article walks you through locating the Learn button, performing a full system reset, reprogramming all your devices, and troubleshooting common issues. You’ll also learn when it’s time to call a professional instead of attempting repairs yourself.
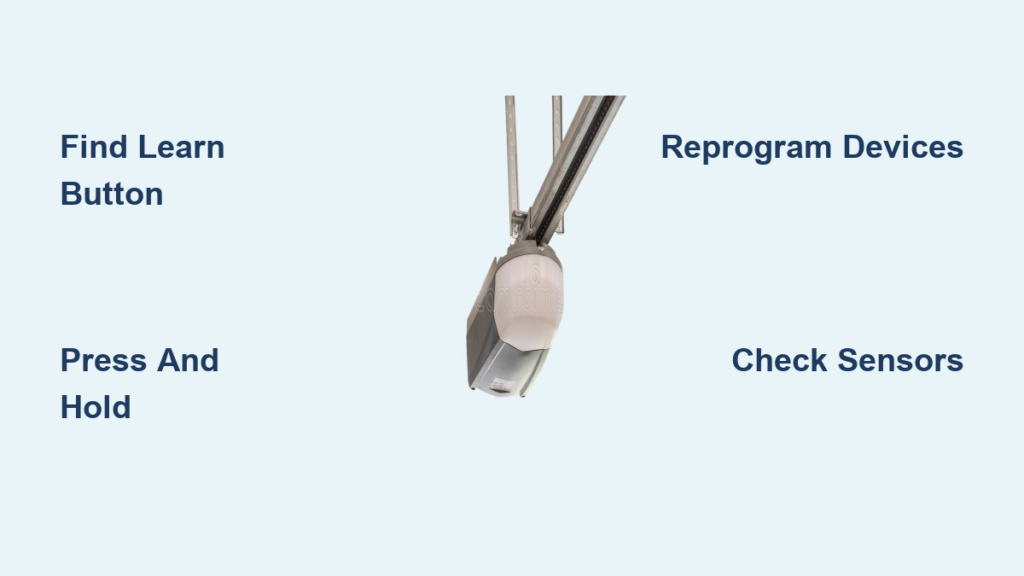
Find the Learn Button on Your Opener
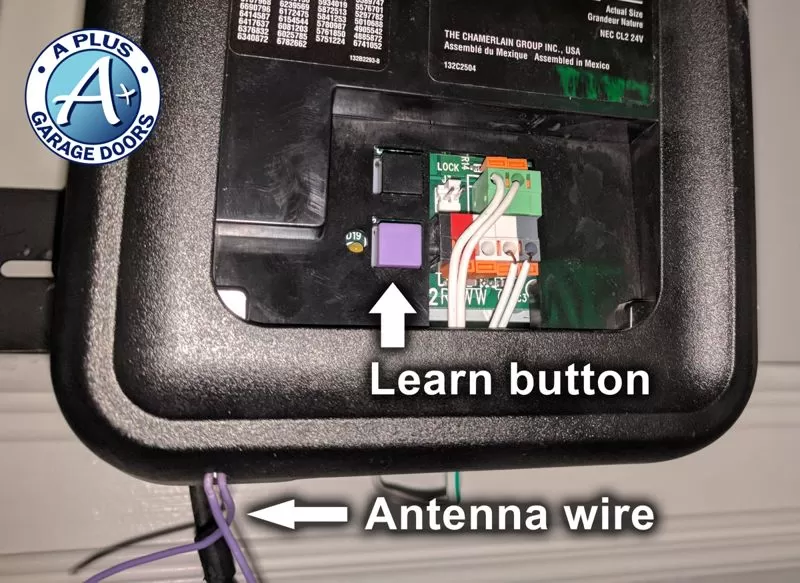
The Learn button serves as the central control point for resetting your garage door opener. This small button initiates programming mode and allows you to erase all stored codes from the system’s memory.
Locate the Button
The Learn button appears on the motor unit housing, typically on the front, back, or side. It may sit behind a removable light cover. Most manufacturers color-code these buttons in purple, yellow, red, or white. The button may be labeled “Learn,” “Program,” “Smart,” or “Set” depending on your model.
Verify Power First
Before attempting any reset, confirm your opener is receiving power. A non-responsive Learn button often indicates a tripped breaker or faulty GFCI outlet. Check for LED indicator lights on the motor unit. A steady light means the system is ready for programming, while rapid flashing indicates it’s already in learn mode. No light at all suggests a power problem that must be addressed first.
Perform a Full System Reset
A full reset clears all remotes, keypads, and vehicle systems from your opener’s memory. This is the most thorough reset option and is necessary when moving into a new home or dealing with security concerns.
Standard Reset for LiftMaster, Chamberlain, and Craftsman
Press and hold the Learn button for 6 to 10 seconds. Watch the LED indicator carefully. When it turns off or begins flashing steadily, release the button. All previously paired devices are now erased from the system memory.
This action removes every remote, wireless keypad, and HomeLink vehicle connection. No device will operate the garage door until you reprogram them.
Factory Reset for Wi-Fi Enabled Models
If your opener connects to MyQ or a smartphone app, perform a triple-press reset to clear Wi-Fi settings completely.
Press and hold the Learn button until the LED goes out, which takes approximately 6 to 8 seconds. Immediately press and hold the button a second time until the LED goes out again. Press and hold a third time until the LED goes out. Three quick beeps confirm the factory reset is complete.
This procedure applies to LiftMaster 8500, Chamberlain B970, and other MyQ-enabled models. Alternatively, you can delete the opener from your MyQ app to trigger an automatic reset.
Use a Power Cycle for Minor Issues
A power cycle provides a soft reset that clears temporary glitches without erasing your programmed devices. This method works well for minor unresponsiveness or electronic interference.
Unplug the garage door opener from its electrical outlet. Wait 15 to 60 seconds to allow the internal capacitors to discharge completely. Plug the unit back in and observe the LED behavior as it reboots.
This approach clears transient memory issues but does not delete stored remote codes. Use this method first when dealing with minor operational problems before attempting a full reset.
Reprogram Remote Controls After Reset
Every remote must be re-paired with your opener following a reset. This ensures only your authorized devices can operate the garage door.
Pair a New Remote
Press the Learn button once. The LED stays illuminated for 30 to 60 seconds. Within that window, press and hold the button on your remote. When the LED flashes, release the button. The pairing is complete. Test the remote to confirm it works.
Most openers support 5 to 8 devices, though some allow up to 30. Program one remote at a time to avoid sync conflicts.
Universal Remote Compatibility
Universal remotes work with most major brands, including LiftMaster, Chamberlain, and Craftsman. Ensure the universal remote supports your model’s security protocol, such as Security+ 2.0. Follow the remote manufacturer’s instructions to sync it with your Learn button.
Reset and Program Your Keypad
Wireless keypads require reprogramming after a reset or battery replacement. The process varies slightly depending on your model.
Standard Keypad Reprogramming
Replace the batteries if needed. Press the Learn button once; the LED remains on. Enter a four-digit PIN on the keypad. Press Enter or the pound key, depending on your model. When the LED flashes, press the Learn button again immediately. The garage door should begin closing to confirm successful programming.
Choose a PIN that isn’t obvious, such as 5-8-2-9, rather than simple sequences like 1-2-3-4.
Legacy 850 Keypad Reset
Older models like the Legacy 850 require a different procedure. Press the 6 and 8 keys simultaneously until the LED begins blinking. Enter your new PIN. Press the Program Set button on the motor unit; the LED flashes purple. Within 30 seconds, press the 0 key on the keypad.
Sync Vehicle HomeLink Systems
Your car’s HomeLink system must be reprogrammed after a reset since all stored codes are erased. This integration allows you to open your garage door from inside your vehicle.
Press and hold your desired HomeLink button in the car for 20 to 30 seconds until the indicator light flashes slowly. Press and hold the Learn button on the motor unit. Return to your vehicle and press the HomeLink button again, holding it until the garage door moves.
Some vehicles require synchronization through a handheld remote. Consult your vehicle owner’s manual for model-specific instructions.
Re-Engage After Manual Operation
During power outages, you may have used the emergency release cord to operate the door manually. Reconnecting the automatic opener properly is essential for恢复正常 operation.
Pull the red emergency release cord toward the door to reattach the trolley mechanism. You should hear a click as the trolley locks back into place. Ensure the door is fully closed before attempting re-engagement. Test the door using the wall switch or remote to confirm proper operation.
Lubricate the trolley and rail every six months to ensure smooth reconnection and prevent future issues.
Check Safety Sensor Alignment
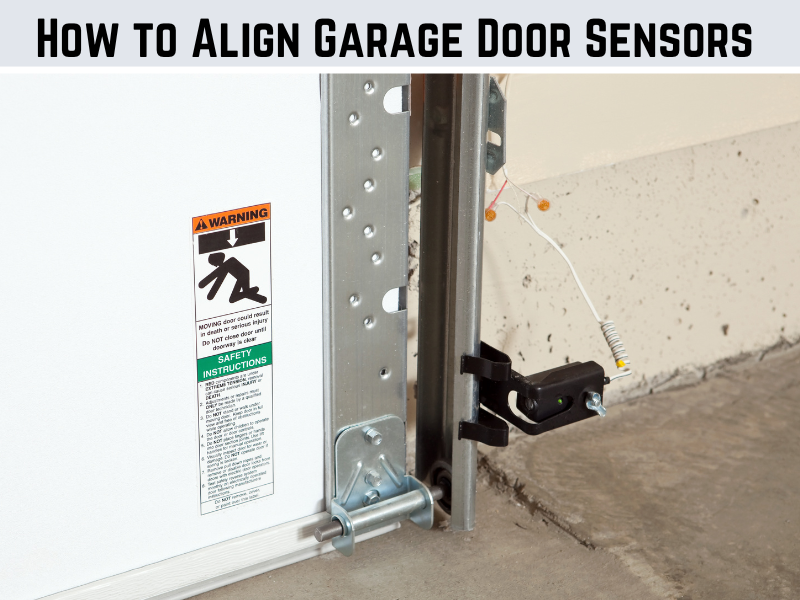
Misaligned safety sensors are a common reason the garage door won’t close, even after a successful reset. These sensors prevent the door from closing if something blocks the path.
Locate the sensors at the bottom of each door track. Ensure the lenses are clean and unobstructed. Check the indicator lights on both sensors. Both should show a solid light, not blinking. Test by placing a box in the doorway; the door should reverse when the beam is broken.
A blinking light indicates misalignment. Adjust the mounting screws until both lights stay solid. Clean the sensors monthly with a soft cloth to maintain reliable operation.
Troubleshoot Common Post-Reset Problems
Even after completing all reset steps correctly, issues can still occur. Understanding common problems helps you resolve them quickly.
Remote Still Not Working
A failed sync or dead battery prevents remote operation. Replace the battery and reprogram the remote within 30 seconds of pressing the Learn button.
Keypad Unresponsive
Low battery or incorrect PIN entry causes keypad failures. Install fresh batteries and reprogram using a new code.
Door Reverses Immediately
Misaligned safety sensors trigger immediate reversal. Realign and clean the sensor lenses, then test again.
No Response From Opener
Power issues prevent any response. Check the outlet, GFCI reset, and circuit breaker.
Wi-Fi Connection Failed
Network settings weren’t cleared during reset. Perform the triple-press factory reset or delete the device from your MyQ app.
Avoid Common Reset Mistakes
Small errors can derail the entire reset process and cause frustration. Knowing what to avoid saves time and effort.
Don’t Forget to Reprogram All Devices
After a full reset, every paired device loses connectivity. Re-pair all handheld remotes, wireless keypads, vehicle HomeLink systems, and MyQ accessories. Track each device as you program it to ensure nothing is missed.
Don’t Skip the Power Check
A dead LED means no reset can occur. Always verify outlet power, circuit breaker status, and GFCI reset before proceeding.
Don’t Overload Memory
Exceeding the device limit causes pairing failures. Most openers support 5 to 8 devices. Perform a full reset before adding new devices if you’ve reached capacity.
When to Call a Professional
Some garage door issues require expert intervention. Attempting repairs on high-tension components poses serious injury risks.
Call a professional if you notice broken torsion springs, door operates unevenly or falls suddenly, persistent clicking with no movement, or flickering lights with no power after outlet checks. Never attempt to repair springs or tracks yourself. Certified technicians have the training and equipment to handle these dangerous repairs safely.
Maintain Your Opener for Long-Term Reliability
Regular maintenance prevents future resets and extends your opener’s lifespan. Simple monthly checks catch problems before they escalate.
Monthly Tasks
Test safety sensor operation by placing an object in the door path. Inspect door balance by disconnecting the opener and manually operating the door. Clean keypad and remote buttons to prevent buildup.
Biannual Maintenance
Lubricate the chain, screw drive, or belt every six months. Tighten mounting hardware that may have loosened. Replace remote and keypad batteries annually.
Frequently Asked Questions About Resetting Garage Door Openers
Do I need to reset my garage door opener regularly?
No. Reset only when necessary, such as moving into a new home, losing a remote, experiencing malfunction, or changing Wi-Fi networks for MyQ models.
Can I reset the opener without a remote?
Yes. The reset uses only the Learn button on the motor unit. Remotes are needed only for re-pairing devices after the reset.
Will resetting delete my HomeLink settings?
Yes. All stored codes, including HomeLink vehicle systems, are erased during a reset. You must reprogram them afterward.
How many remotes can I program?
Most modern openers support 5 to 8 devices, though some allow up to 30. Check your model’s specifications for exact capacity.
What if the Learn button doesn’t respond?
Possible causes include power issues, end-of-life motor unit, or internal fault. Try a hard reset by turning off power for 60 seconds, then restoring it.
Can I use universal remotes?
Yes. Universal remotes work with most brands, including LiftMaster, Chamberlain, and Craftsman. Ensure compatibility with your model’s security protocol.
Why does my door open but not close?
Misaligned or obstructed safety sensors typically cause this issue. Clean the lenses, realign the sensors, and check for wiring damage.
Key Takeaways for Resetting Your Garage Door Opener
Resetting your garage door opener restores security and ensures reliable operation. Locate the Learn button on your motor unit, then press and hold it for 6 to 10 seconds to erase all stored codes. For Wi-Fi enabled models, perform the triple-press factory reset to clear network settings. After any reset, reprogram all remotes, keypads, and vehicle HomeLink systems.
Always verify power supply and check safety sensor alignment before testing your door. Regular maintenance, including monthly sensor checks and biannual lubrication, prevents issues that would require future resets. For mechanical failures or broken springs, contact a certified professional rather than attempting DIY repairs. With these steps, you maintain full control over your garage door access while keeping your home secure.


