
A drafty front door on a cold winter night isn’t just uncomfortable, it’s costly. That faint whistle of wind under the door, the chill creeping across the floor, or the sudden drip during a storm all signal unsealed door gaps. These small openings may seem harmless, but they can significantly increase energy bills, invite pests, and compromise indoor comfort. The good news: sealing door gaps is a fast, affordable fix with immediate results. Whether you’re a homeowner, renter, or DIY beginner, this guide shows you exactly how to stop air leaks, block moisture, and boost efficiency using proven methods and the right materials.
Find and Measure Door Gaps Before Sealing
Before you seal anything, you need to see where air is getting in. Most gaps are invisible until you test for them.
Inspect for Light Leaks
Close the door and turn off indoor lights. Have someone stand outside with a flashlight, shining it around the edges. Any visible light from the inside means an air gap. Pay close attention to the bottom edge of the door, the latch side and top jamb, and the bottom corners where the door meets the frame and threshold. Even a pinprick of light can let in cold air and bugs.
Use the Dollar Bill Test
Close the door on a dollar bill at various points along the jamb. Pull it out slowly. If it slides easily, the seal is weak. If it resists, the contact is good. Repeat this test on all three sides to identify weak spots.
Measure Gap Sizes
Use a ruler or caliper to record your measurements. Bottom gaps typically range from 2 to 6 mm. Side and top gaps should be less than 1.5 mm. Corner gaps are often triangular, measuring 1 to 3 mm at the widest point. Note whether your door is inward or outward opening, as this affects which sweep type you should choose.
Seal the Bottom Gap with a Door Sweep
The largest air leak is usually at the bottom. A door sweep is the most effective fix for this problem.
Choose the Right Sweep Type
Different sweep types work better for different situations. Vinyl or rubber sweeps work best on smooth, even thresholds. Bristle sweeps excel on uneven floors or in debris-prone areas. Adjustable sweeps accommodate sloped or warped thresholds. Saddle thresholds provide a permanent outdoor seal and replace existing thresholds entirely.
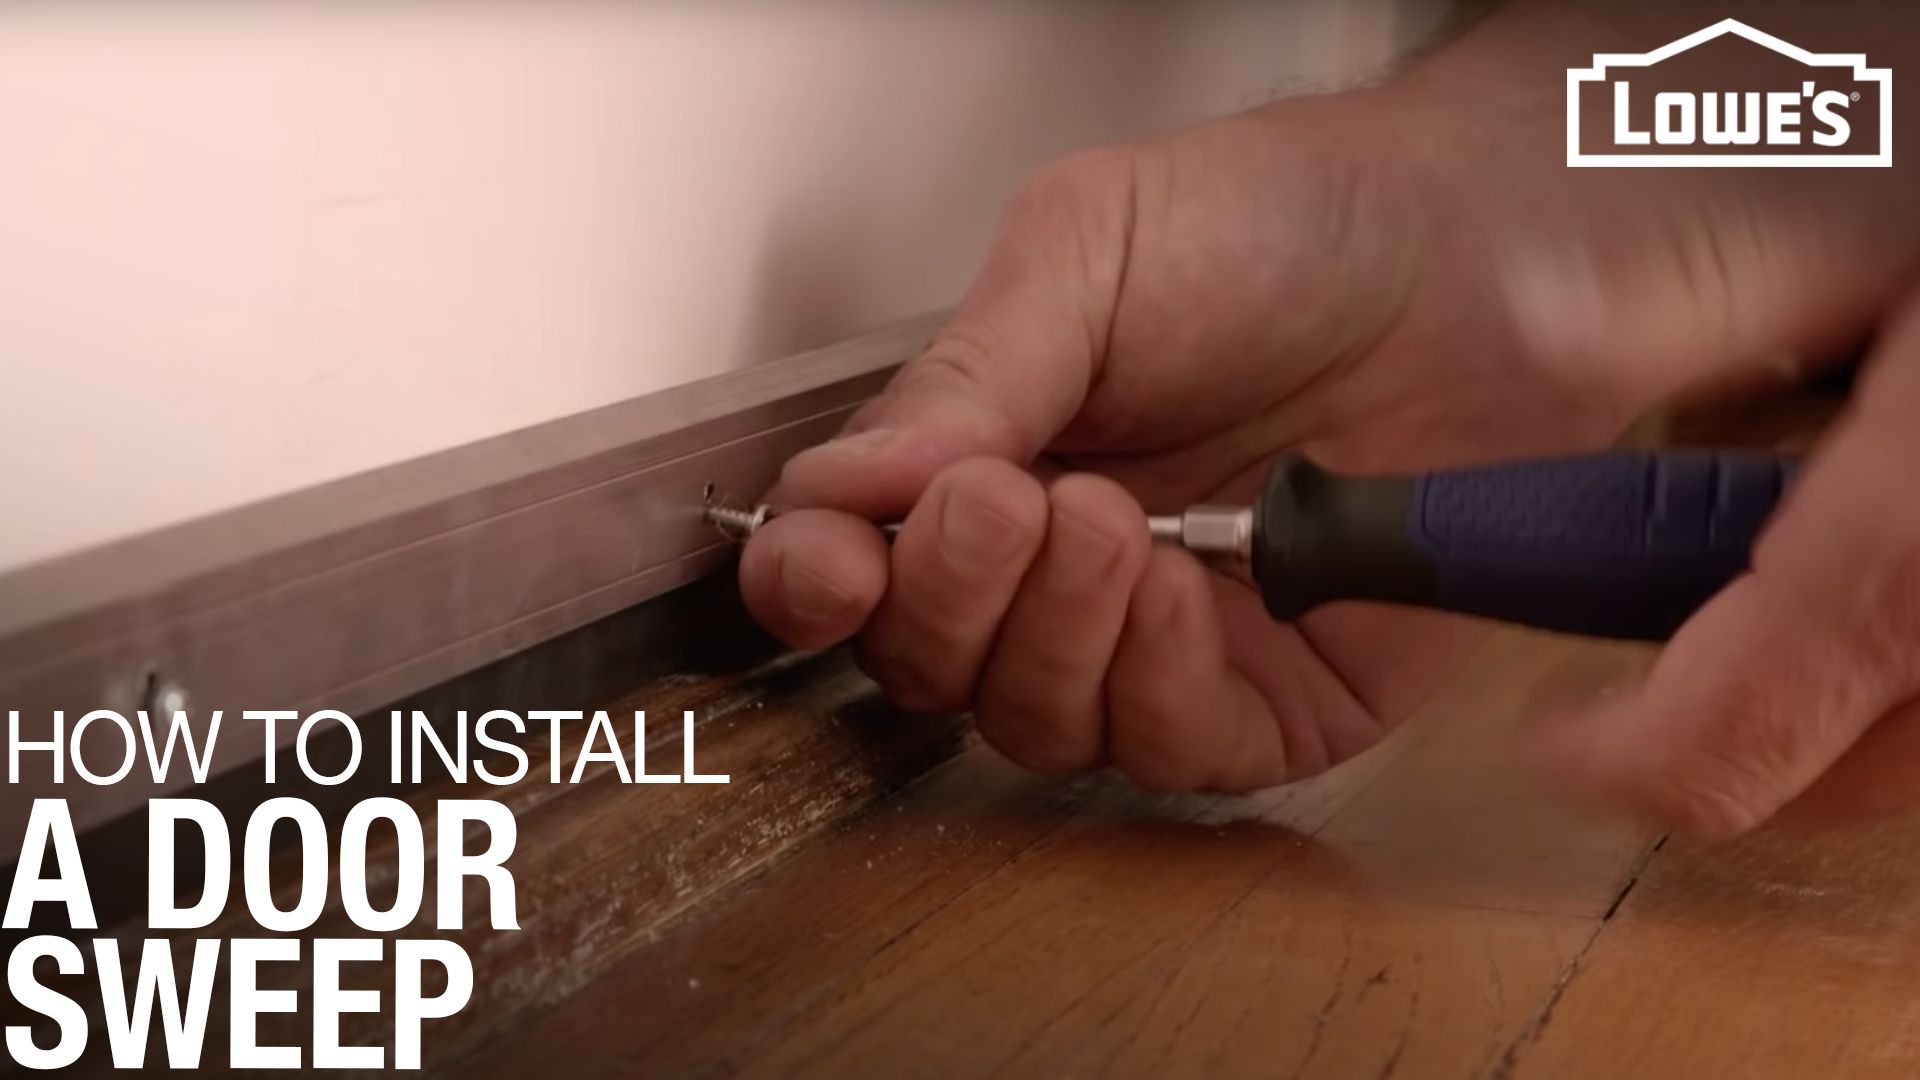
Install a Door Sweep in 5 Steps
- Measure your door width and mark the sweep length.
- Cut to size using a hacksaw for metal sweeps or a utility knife for vinyl.
- Drill 1/8 inch pilot holes to prevent wood splitting.
- Align the sweep so the sealing fin lightly touches the threshold when closed.
- Screw into place and test door movement for no dragging or binding.
Pro Tip: For outward-opening doors, pick a sweep with a drip edge to shed rainwater away from your entryway.
Weatherstrip Sides and Top of Door
Once the bottom is sealed, focus on the vertical and horizontal gaps along the sides and top.
Use V Strip for Durable Jamb Seals
V strip, also called tension seal, is ideal for side and top gaps. It’s made of flexible aluminum or plastic that presses into a groove on the door jamb. The material compresses when the door closes, creating a tight seal without adhesives or screws.
Install V Strip in 3 Steps
- Cut to length with scissors to match door height.
- Press into the channel along the latch side and top jamb.
- Miter corners at 45 degrees if needed for a clean fit at transitions.
This method creates a low-profile seal that lasts 3 to 5 years with minimal maintenance.
Close Small Gaps with Foam Weatherstripping
For narrow gaps or temporary fixes, adhesive foam strips work fast.
Pros and Cons of Foam Strips
Foam weatherstripping is cheap, costing only $2 to $5 per roll, and it’s easy to apply. This makes it good for renters or short-term use. However, foam flattens over time and needs replacement every 1 to 2 years. It’s also not waterproof or pest-proof, limiting its effectiveness in some situations.
Apply Foam Strip Correctly
Clean the jamb with rubbing alcohol. Cut the strip to length without overlapping. Peel the backing and press firmly where the door contacts the frame. Close the door to compress the strip and set its position. Avoid applying foam in direct sunlight or on painted surfaces that may peel.
Fix Bottom Corner Gaps with Foam Wedges

Even with a sweep, small triangular gaps at the bottom corners often remain. These gaps let in cold drafts, rain splash, and pests like ants, spiders, and rodents.
Install Foam Wedge Sealers
- Clean the corner with a dry cloth.
- Peel the adhesive liner from the foam wedge.
- Place the wedge with the thin edge facing outward and the thick base against the stop trim.
- Press firmly into the junction of jamb and threshold.
- Stack a second wedge if the gap is deep, as both stay hidden when the door is closed.
These wedges cost $3 to $7 per pack, require no tools, and are completely renter-friendly.
Seal Without Drilling: Adhesive Rubber Strips
If you cannot drill holes, such as in a rental property, use strong adhesive seals instead.
Install Adhesive Rubber Strips
- Clean the door edge with rubbing alcohol to remove all oil and dust.
- Measure and cut the strip with a hacksaw for clean ends.
- Mark alignment points to ensure straight placement.
- Peel the tape backing and press the strip firmly from one end to the other.
- Hold for 30 seconds per section to ensure good adhesion.
Critical: The surface must be oil-free and dust-free, or the bond will fail. This method works best for bottom or side gaps where sweeps are not allowed.
Add Rubber Corner Pads for Extra Protection
For a more durable corner seal, use rubber or silicone pads.
Install Door Corner Seals
- Locate the gap at the bottom corner.
- Peel the adhesive backing from the rubber pad.
- Press firmly into the triangle where door, jamb, and threshold meet.
- Test by closing the door. The pad should compress slightly.
These pads block air, water, and pests and last 2 to 4 years with proper care.
Test Your Seals for Leaks
After installation, verify your work using multiple methods.
Check with These Tests
The visual check involves closing the door and looking for light penetration. The hand test requires running your hand along edges to feel for drafts. The smoke test uses incense; drifting smoke indicates an air leak. The water test observes during rain to ensure no puddles form. The dollar bill test re-tests at all points. The bill should resist pulling when inserted properly.
If leaks remain, add a second foam wedge or adjust the sweep height.
Maintain Seals for Longevity
Even the best seals wear out. Prevent failure with simple seasonal care.
Replace Seals on Schedule
Foam weatherstripping lasts 1 to 2 years and shows signs like flattening, cracking, or peeling. V strip lasts 3 to 5 years and shows wear through looseness, bending, or noise. Door sweeps last 3 to 5 years with signs including worn fins and loose screws. Foam wedges last 2 to 4 years and show dislodging or compression. Adhesive rubber strips last 2 to 3 years and show peeling at edges.
Seasonal Maintenance Routine
- Inspect seals before winter and summer.
- Clean sweeps with soapy water and a brush.
- Re-tighten screws on door sweeps.
- Reapply adhesive if corner pads lift.
- Replace worn parts. Do not wait for total failure.
Build a Complete Weatherproofing System
One product is not enough. Use layers for maximum protection.
3-Layer Sealing Strategy
The primary layer is a door sweep or threshold seal for the bottom. The secondary layer is V strip or foam for the sides and top. The tertiary layer is foam wedges or rubber pads for the corners.
This approach stops air, water, pests, and noise from all entry points simultaneously.
Choose the Right Fix for Your Situation
Match solutions to your specific needs for the best results.
Solution Matching Guide
Older homes with settling foundations benefit from foam wedges, adjustable sweep, and V strip combined. Exterior doors in rainy areas need a drip-edge sweep plus corner seals. Minor leaks after sealing respond well to foam wedges or rubber pads. Renters should use adhesive foam wedges, rubber strips, and removable sweeps. Pest problems require a bristle sweep plus sealed corners. High AC use calls for durable V strip plus a tight sweep.
Maximize Energy Efficiency and Comfort
Sealing door gaps delivers real, measurable benefits for your home.
Proven Results
Sealing door gaps can lower energy bills by reducing HVAC strain by up to 20 percent. You will experience better comfort by eliminating cold drafts at floor level. Fewer pests will enter because you block entry for ants, mice, and spiders. You will notice less noise from reduced outdoor sound transmission. Moisture control prevents water from entering during storms.
Most projects cost under $50 and take under 30 minutes to complete.
Frequently Asked Questions About Sealing Door Gaps
How do I know if my door has gaps I need to seal?
Close your door and turn off interior lights. Have someone shine a flashlight around the outside edges. Any visible light from inside indicates a gap. You can also use the dollar bill test. Insert a dollar bill between the door and jamb. If it slides out easily, the seal is insufficient.
What is the best way to seal the bottom of a door?
A door sweep is the most effective solution for bottom gaps. Choose between vinyl, rubber, bristle, or adjustable types based on your threshold condition. For outward-opening doors, select a sweep with a drip edge to redirect rainwater.
Can I seal door gaps without drilling?
Yes. Adhesive rubber strips, foam weatherstripping, and foam wedge sealers require no drilling. These options are ideal for renters or situations where permanent modifications are not allowed. Clean surfaces thoroughly before applying adhesive products for the best bond.
How often should I replace door weatherstripping?
Replace foam weatherstripping every 1 to 2 years. Replace V strip, door sweeps, and foam wedges every 3 to 5 years. Inspect all seals seasonally, especially before winter and summer, to catch wear before it causes problems.
Will sealing door gaps really lower my energy bills?
Yes. Sealing door gaps reduces HVAC workload significantly. Most homeowners report lower energy bills within the first month after sealing. The exact savings depend on how many doors you seal and your local energy costs, but reductions of up to 20 percent are common.
What causes door gaps to appear over time?
Door gaps develop from normal settling of the house, door warping due to humidity changes, hinge loosening, and wear on existing weatherstripping. Older homes experience more gaps due to foundation settling. Temperature changes cause materials to expand and contract, creating new gaps over time.
Key Takeaways for Sealing Door Gaps
Sealing door gaps is one of the fastest ways to improve home efficiency and comfort. Start by identifying all gap locations using the light test and dollar bill test. Target the bottom first with a door sweep, then seal the sides and top with V strip or foam weatherstripping. Add foam wedges or rubber corner pads for any remaining triangular gaps at the corners. Test your work using smoke or draft detection to ensure all leaks are sealed.
With proper installation and seasonal care, your seals will last for years, keeping the outside out and your home comfortable. Most projects cost under $50, take less than 30 minutes, and deliver immediate results in comfort and energy savings.


